Mindbricks Saas Guide
A Human-Readable Guide to the Mindbricks Platform UI with SaaS-Focused Explanations.
1. Authentication
The Authentication section covers all account access and security-related screens in Mindbricks. These pages handle user identity and access control before entering any workspace or project.
Authentication → Login
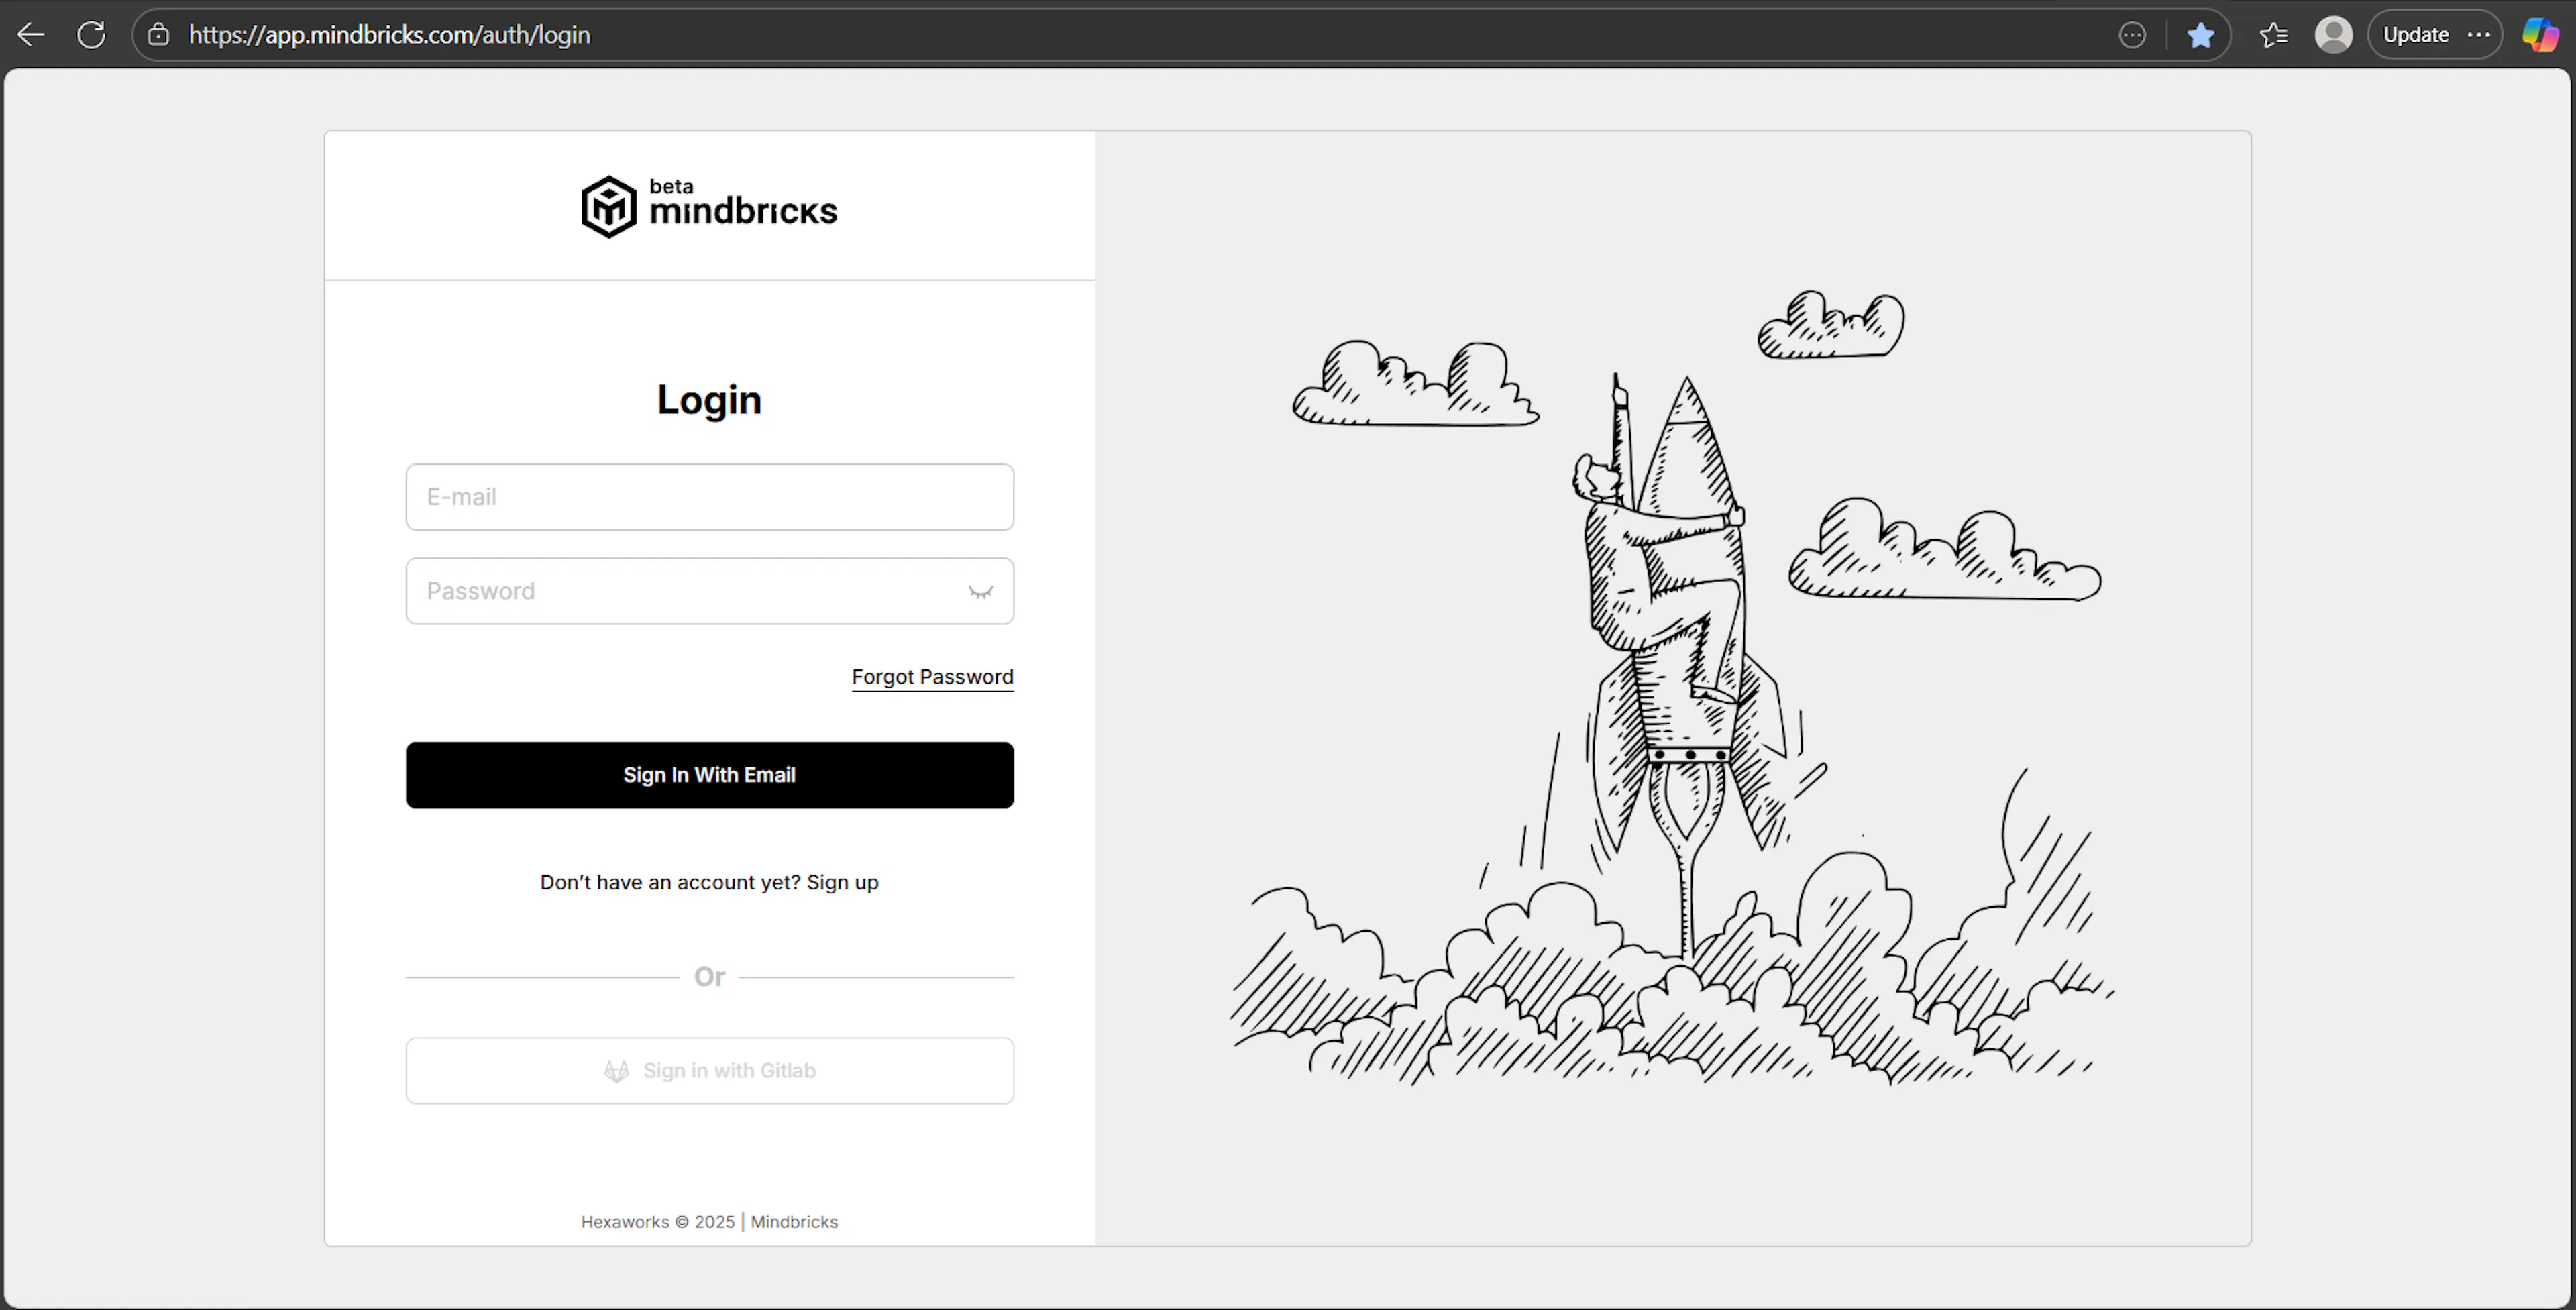
What this screen is for
The Login screen allows existing users to access their Mindbricks account and continue working on their workspaces and projects.
How to use
-
Enter your email address
-
Enter your password
-
Click Sign In with Email
-
(Optional) Use Sign in with GitLab if your account is connected
Notes
-
Password must be at least 6 characters long
-
Email verification is required before login
-
Invalid credentials will display an error
-
Successful login redirects to the Workspace area
Authentication → Create Account
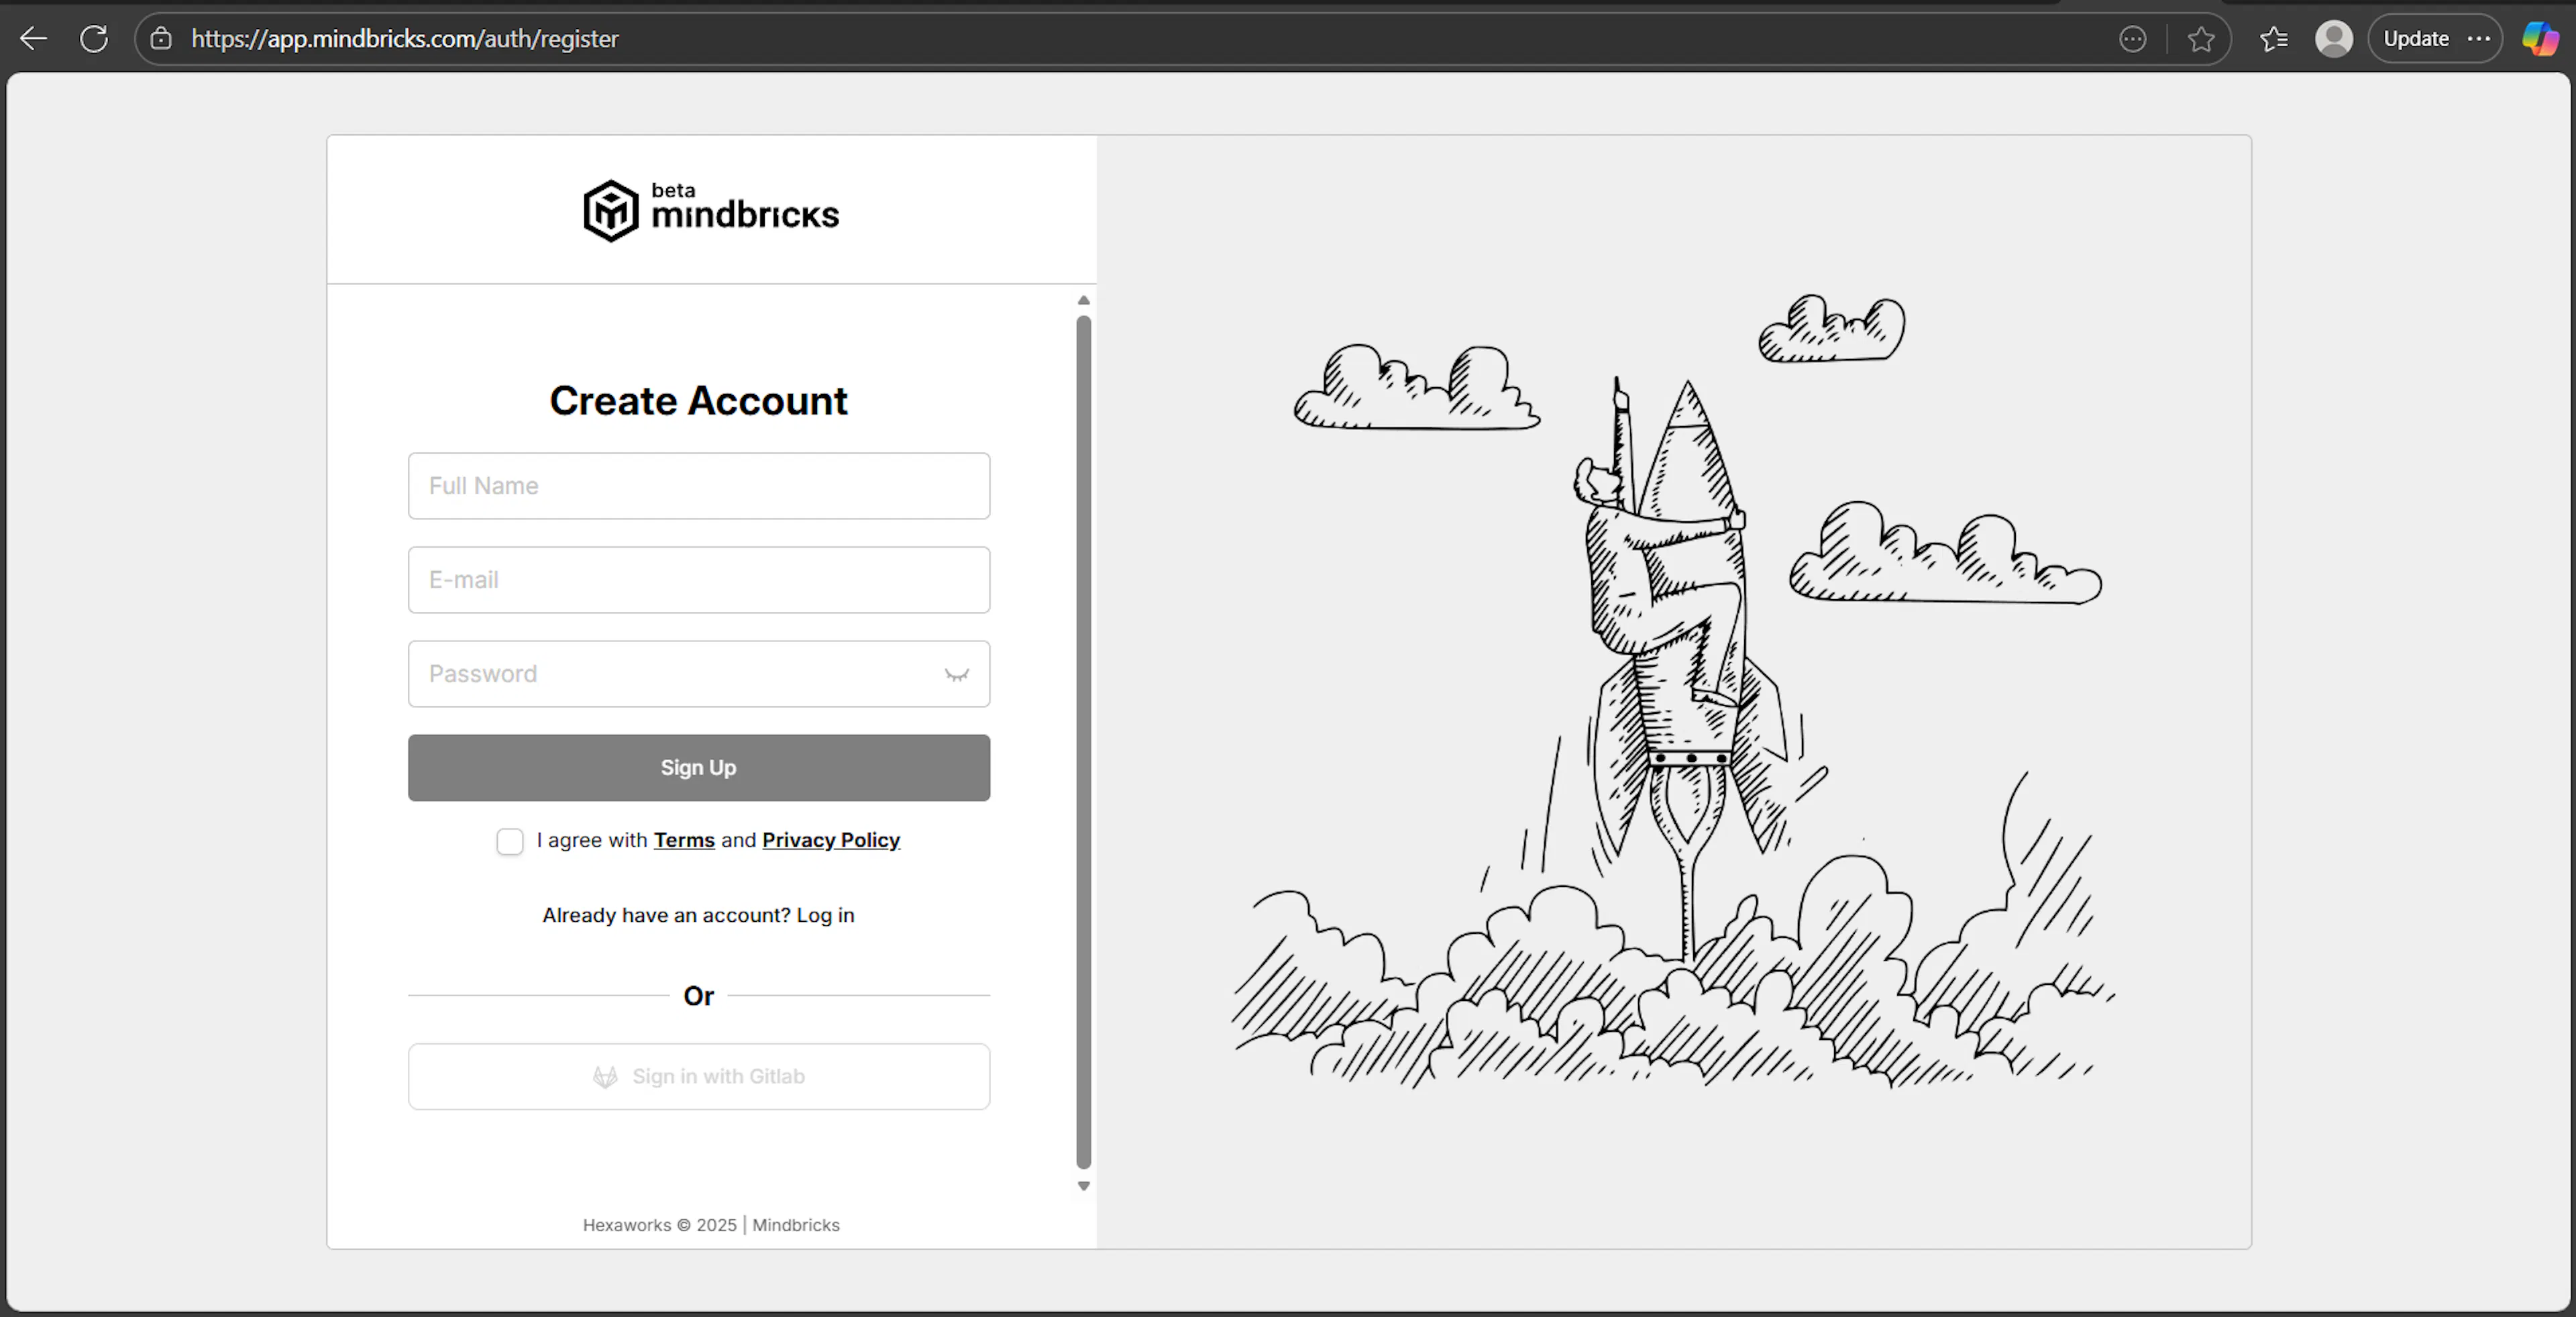
What this screen is for
The Create Account screen is used to register a new user on the Mindbricks platform.
Creating an account establishes your user identity but does not create any workspace or project yet.
How to use
-
Enter your full name
-
Enter a valid email address
-
Create a password
-
Accept the Terms and Privacy Policy
-
Click Sign Up
What happens next
-
A verification email is sent to your inbox
-
The account remains inactive until email verification is completed
Authentication → Verify Email
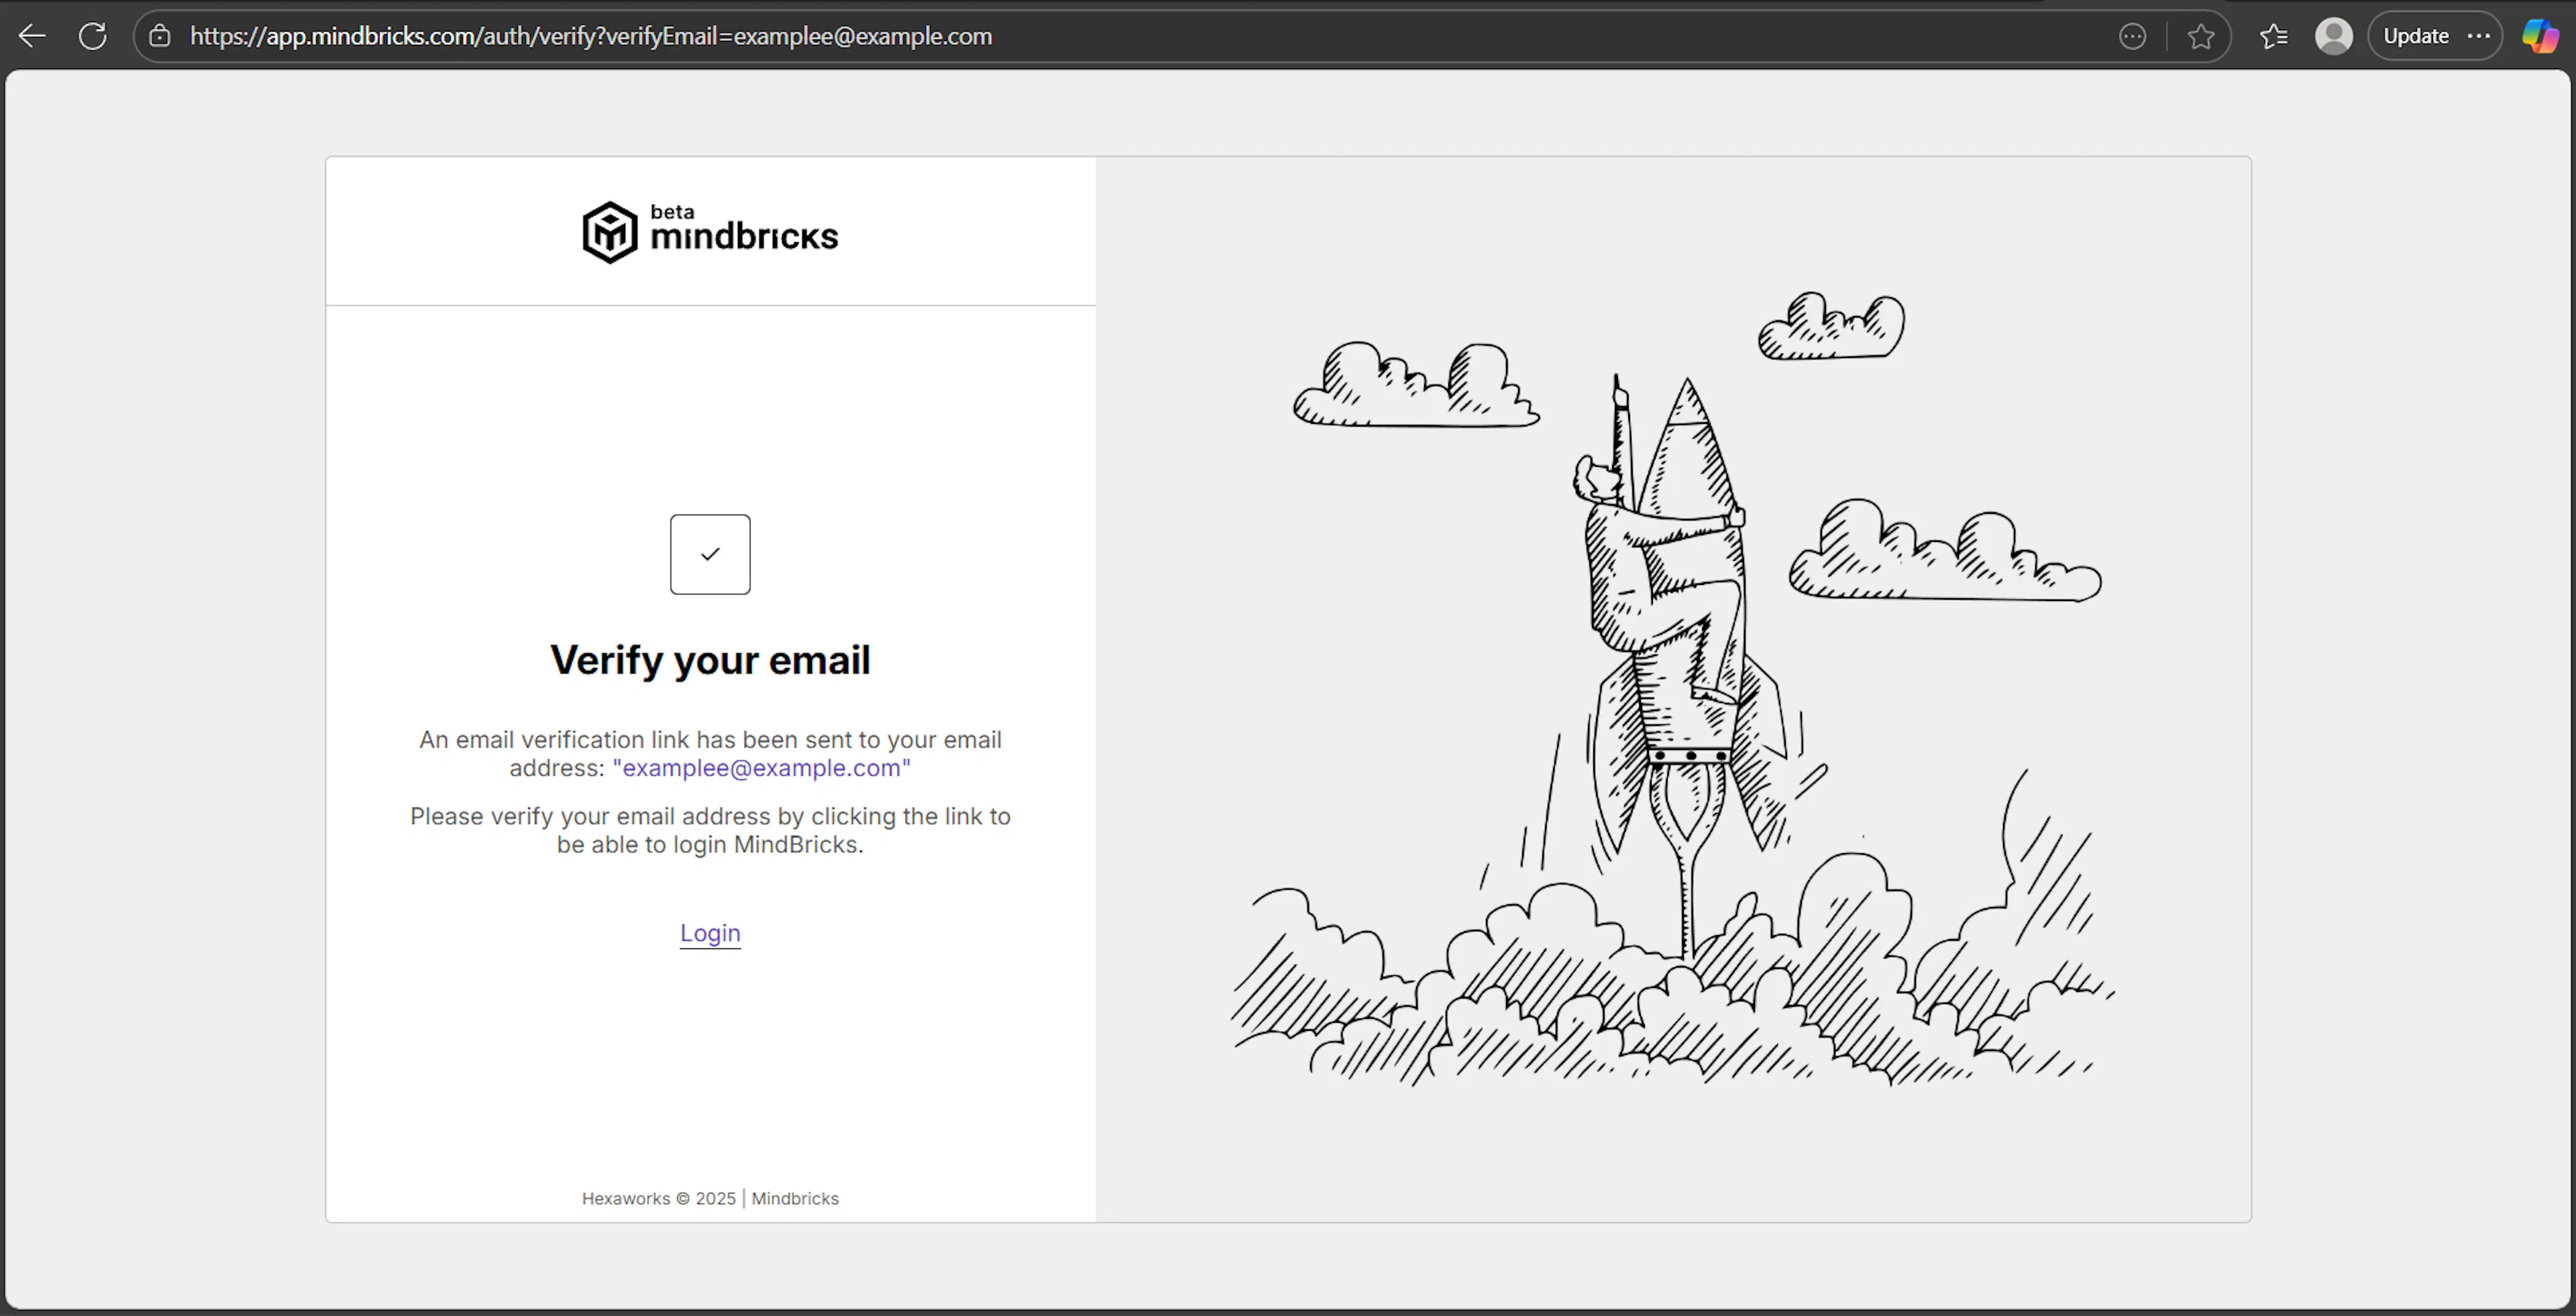
What this screen is for
The Verify Email screen informs the user that email confirmation is required to activate the account.
How it works
-
A verification link is sent to the registered email address
-
Click the link in the email to activate your account
-
Once verified, you can log in to Mindbricks
Notes
-
Login is blocked until verification is completed
-
Verification links may expire for security reasons
Authentication → Forgot Password
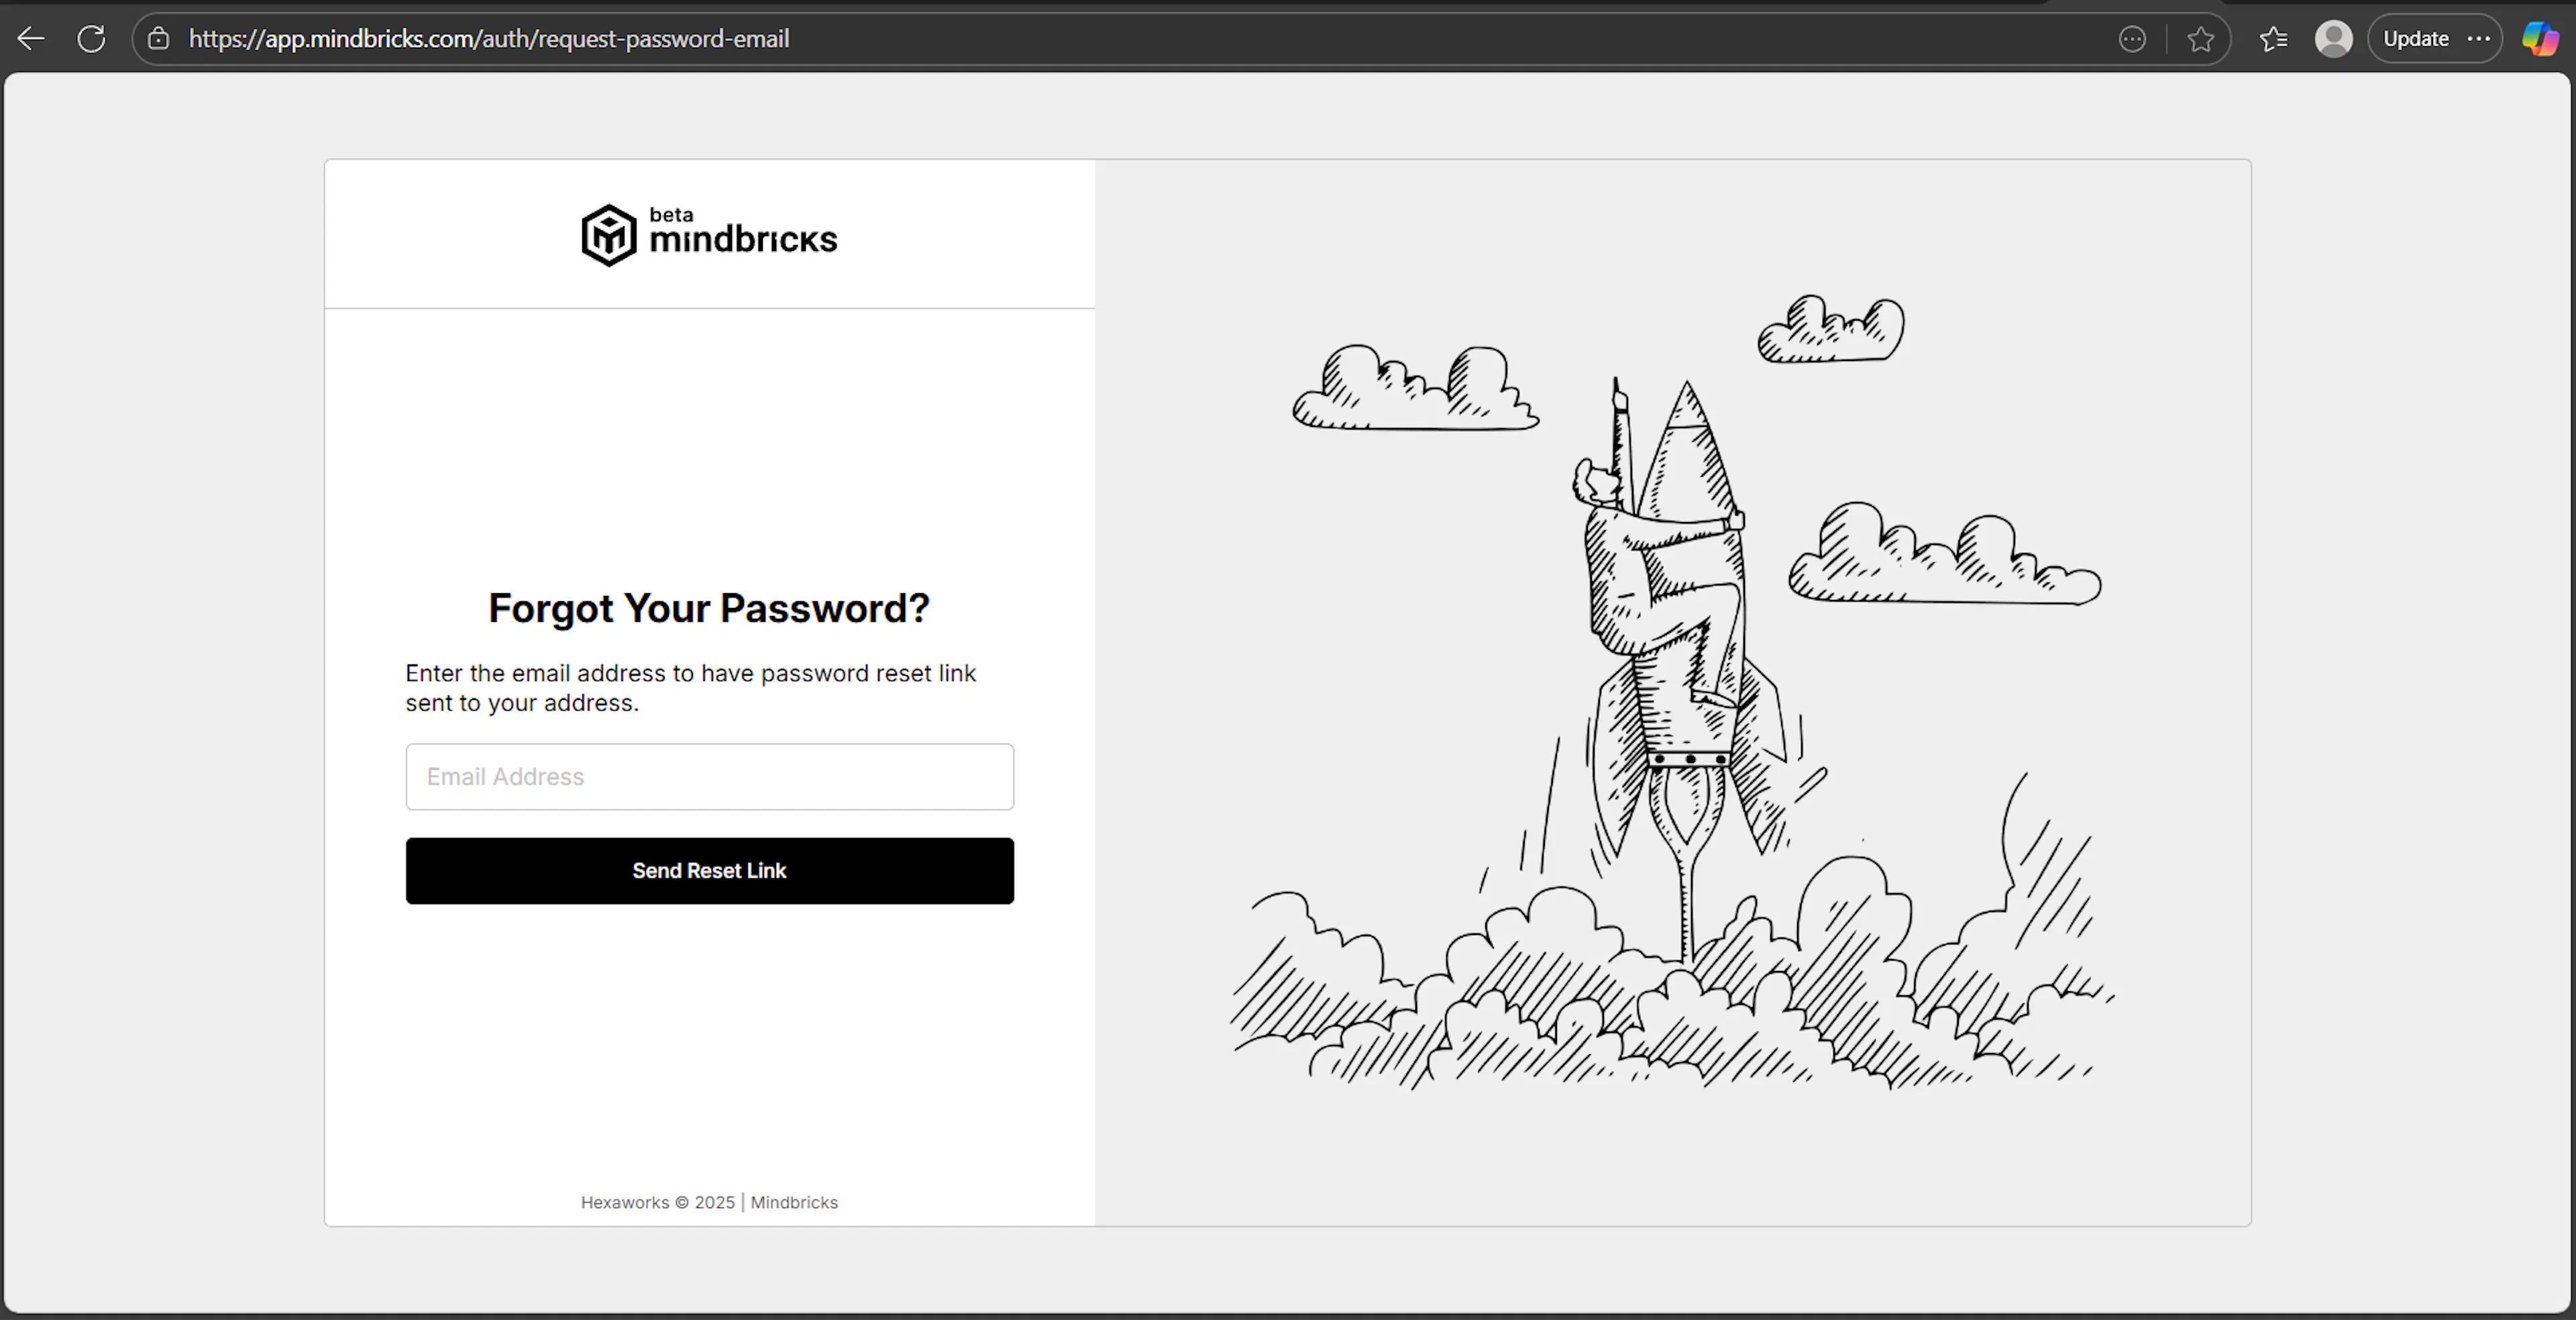
What this screen is for
The Forgot Password screen allows users to recover access if they forget their password.
How to use
-
Enter your registered email address
-
Click Send Reset Link
-
Follow the instructions sent to your email
Security behavior
-
Reset links are time-limited
-
After resetting your password, you can log in with the new credentials
2. Workspace Management
The Workspace area allows you to manage projects, team members, and organization-level settings. These screens focus on collaboration, access control, and integrations rather than system design.
Workspace → Projects
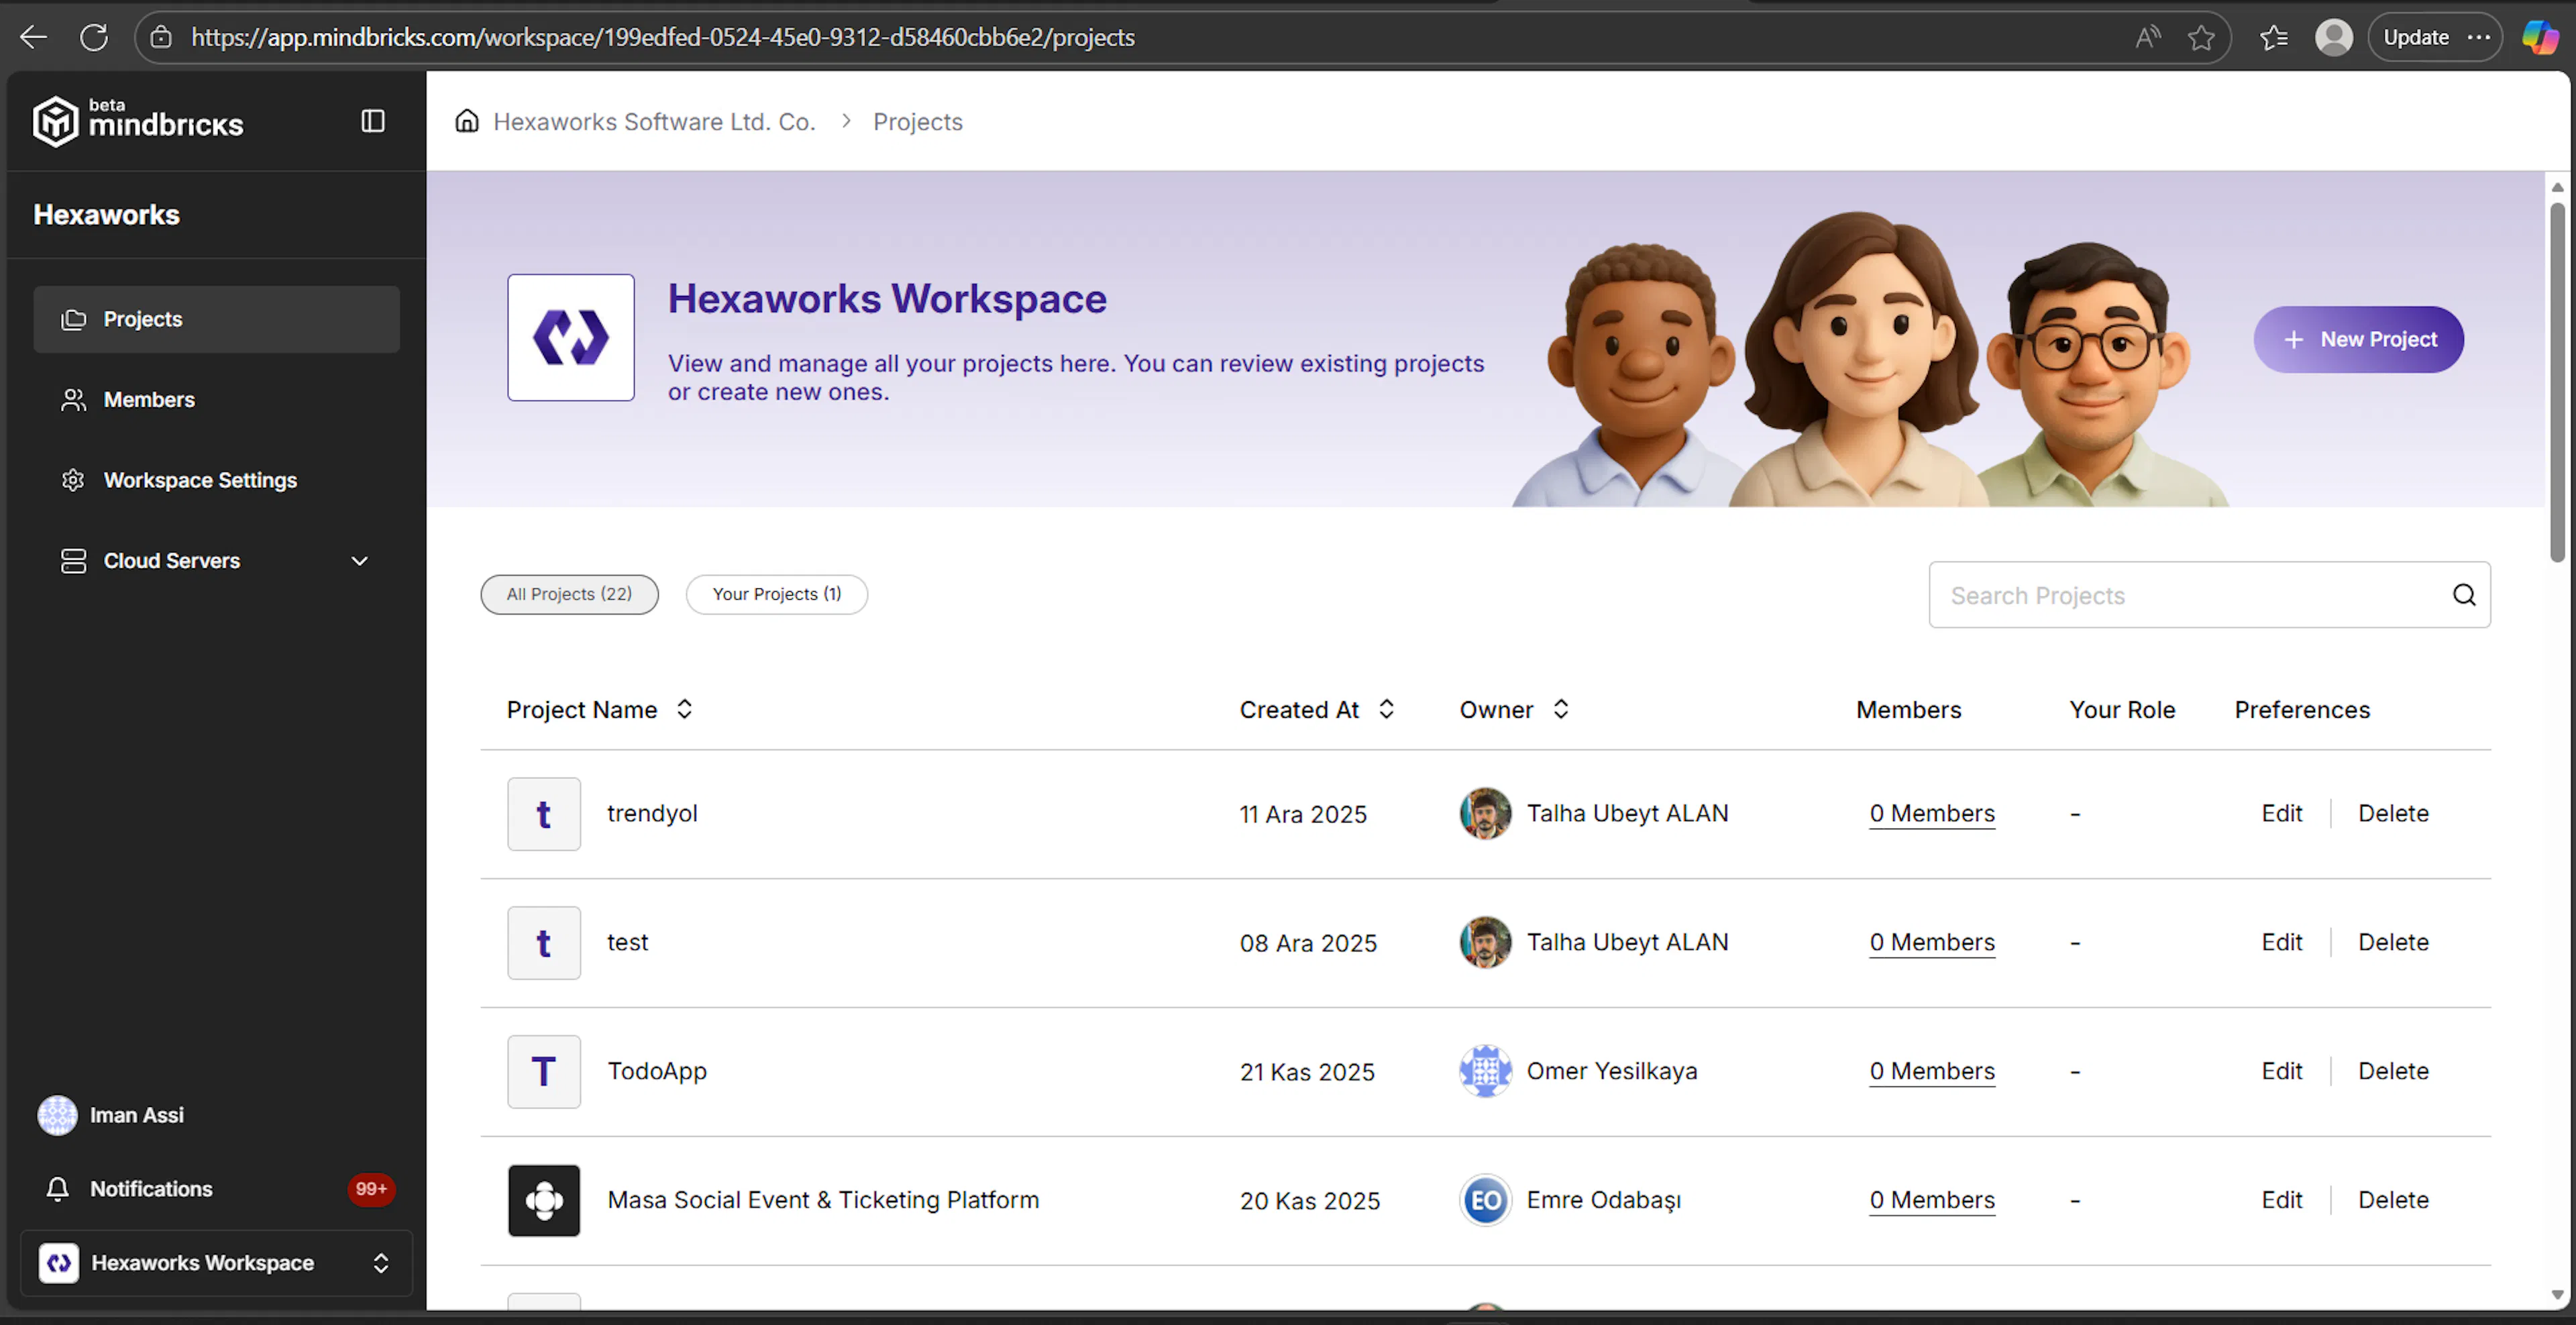
The Projects page lists all projects inside the current workspace.
What you can do on this page
-
View all projects in the workspace
-
Filter between All Projects and Your Projects
-
Search projects by name
-
See project metadata:
-
Project name
-
Creation date
-
Owner
-
Member count
-
Your role (Owner, Member, etc.)
-
Available actions
-
New Project – create a new project
-
Edit – update project information
-
Delete – permanently remove a project (if you have permission)
-
Click a project row to open the Project Home
This page is the main entry point for working with projects.
Workspace → Members
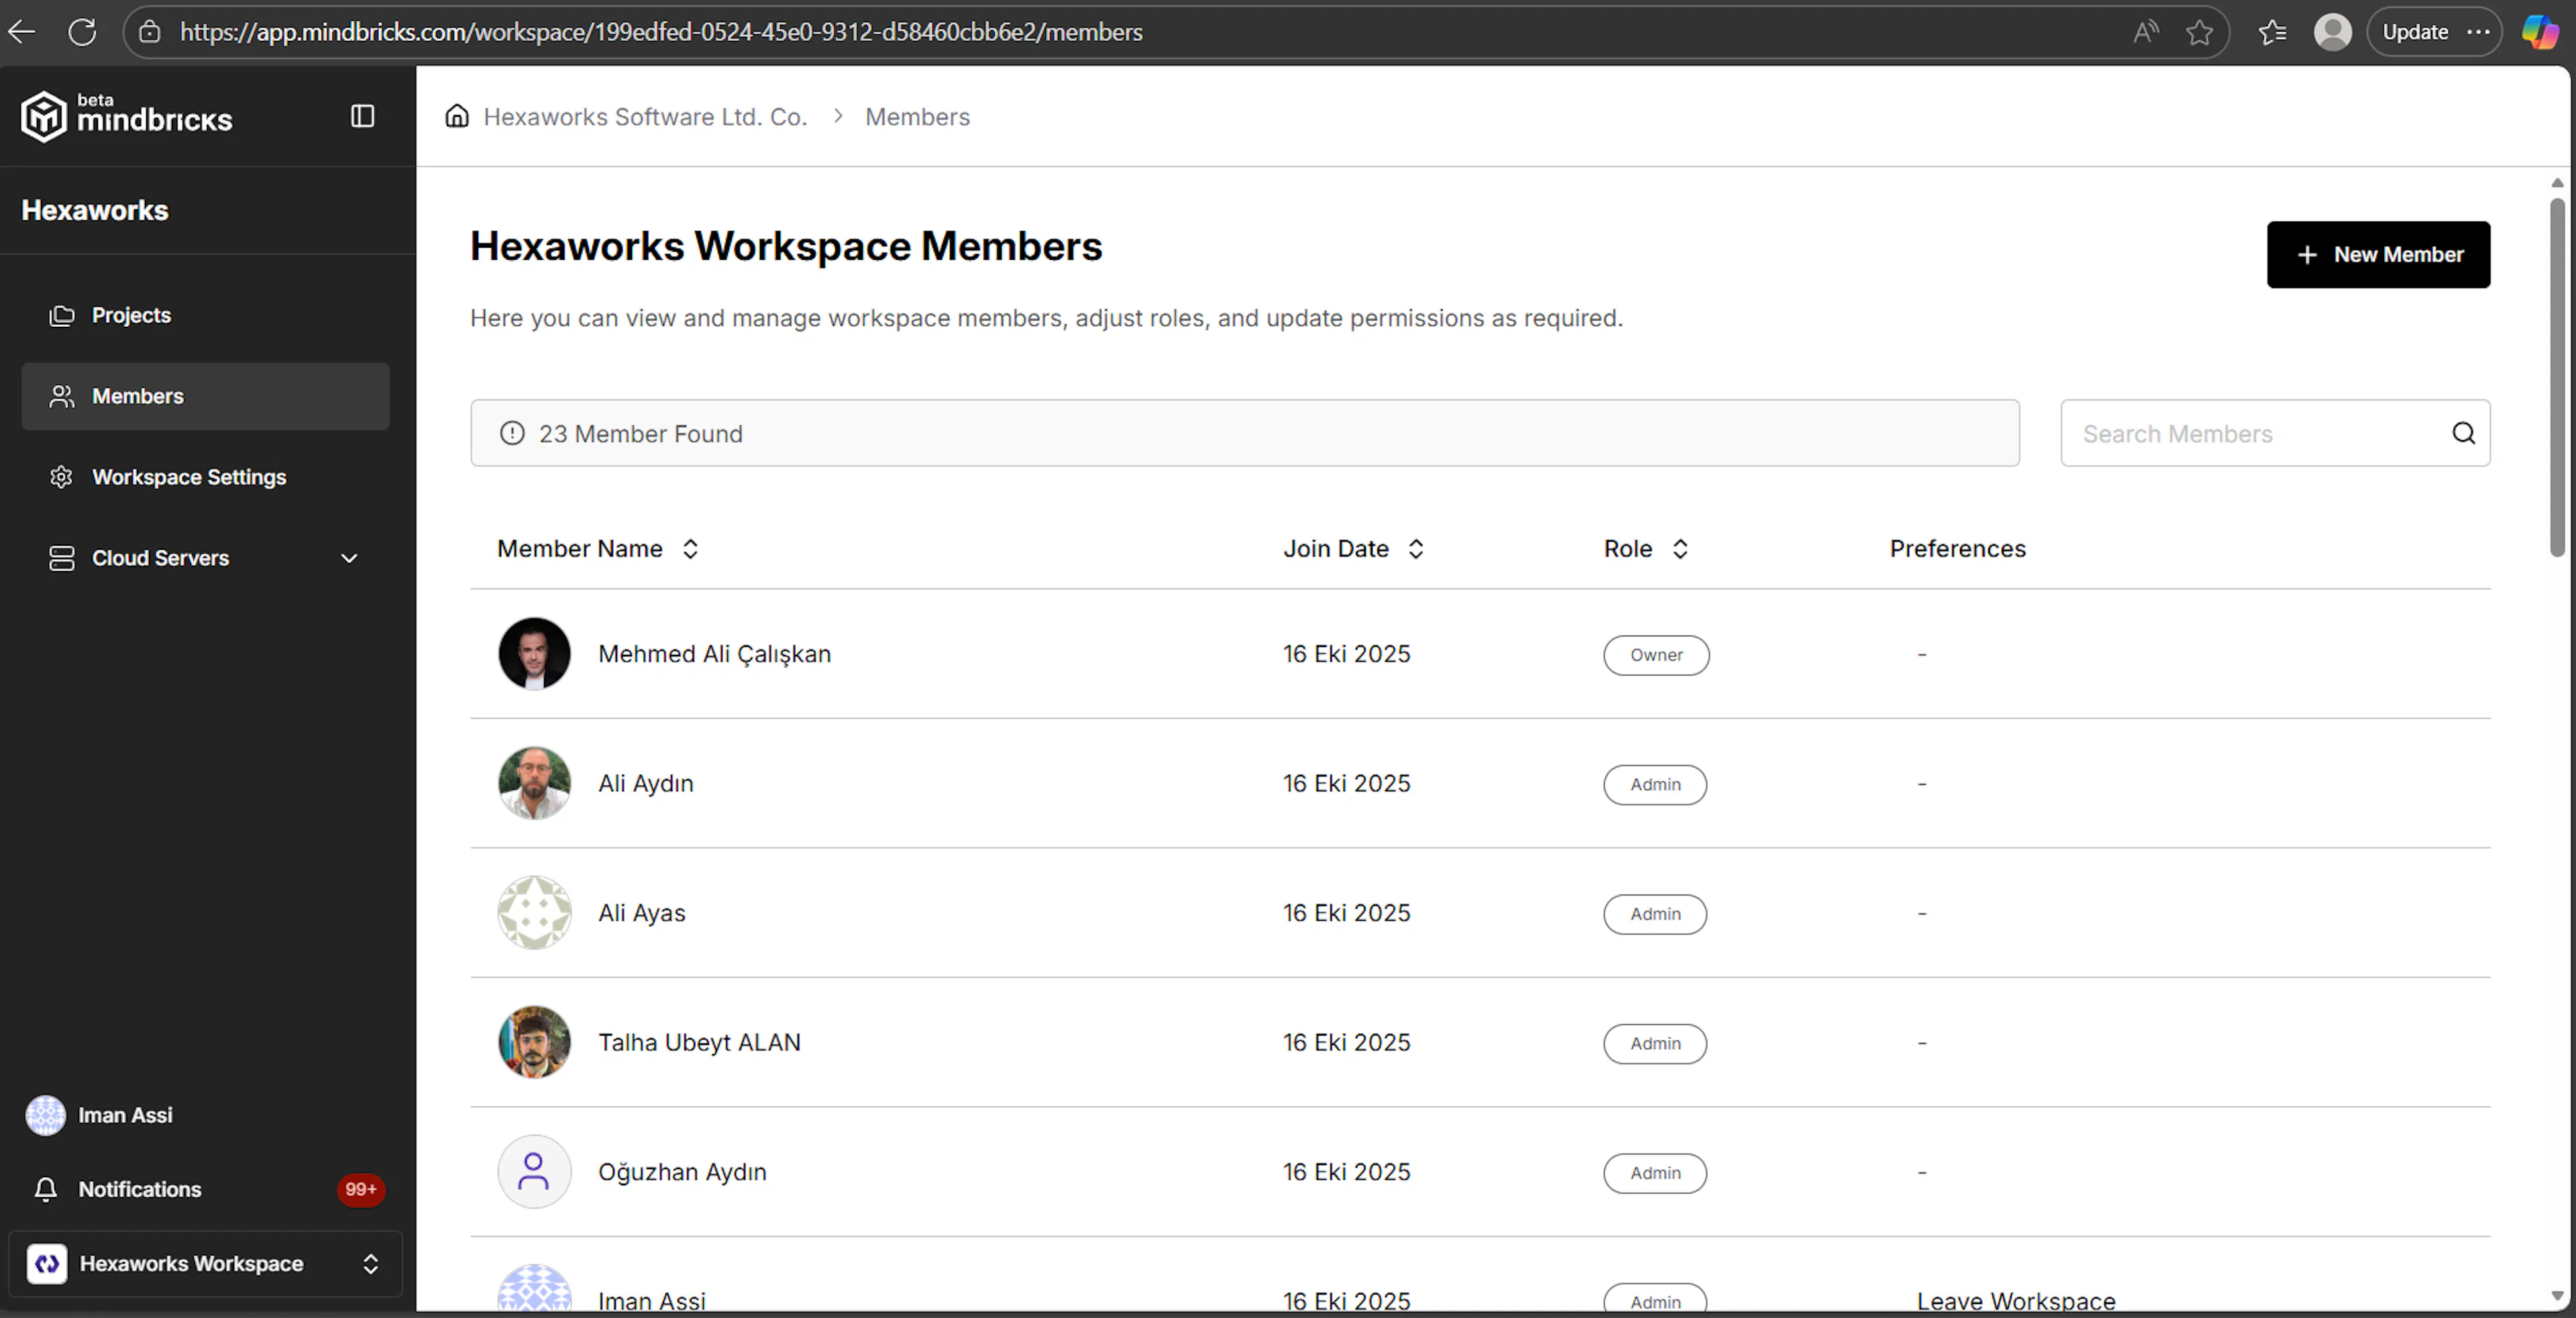
The Members page lets you manage who has access to the workspace.
What you see
-
List of workspace members
-
Member name and avatar
-
Join date
-
Assigned role (e.g. Owner)
-
Member count
What you can do
-
Invite new members to the workspace
-
Assign or update member roles
-
Remove members (depending on permissions)
Workspace roles control access level, not service behavior.
Workspace → Settings
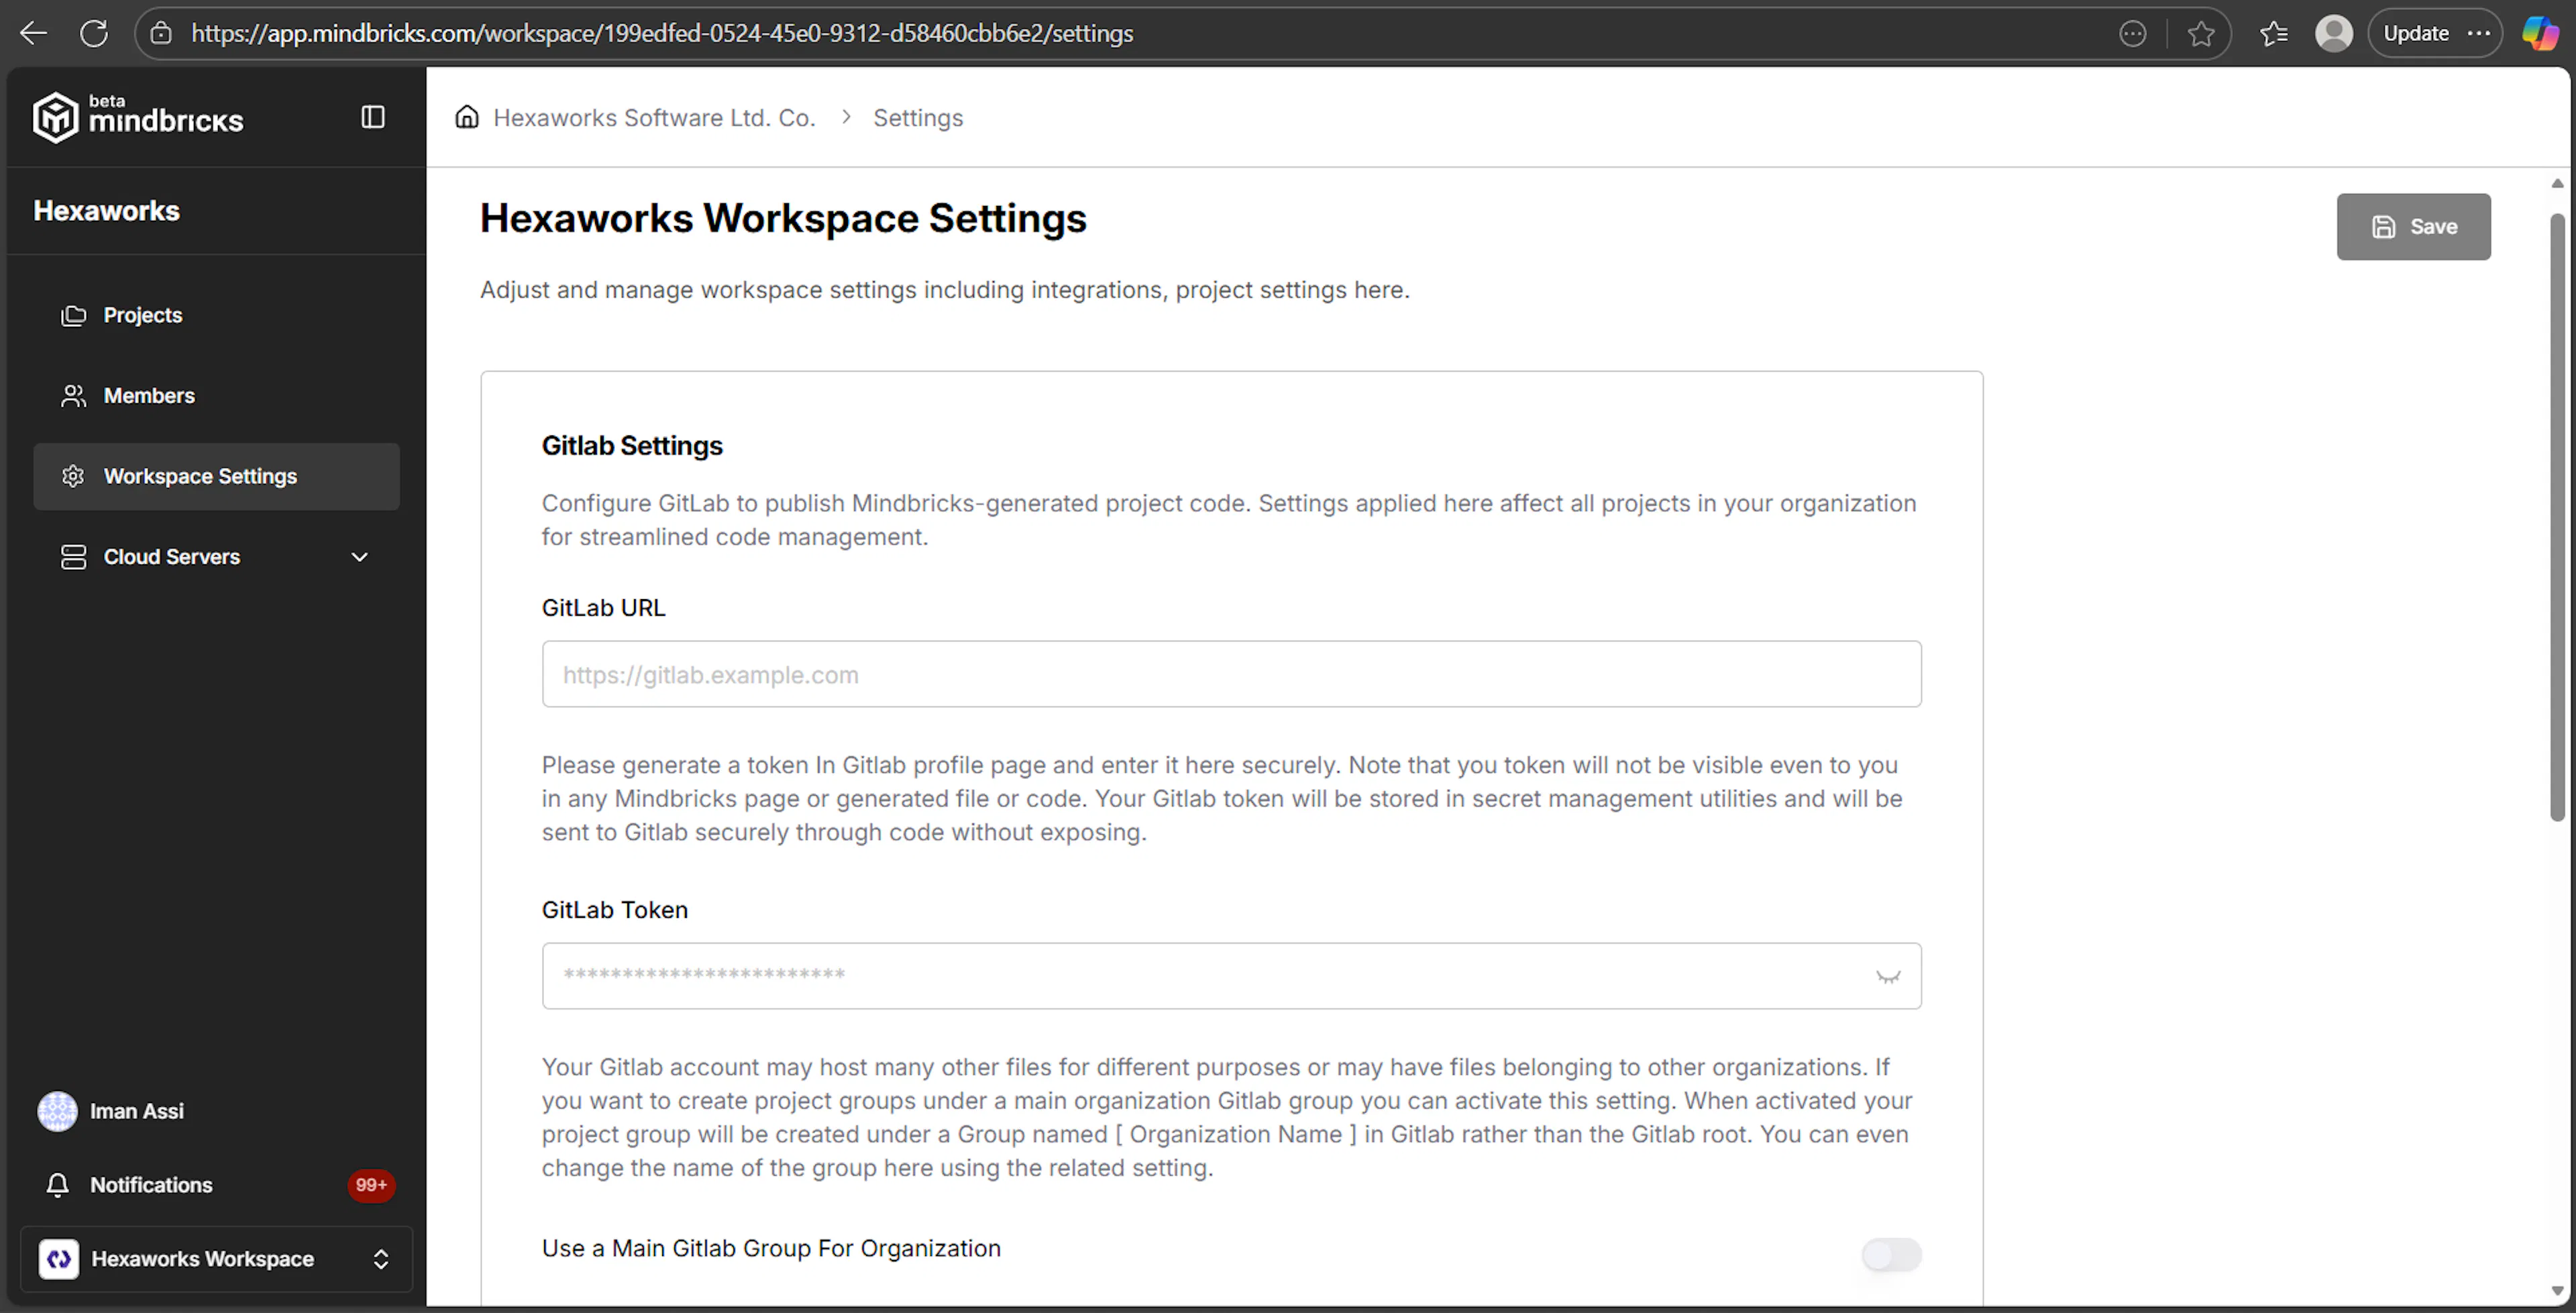
The Workspace Settings page is used to configure organization-wide integrations and defaults.
Changes made here apply to all projects in the workspace.
GitLab Settings
Configure GitLab to publish Mindbricks-generated code automatically.
Settings include
-
GitLab URL
-
GitLab access token
-
Optional main GitLab group for organization projects
Tokens are stored securely and never exposed in generated code.
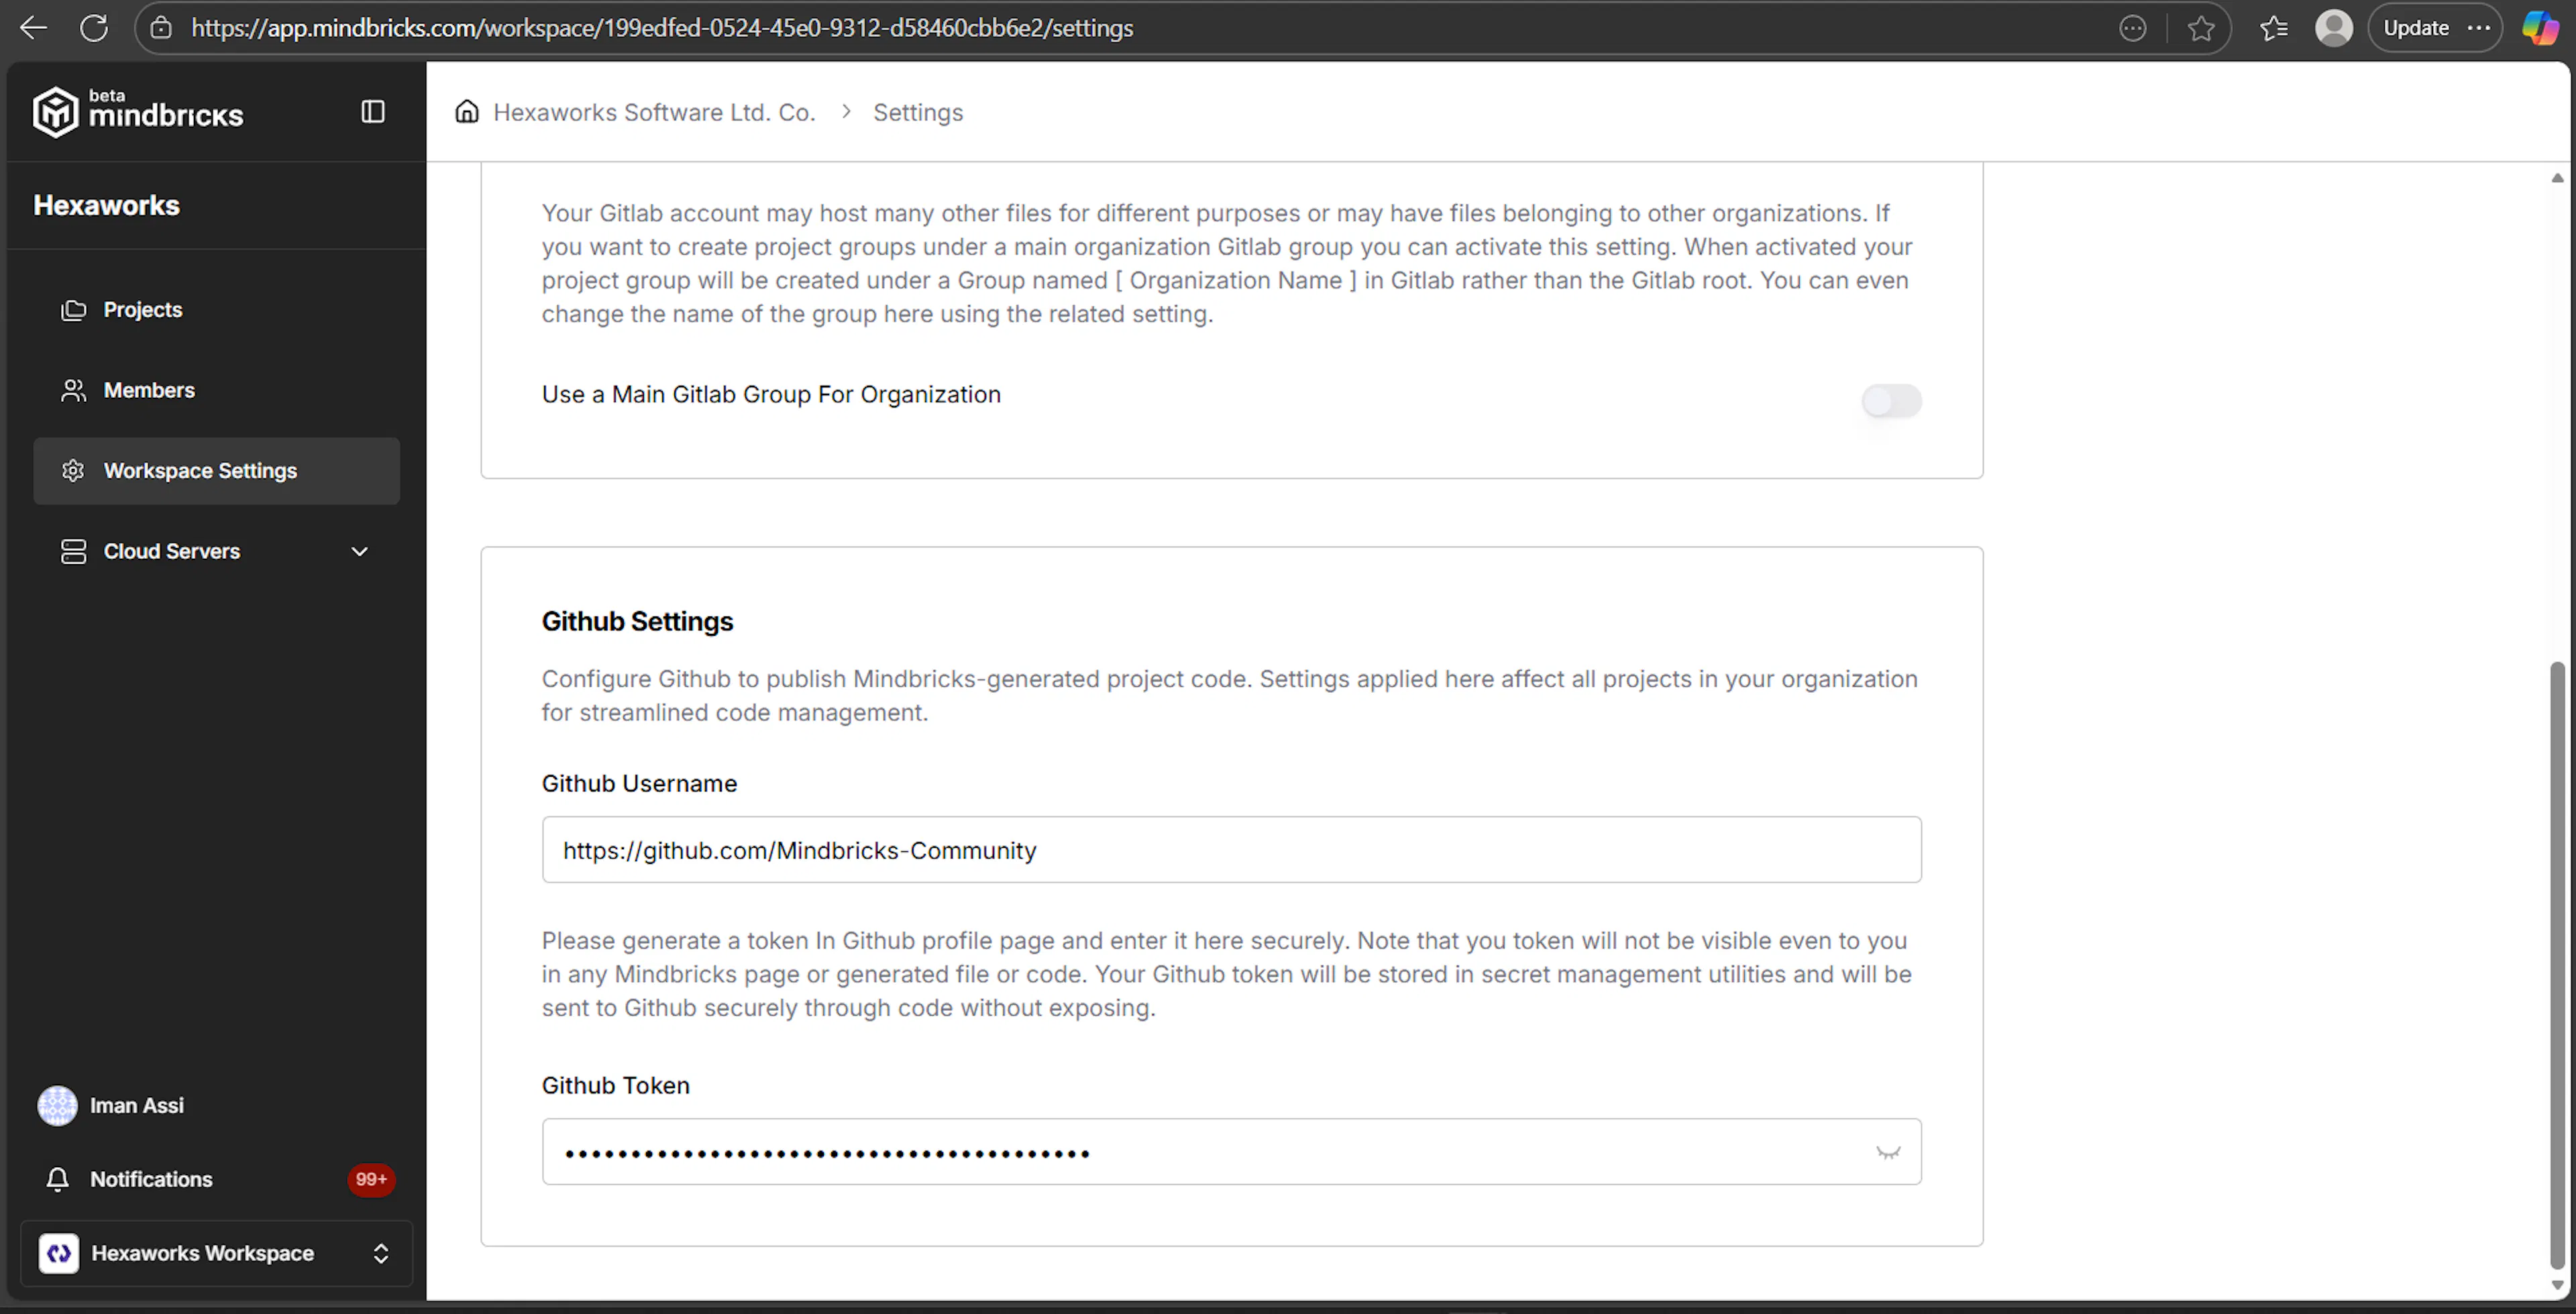
GitHub Settings
Configure GitHub as an alternative code publishing destination.
Settings include
-
GitHub username
-
GitHub access token
This allows Mindbricks to sync generated repositories directly to GitHub.
How Workspace Settings Are Used
-
Repository settings affect all projects
-
Deployment repositories use these credentials
-
You can change integrations at any time
-
Existing projects are not deleted when settings change
3. Projects & AI-Driven Design Flow
This section explains how projects are created and designed in Mindbricks using AI assistance (Agent Ada), and how the system automatically generates project artifacts and services.
ℹ️ Note
Workspace Settings, Members, and Projects management — along with their detailed behavior and pattern-level explanations — are fully covered in the Mindbricks Project Guide.
This section focuses on the user experience and flow inside the project workspace.
Project Overview
When you open a project, you are taken to the Project Home screen.
This page provides:
-
A high-level project summary
-
Access to generated documents
-
Visibility into defined and designed services
-
A live AI assistant (Agent Ada) on the right side
Answering AI Questions (Agent Ada)
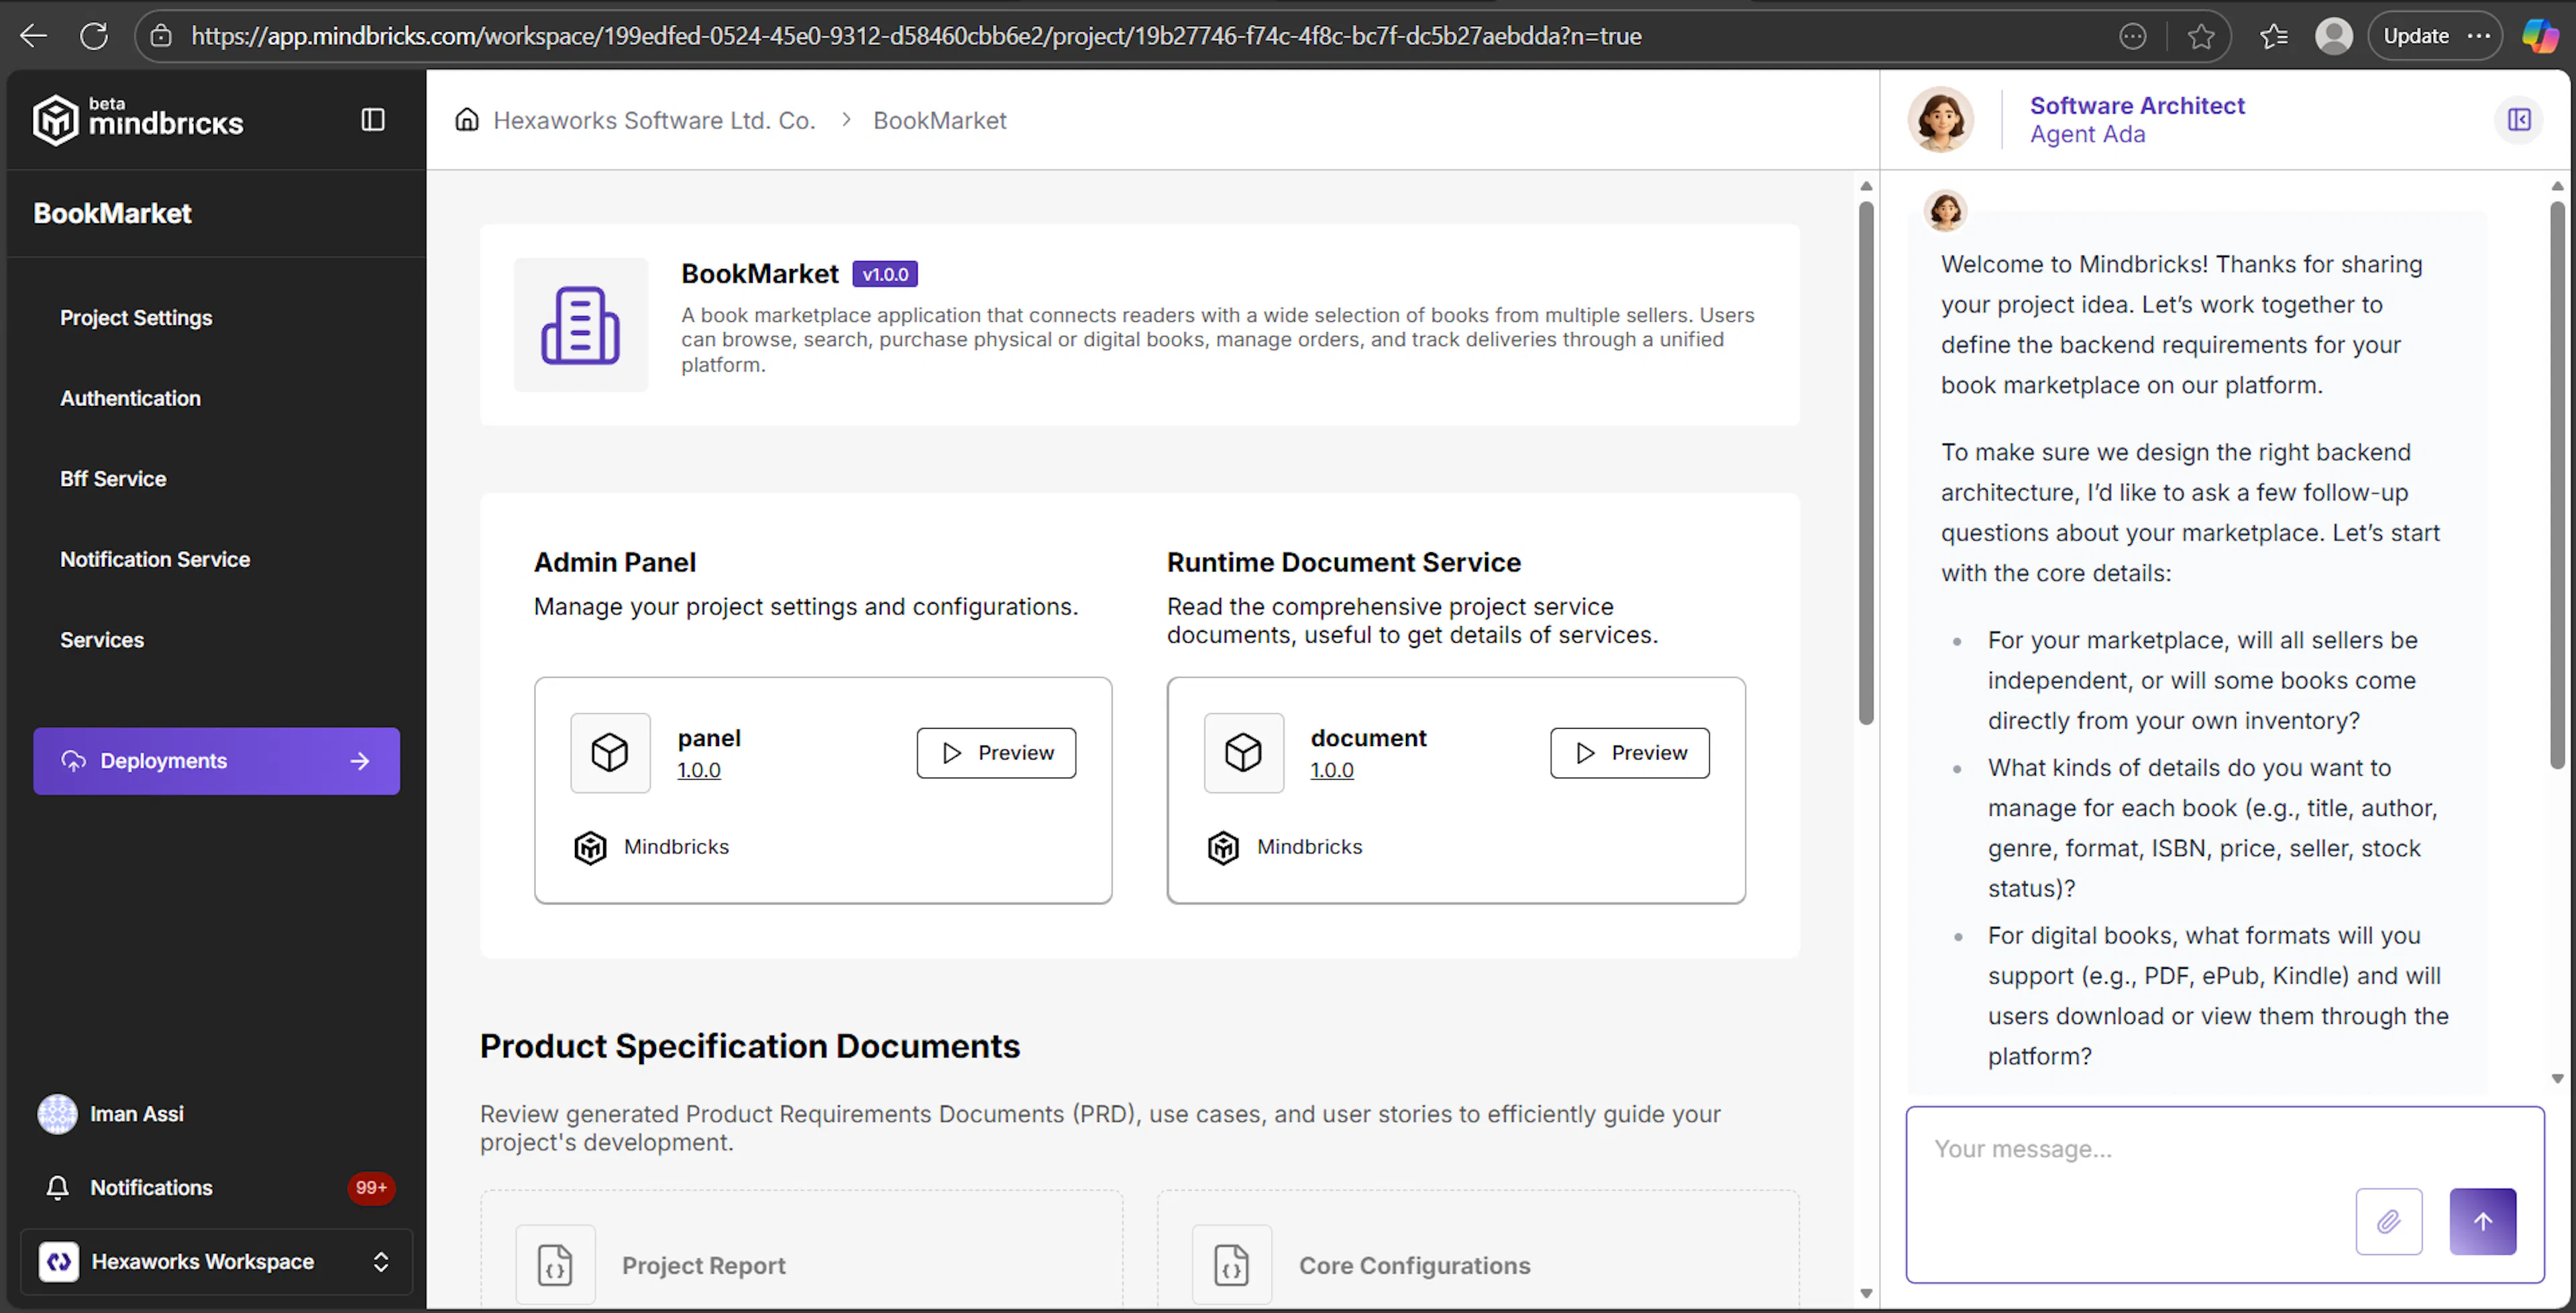
After creating a project, Agent Ada starts by asking a series of questions to better understand your system.
These questions typically cover:
-
Project type and domain
-
Core business focus
-
Functional requirements (e.g. checkout, inventory, users)
-
Design preferences and assumptions
You answer these questions directly in the chat panel.
Automatic Project Artifacts Generation
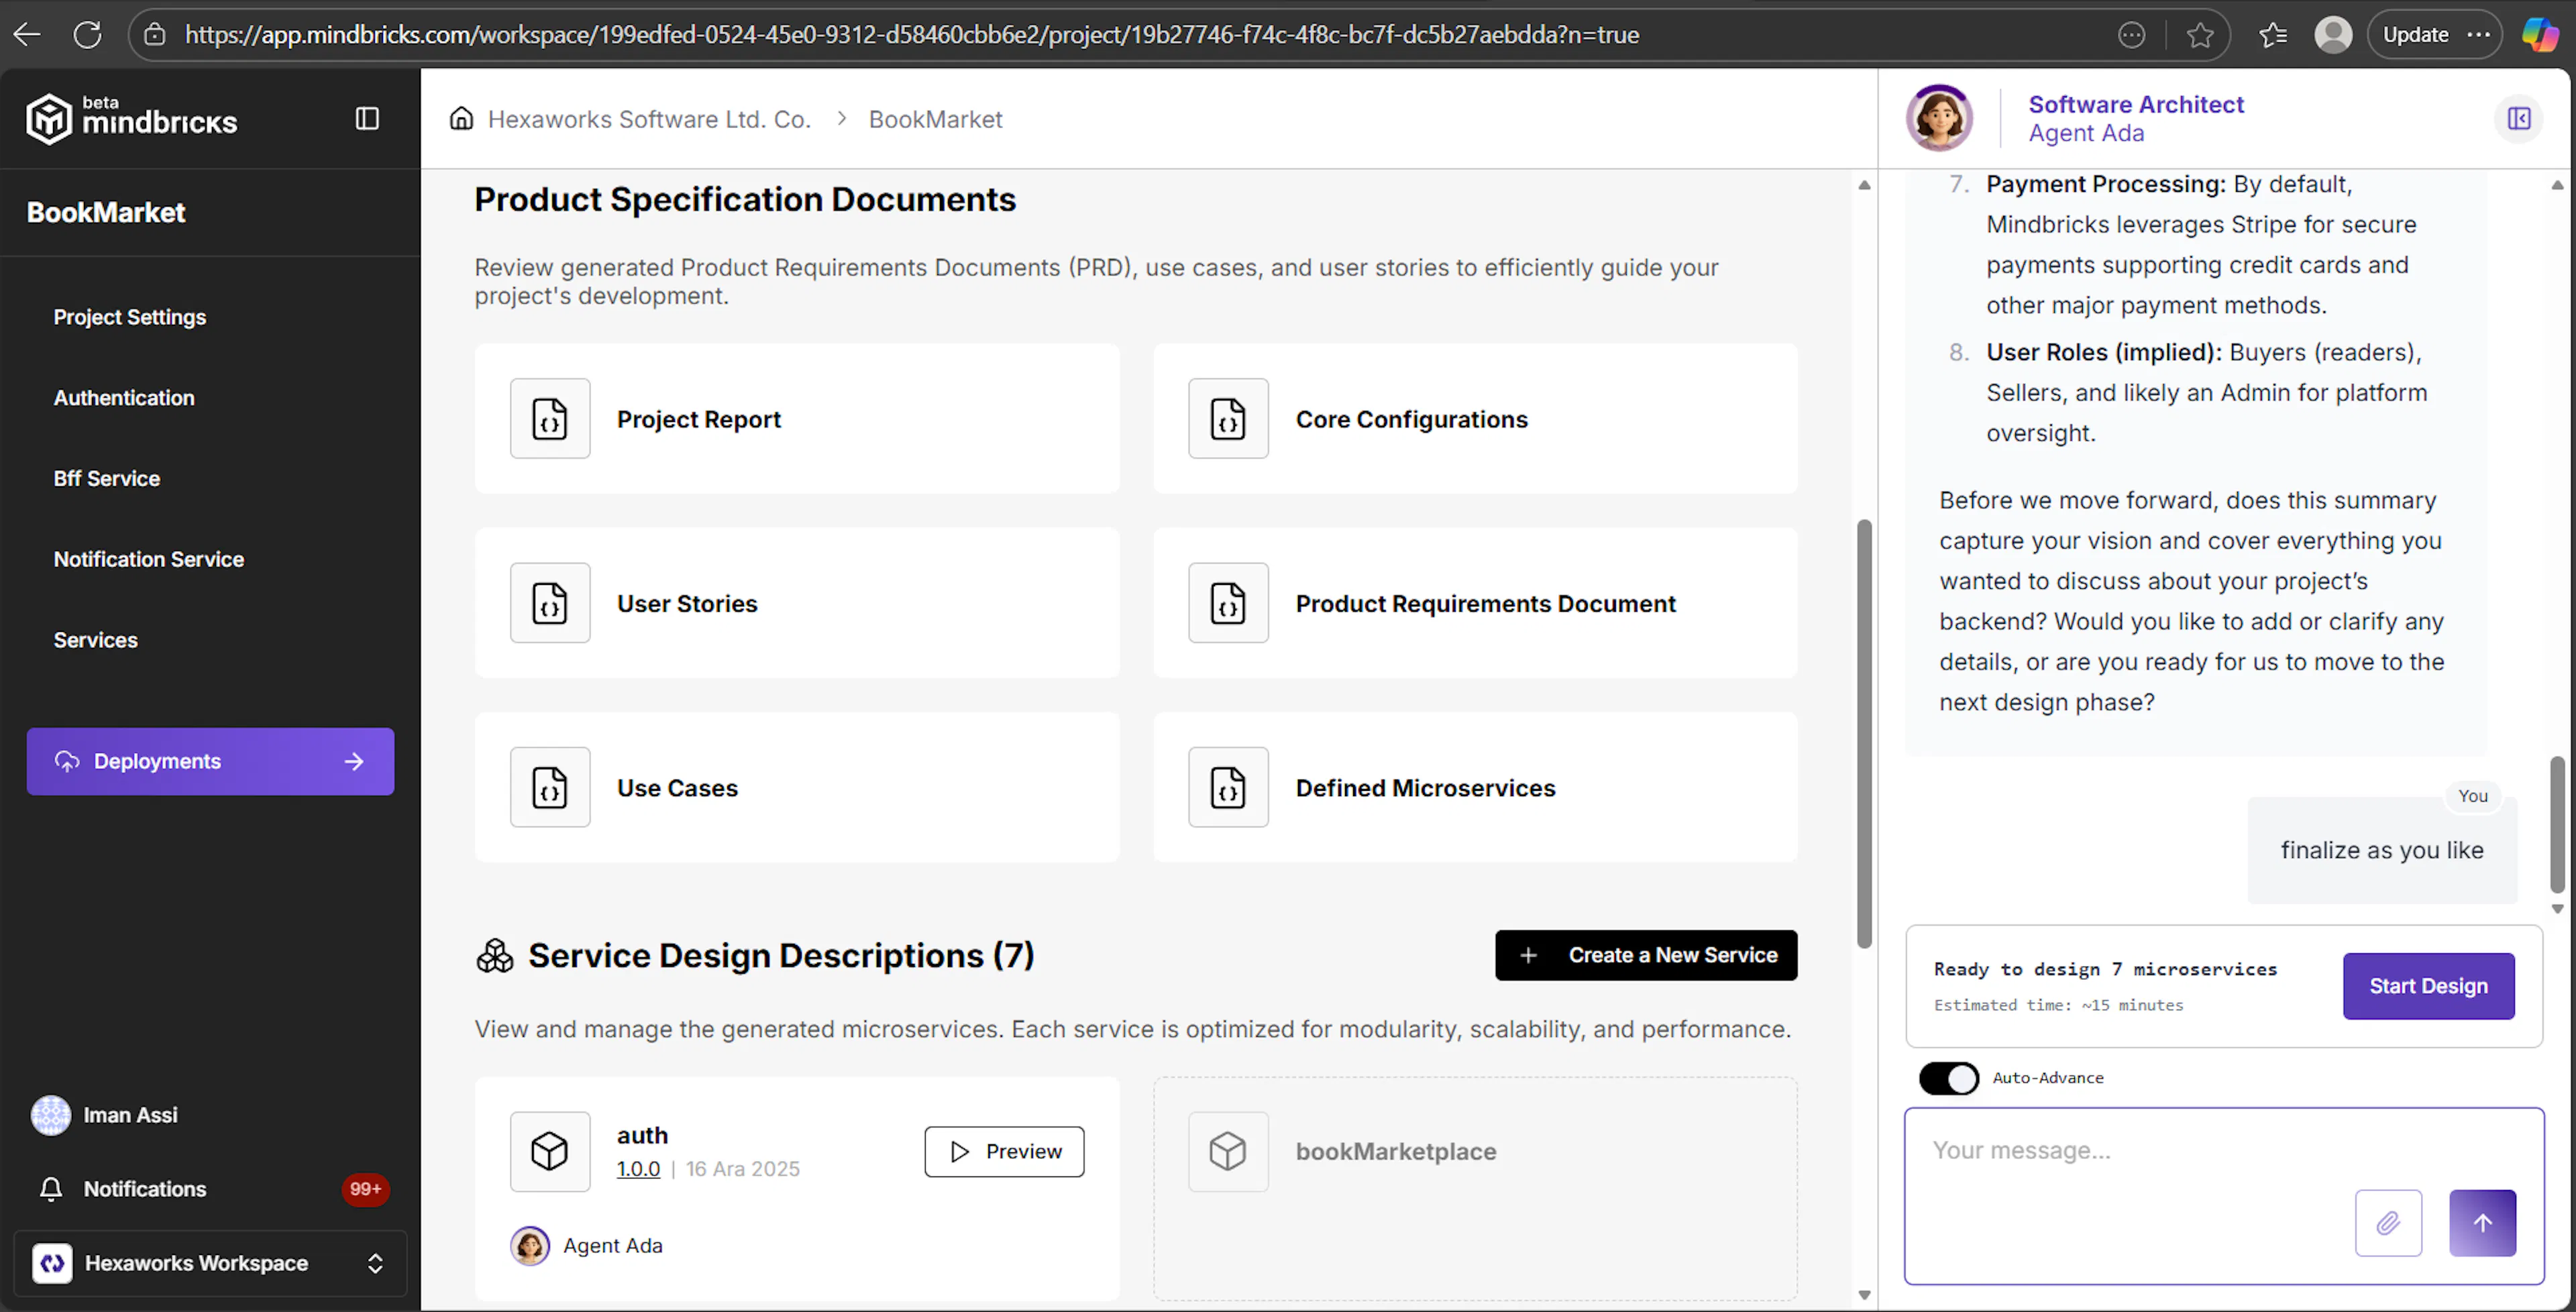
Once the initial questions are answered, Mindbricks automatically generates the following artifacts:
-
Project Report
-
Core Configurations
-
User Stories
-
Use Cases
-
Product Requirements Document (PRD)
-
Defined Microservices
These documents are continuously refined as the project evolves.
No manual setup is required at this stage.
Time Estimation & Design Readiness
After defining the microservices, Agent Ada provides:
-
The number of microservices to be designed
-
An estimated time to complete the design
-
A clear Start Design button
This gives you transparency before the design phase begins.
Starting the Design Process
When you click Start Design:
-
Mindbricks begins designing all defined microservices
-
Each service is designed one by one
-
Progress and completion messages appear in the AI panel
The design process is fully automated but remains transparent.
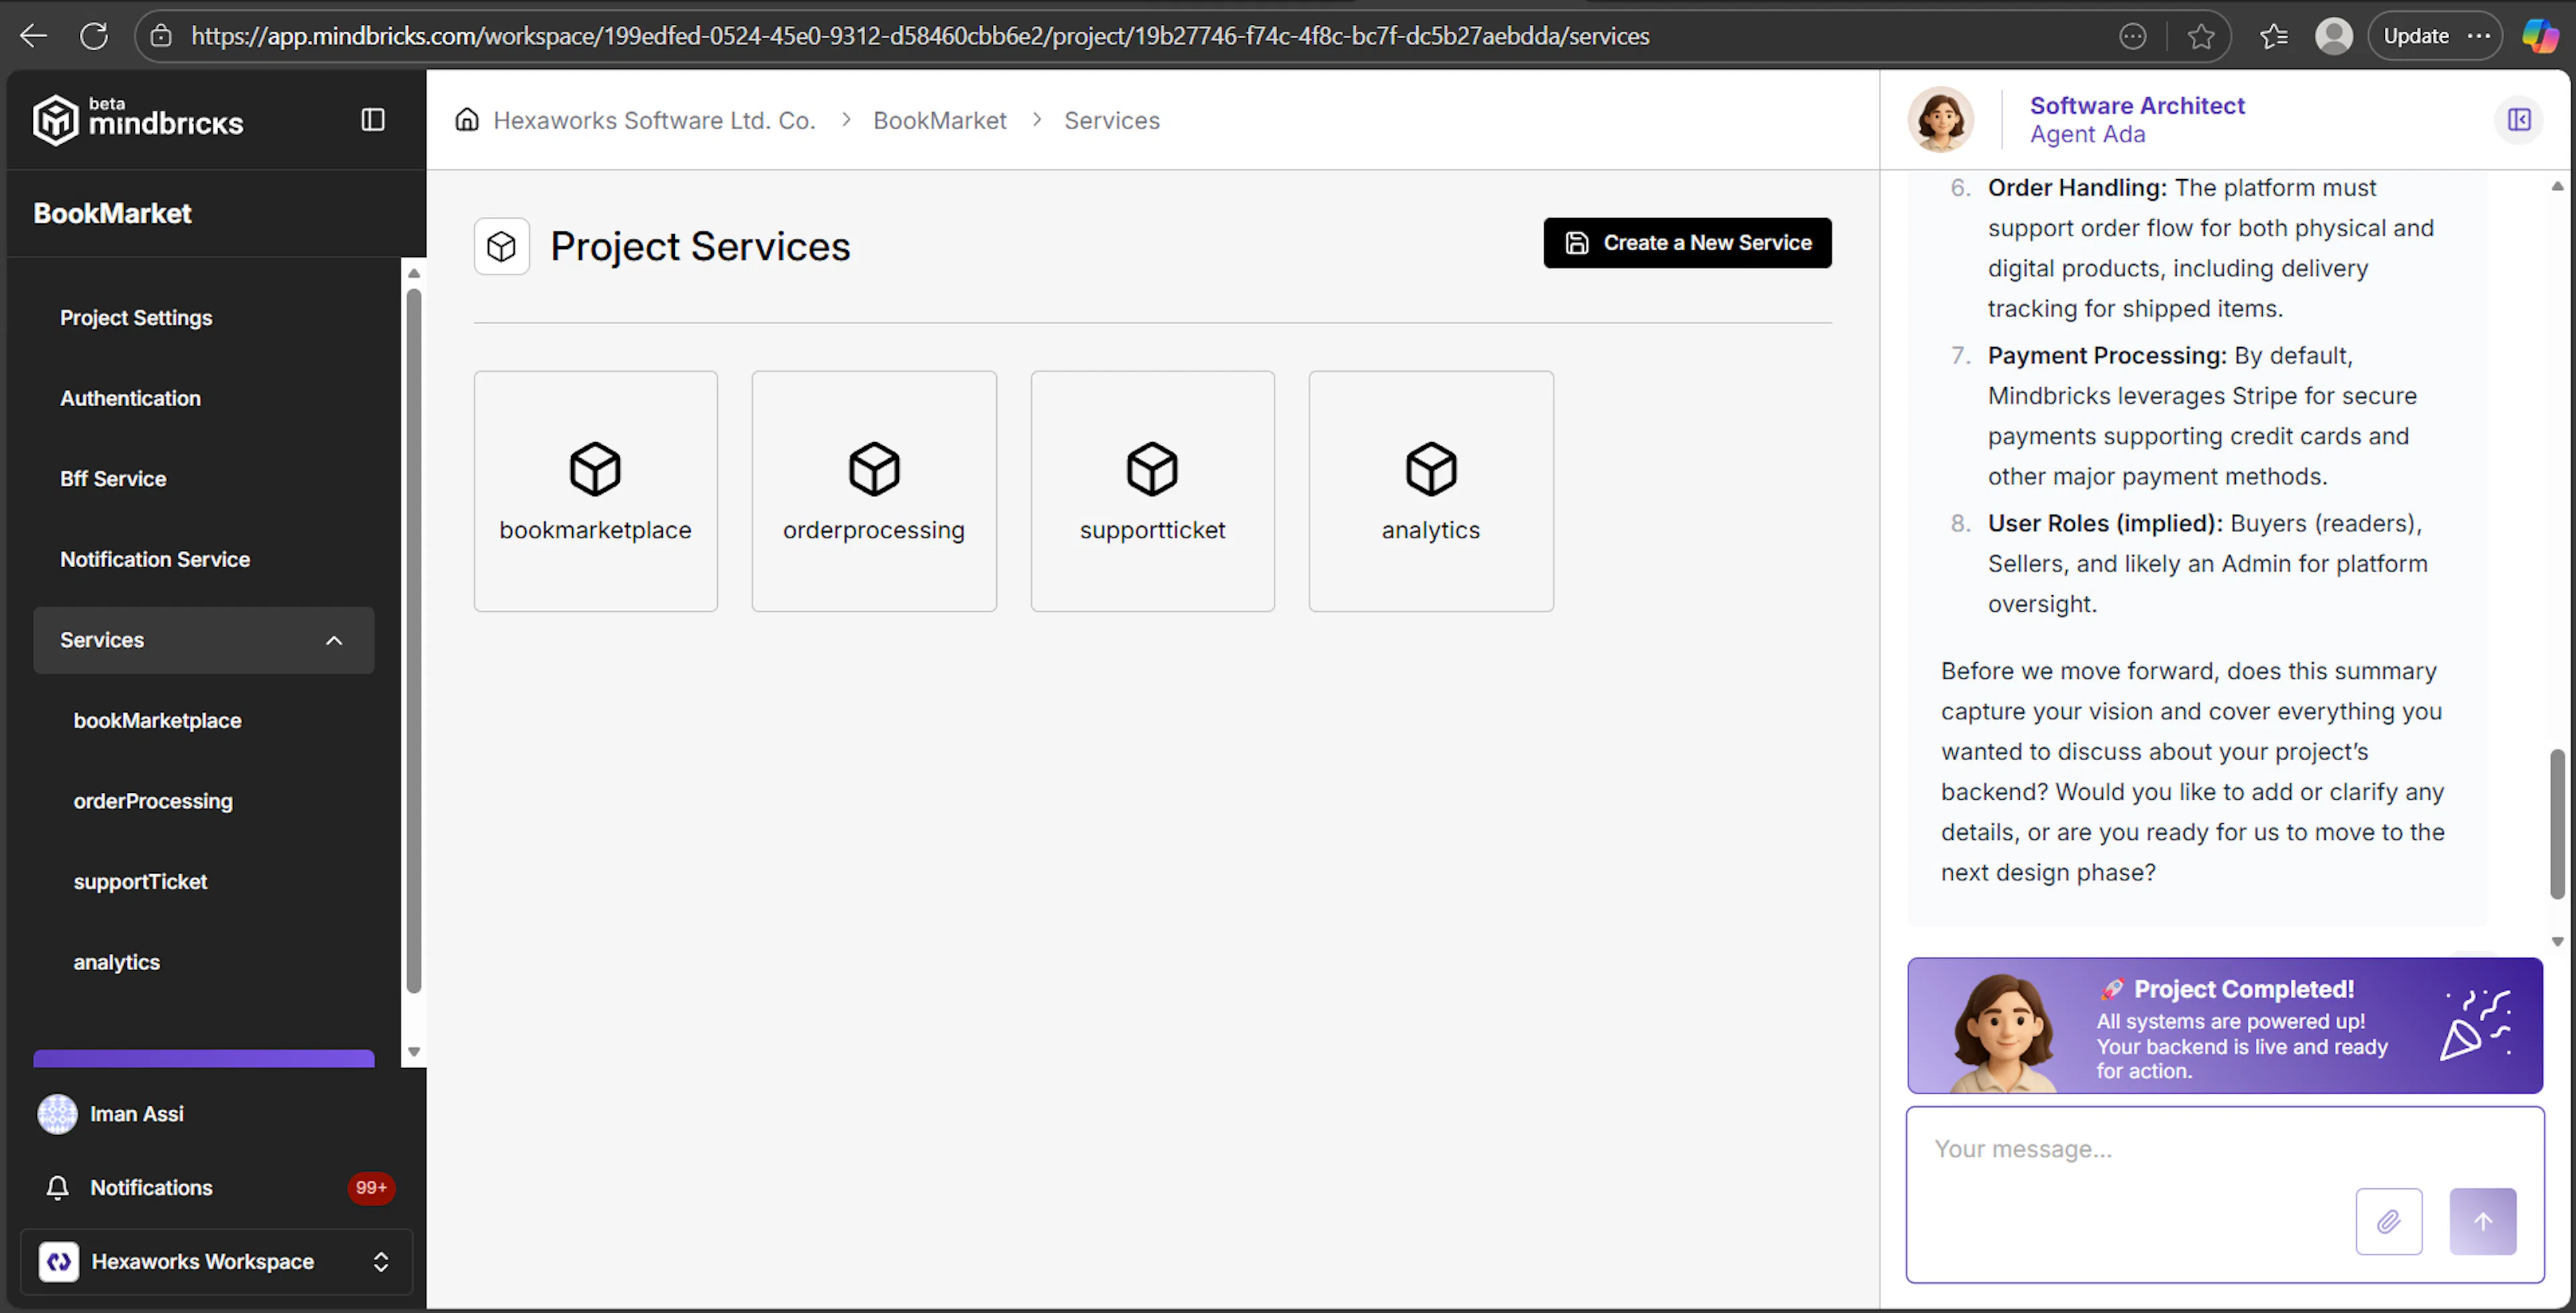
Service Design Completion
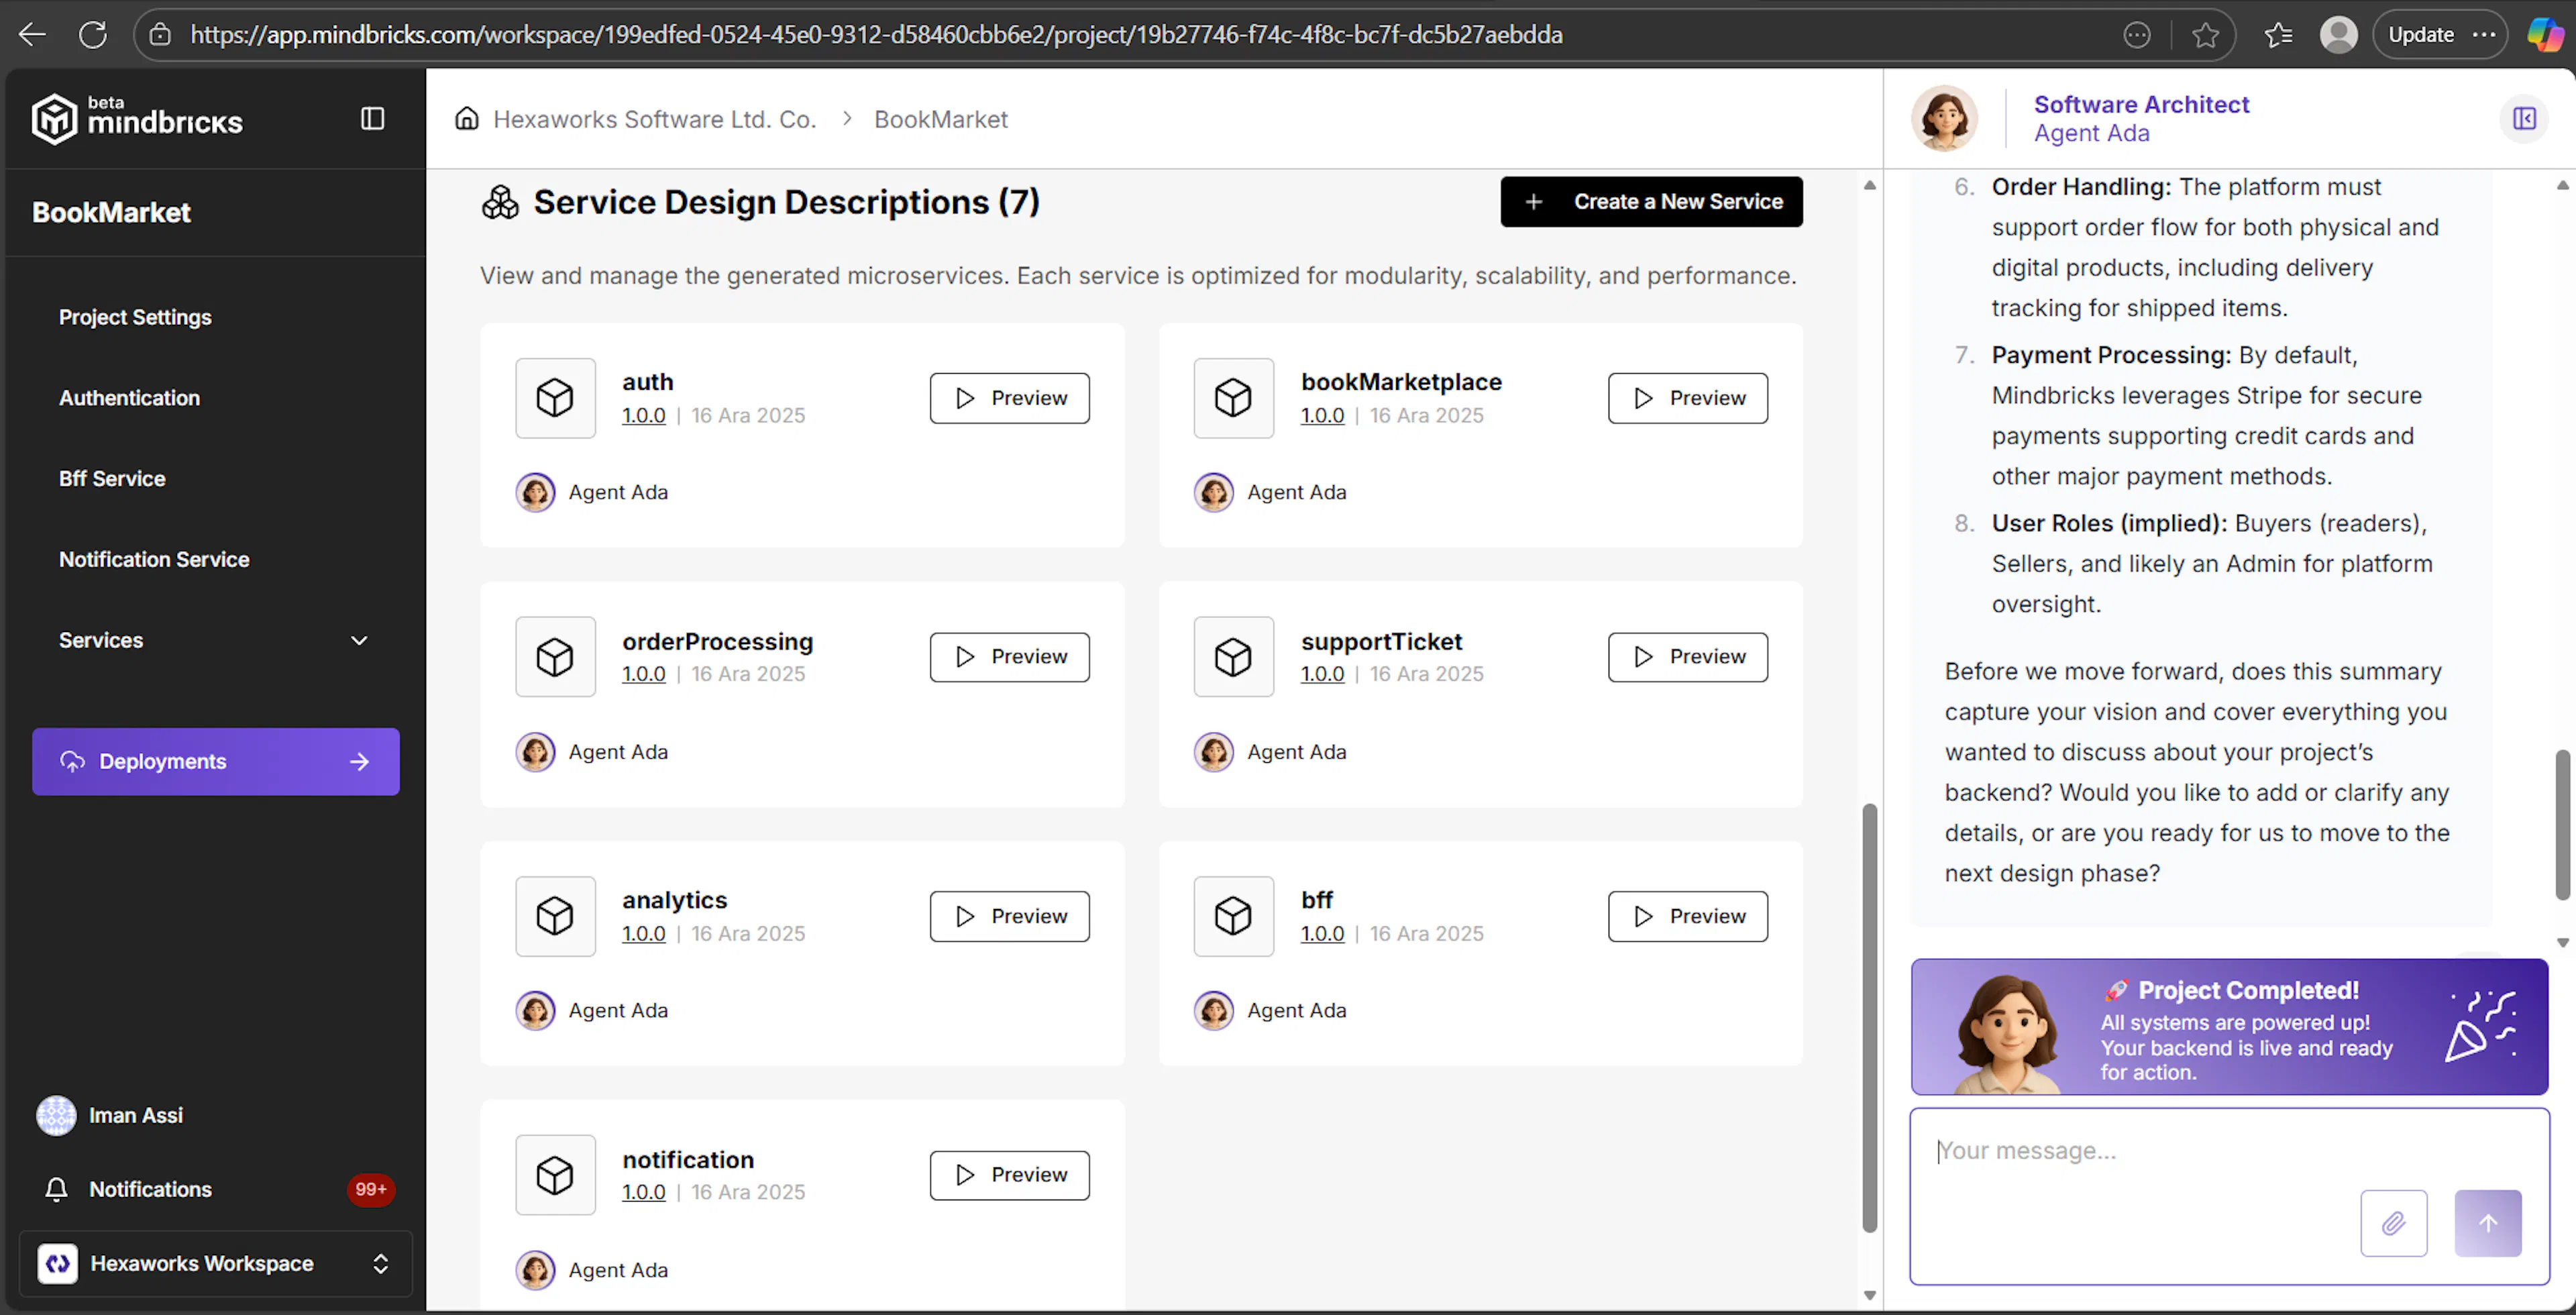
As each microservice is designed successfully:
-
It appears in the Services section
-
A Preview button becomes available
-
The service version and design timestamp are shown
This allows you to follow progress service by service.
Previewing Services & API Testing
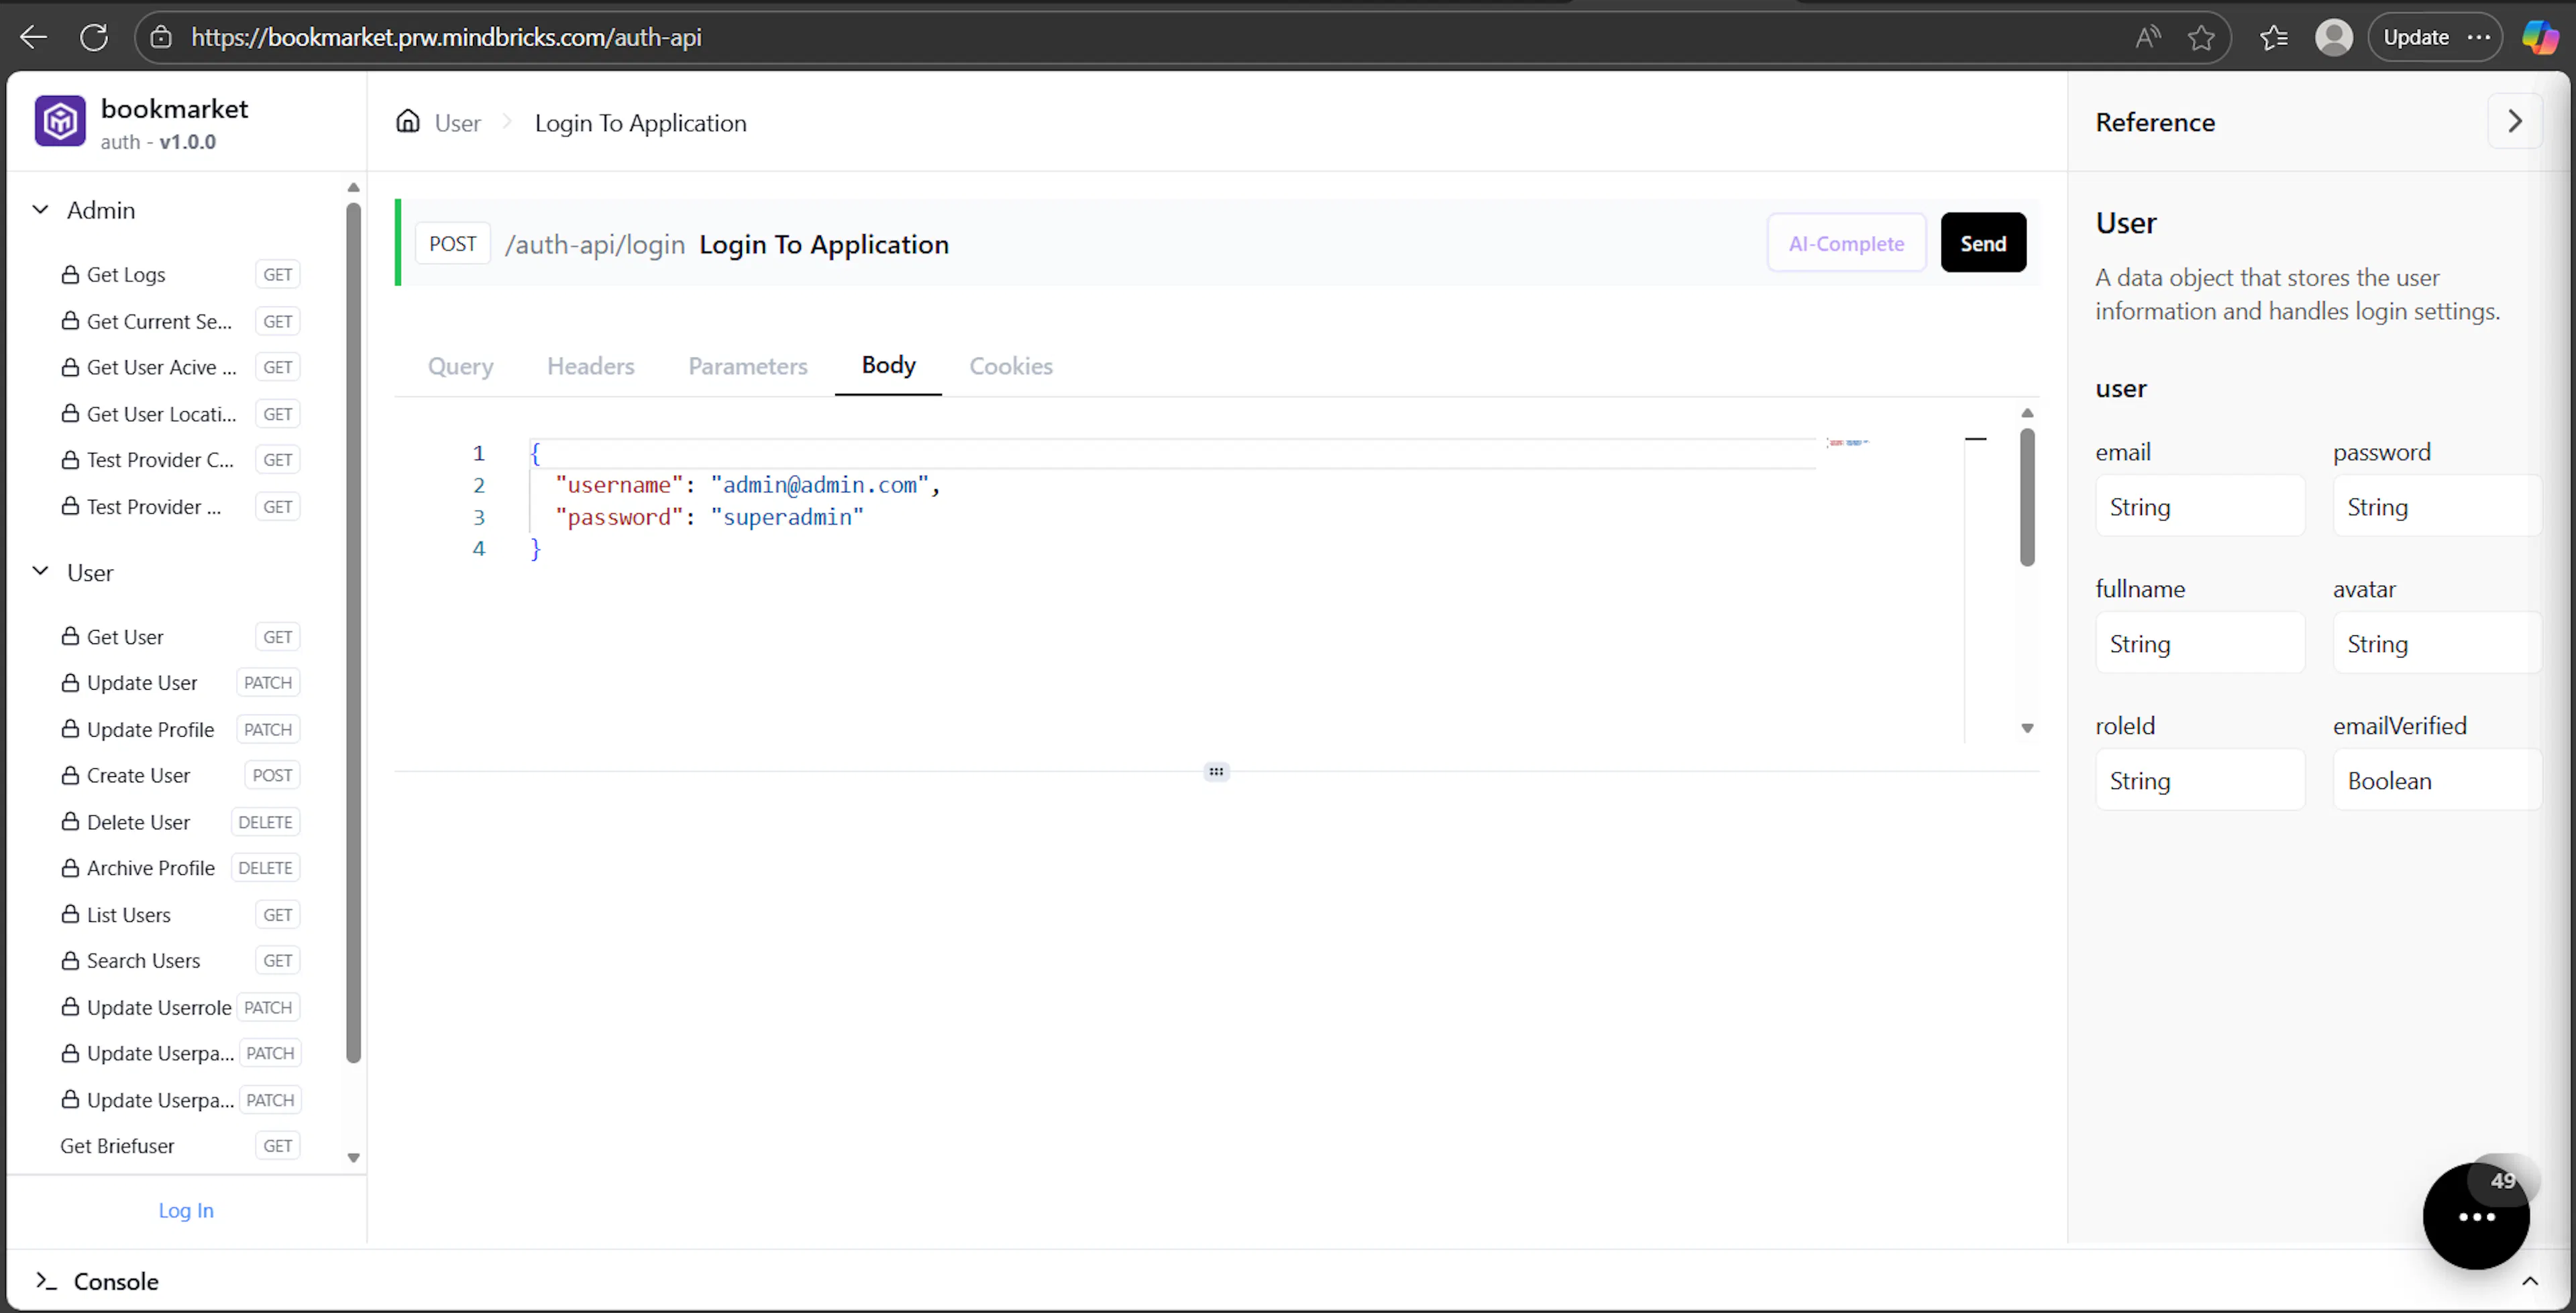
Clicking Preview on a service opens a live API interface where you can:
-
Explore generated endpoints
-
Test API requests and responses
-
Validate service behavior
Preview Session Duration
-
Each preview session is valid for 30 minutes
-
After expiration, you can start a new preview session
-
This ensures efficient and secure preview usage
Service Screens, Manual Editing & AI-Generated Content
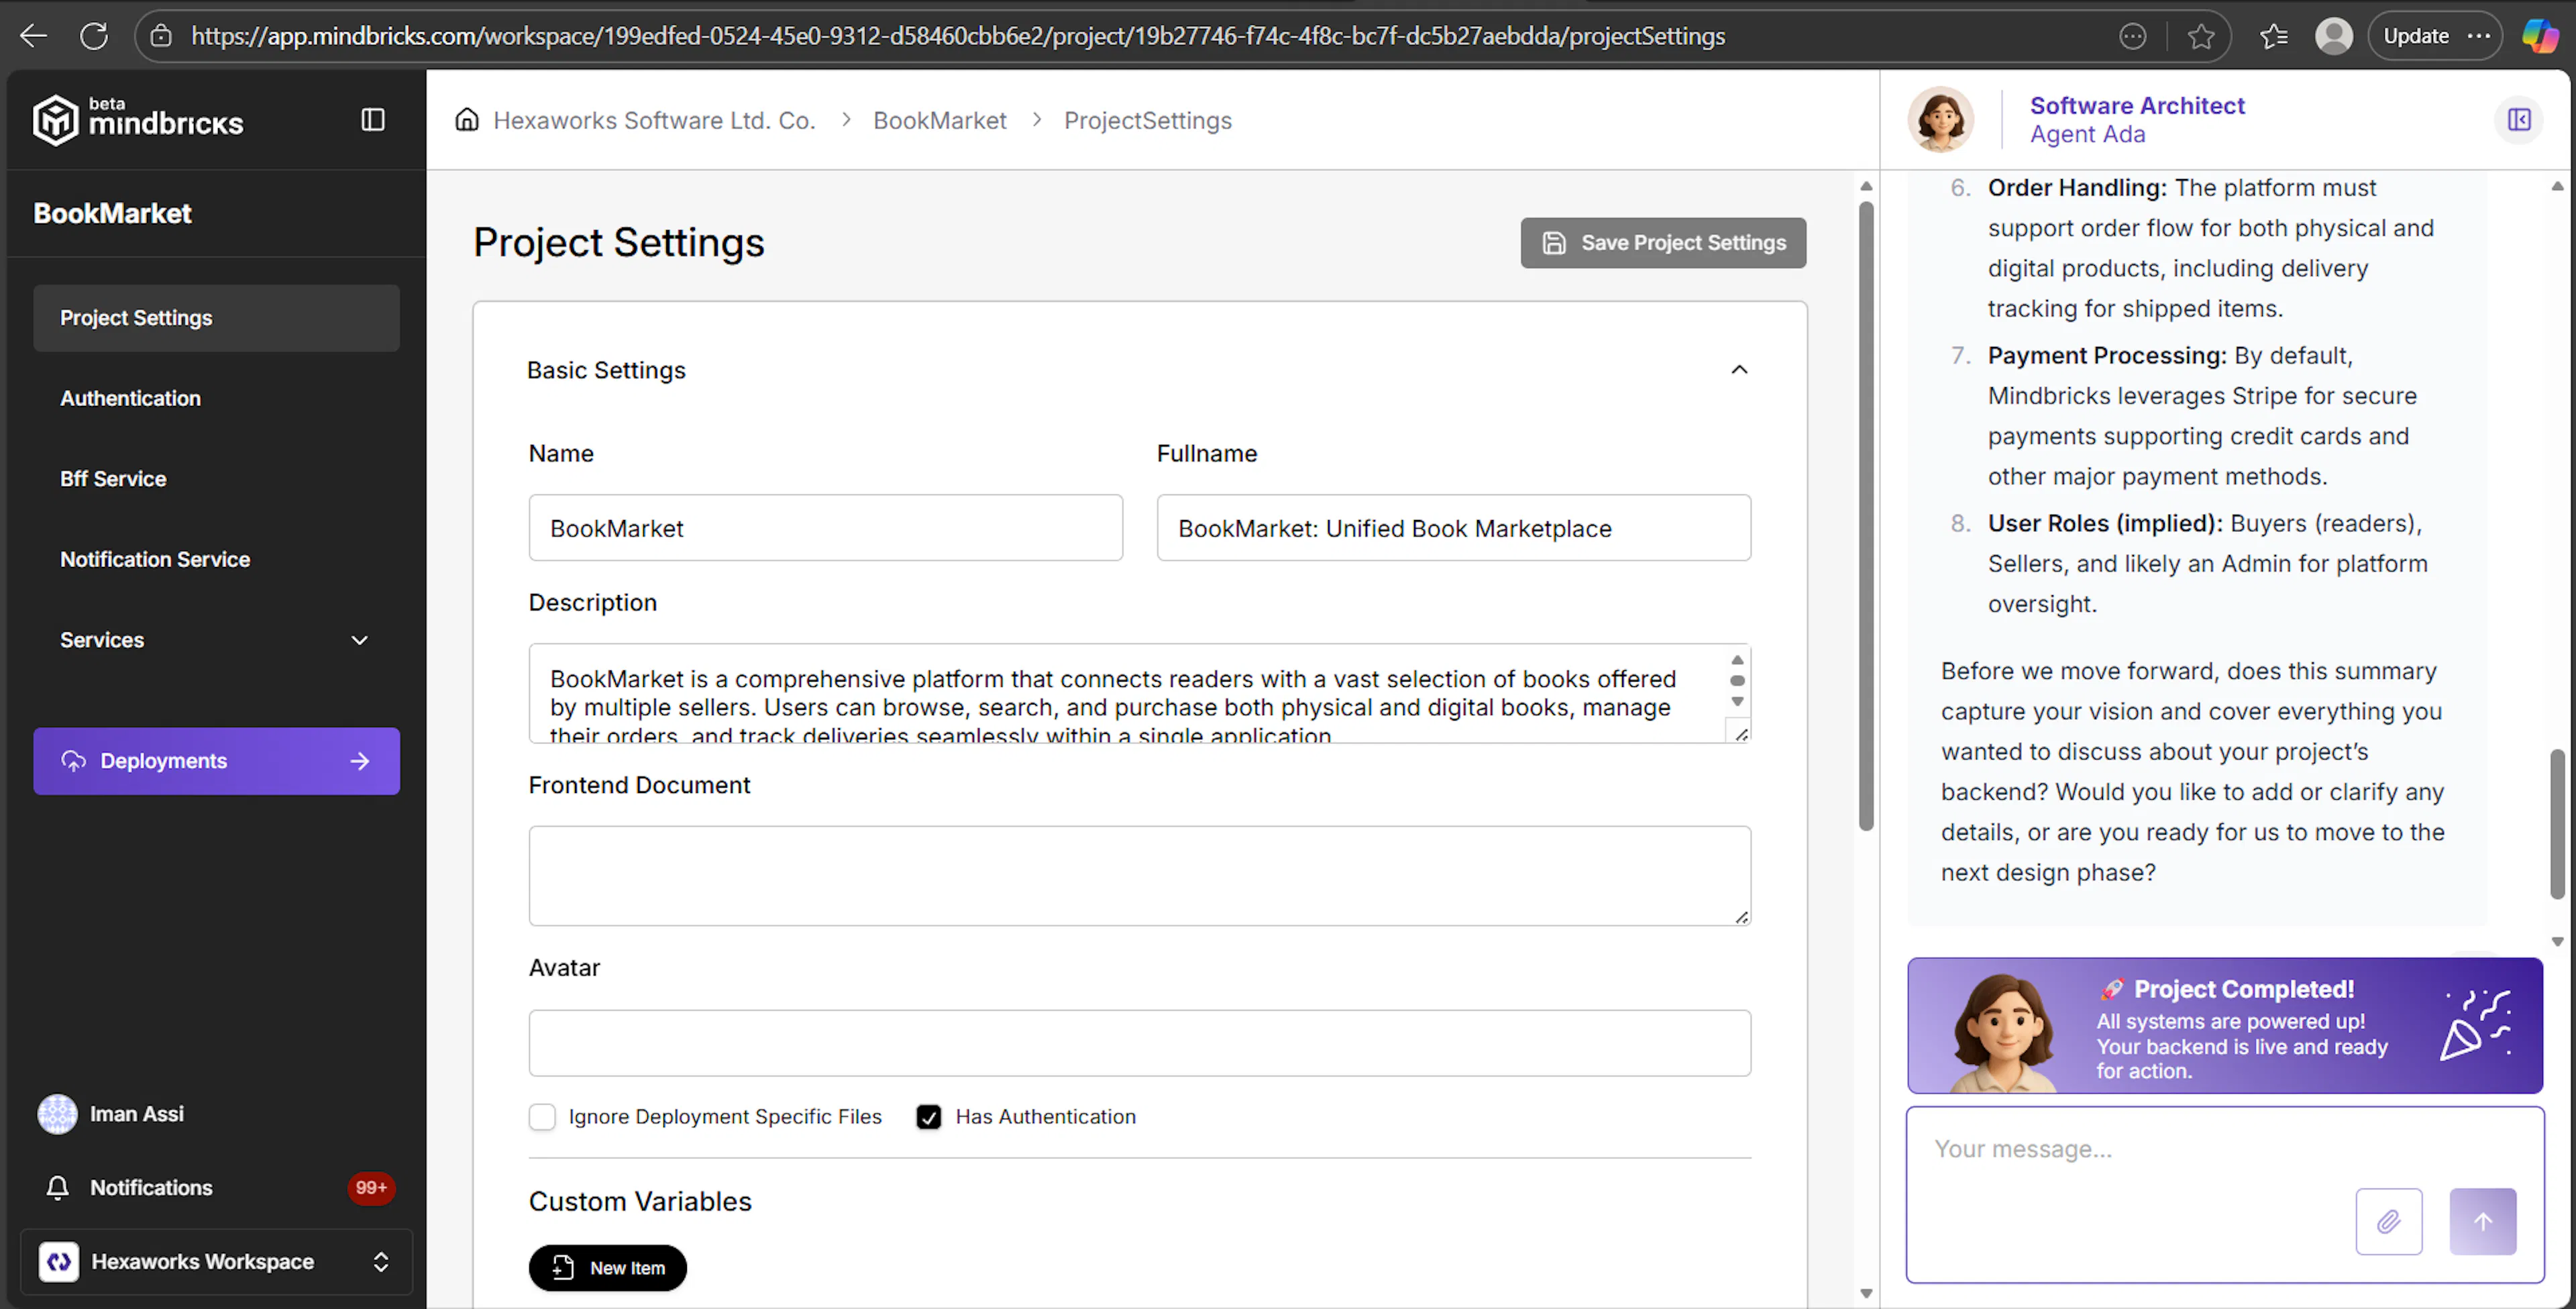
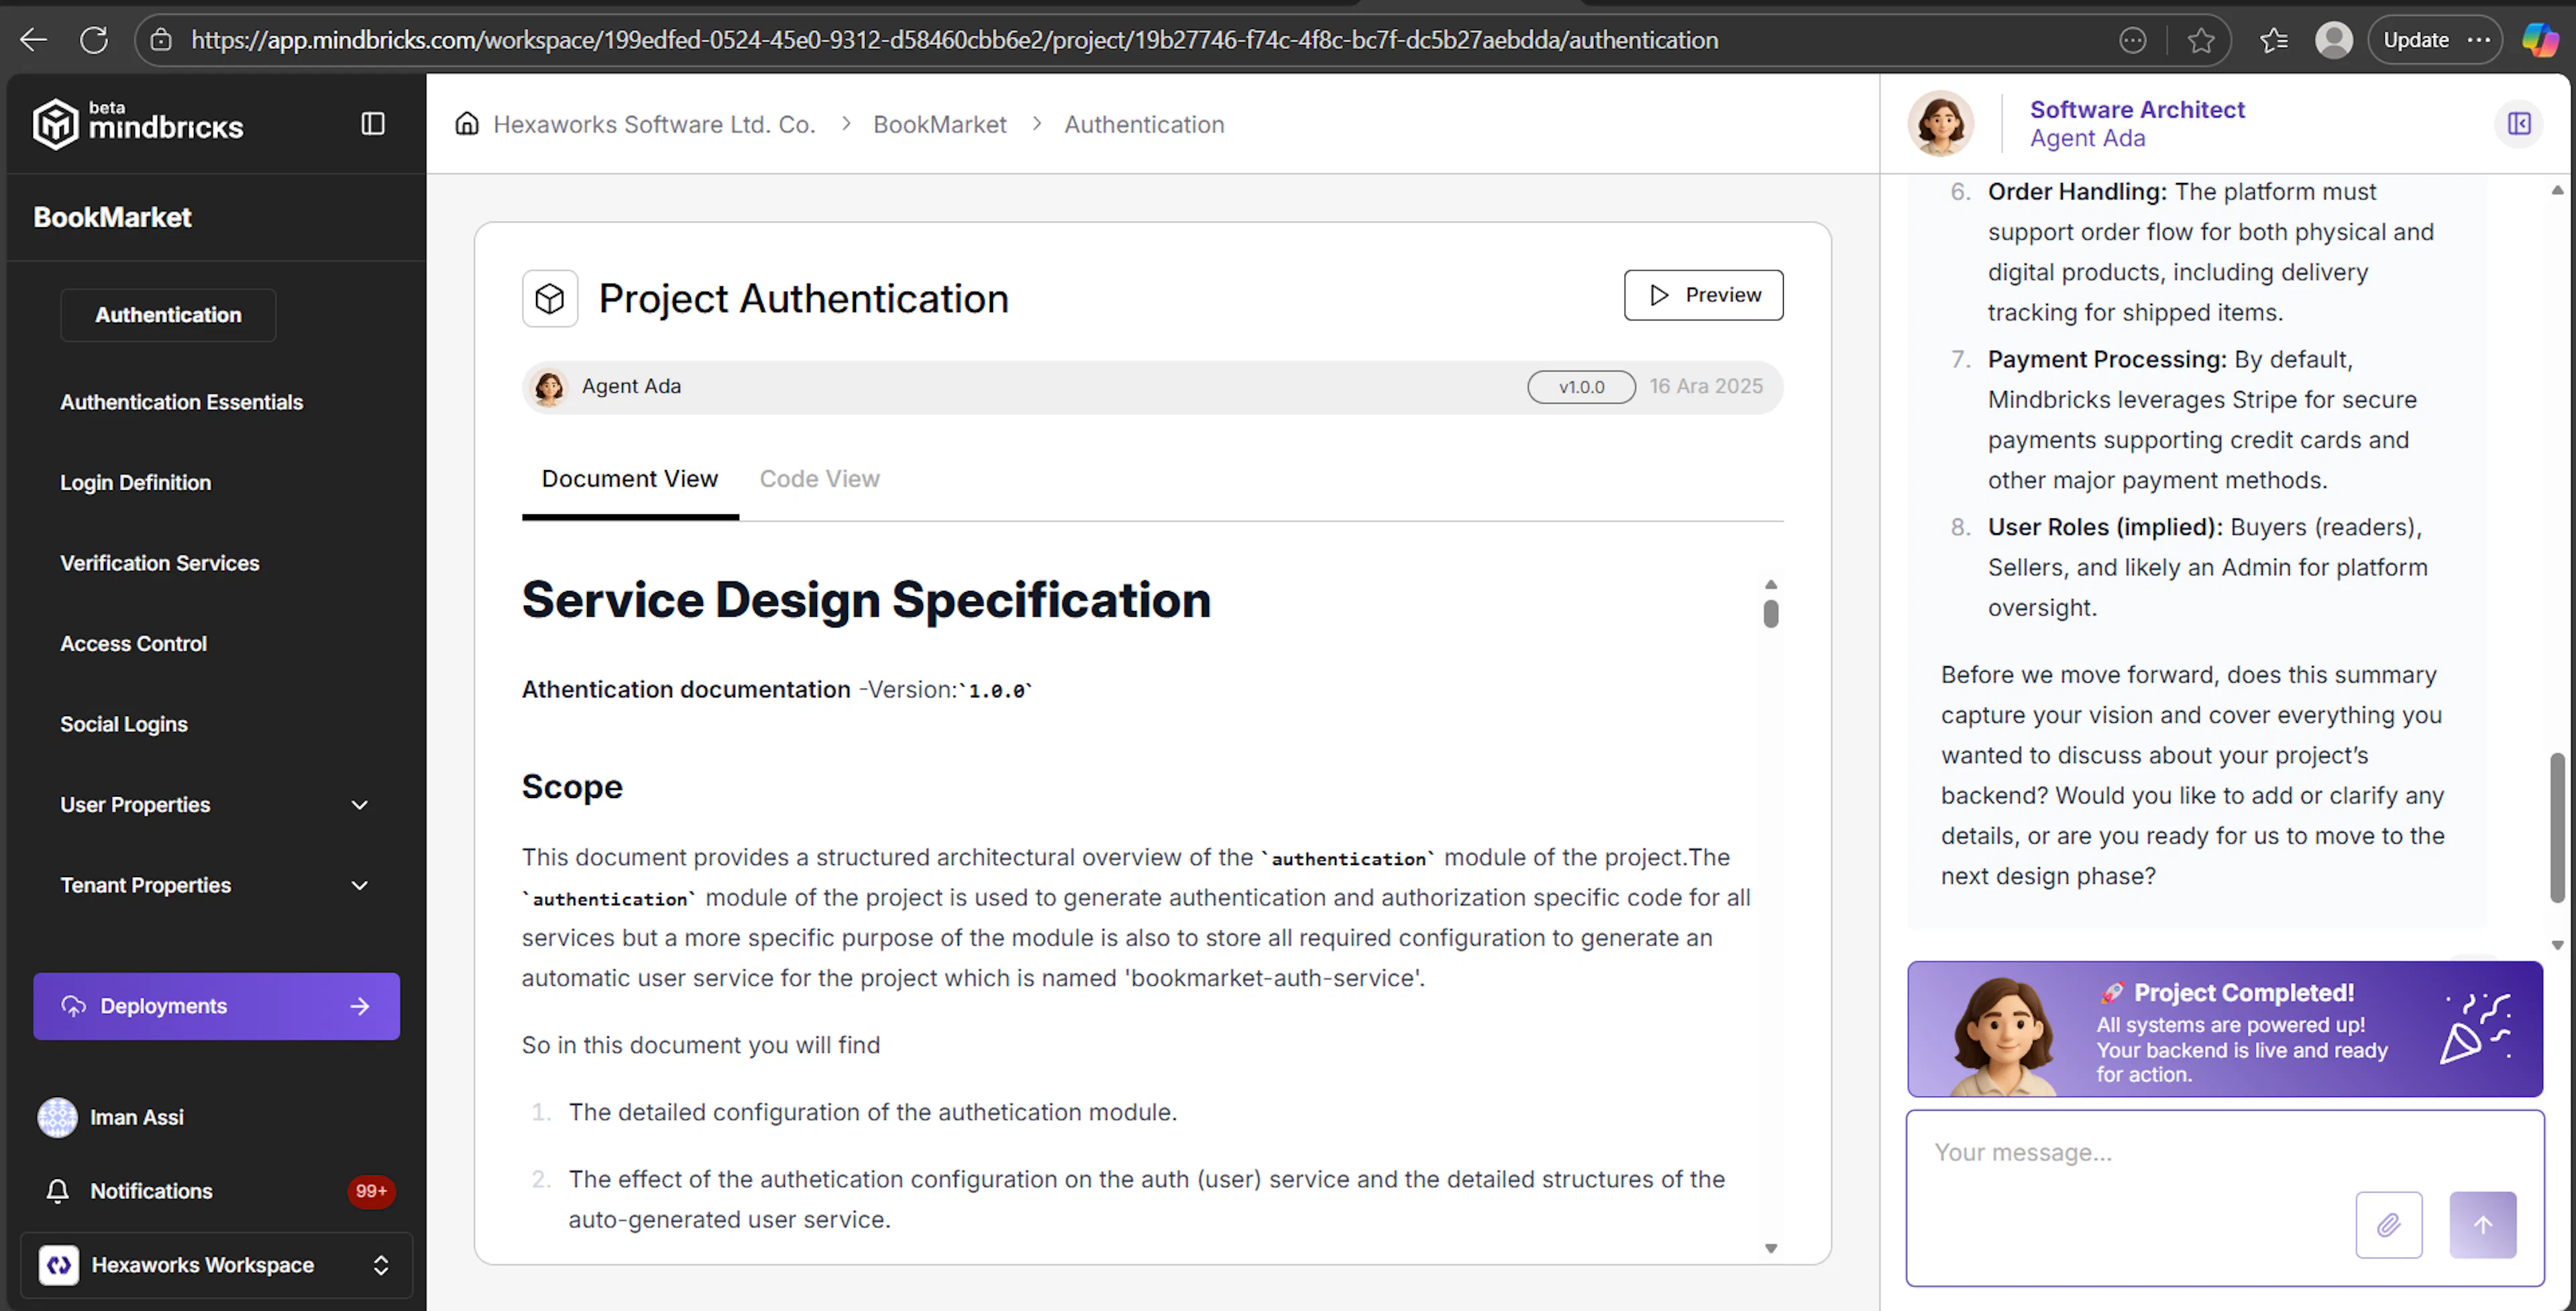
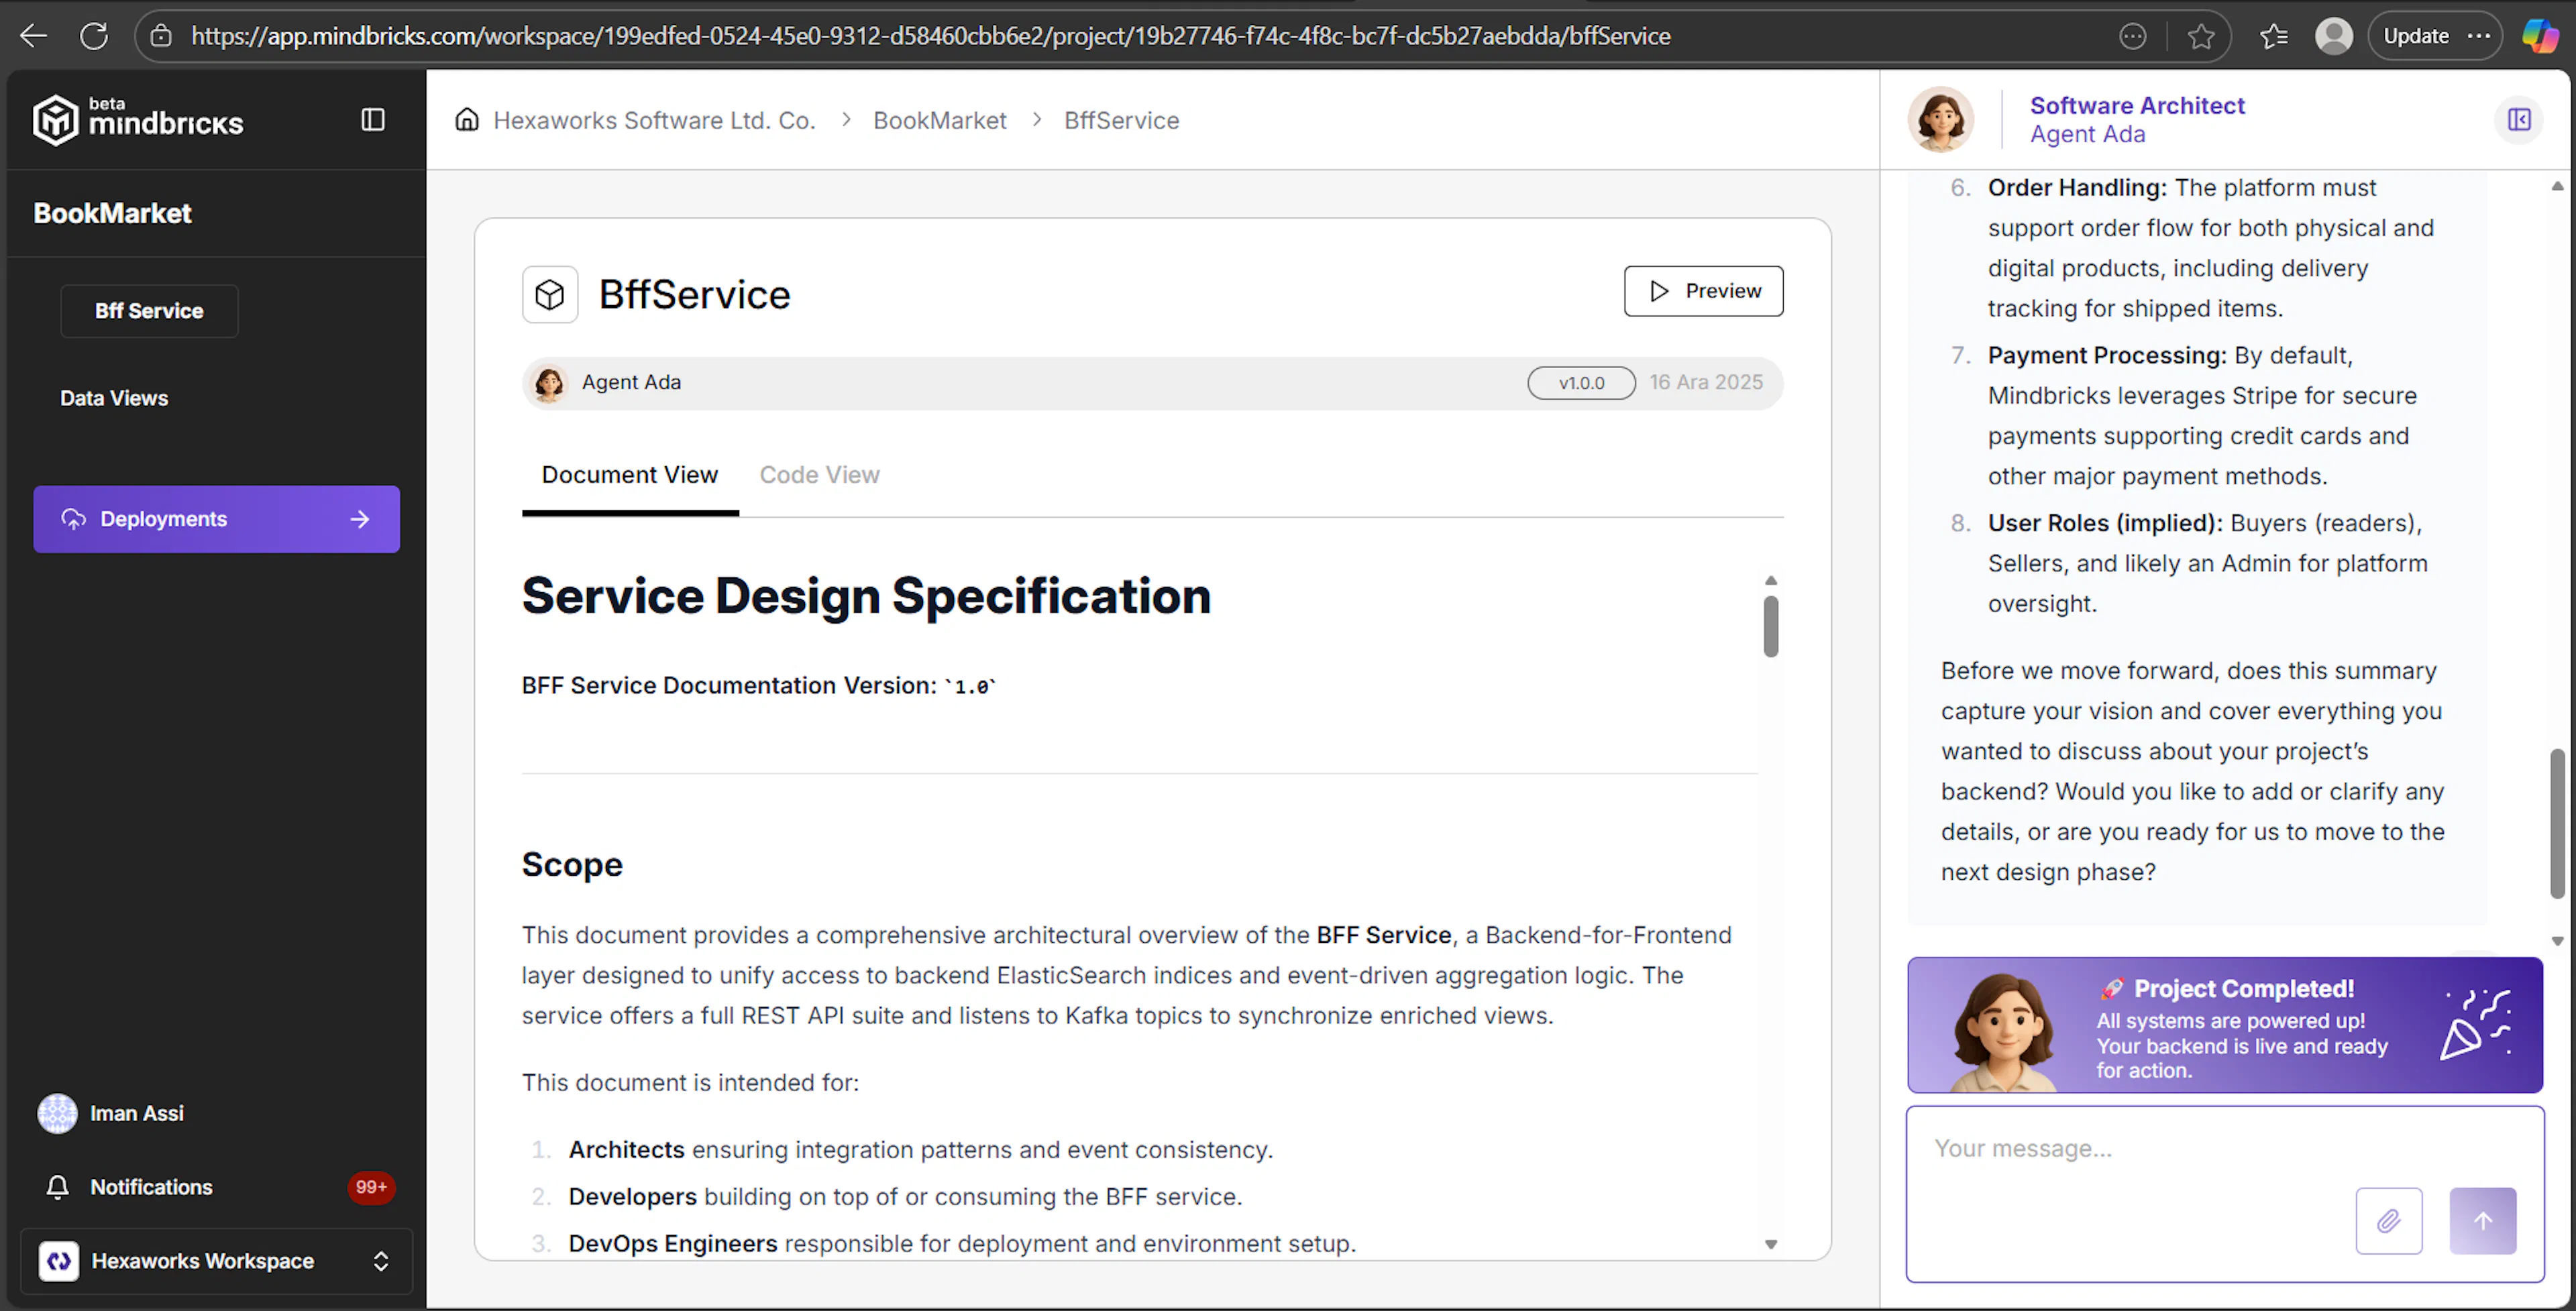
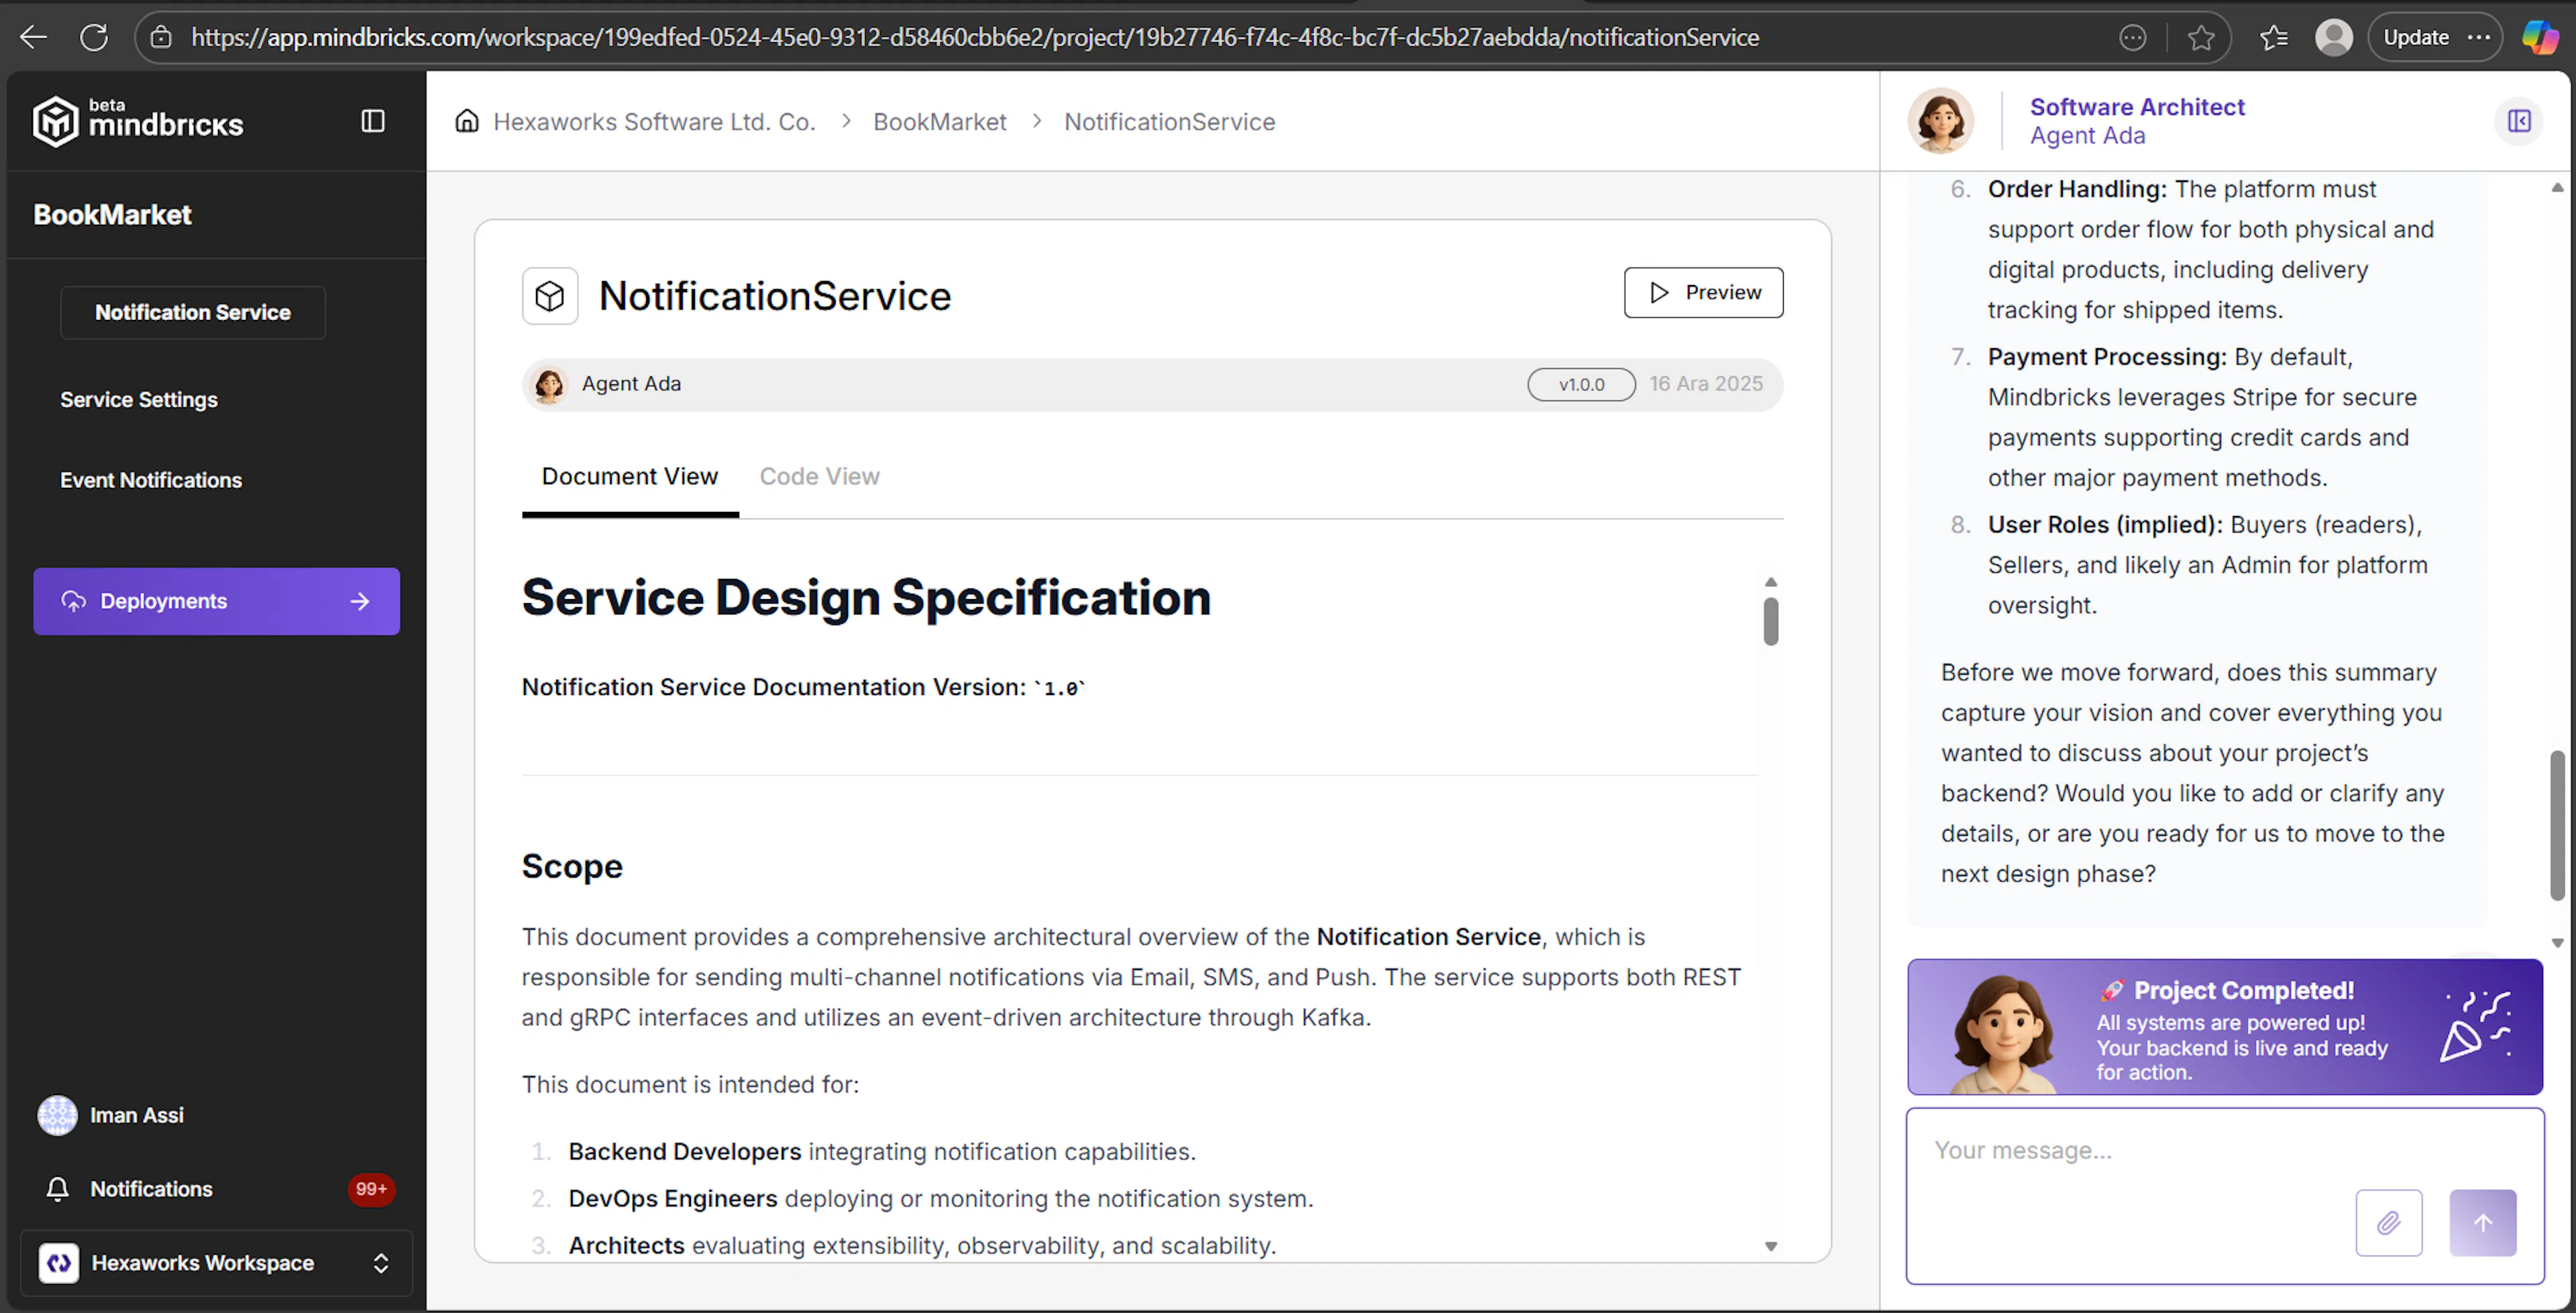
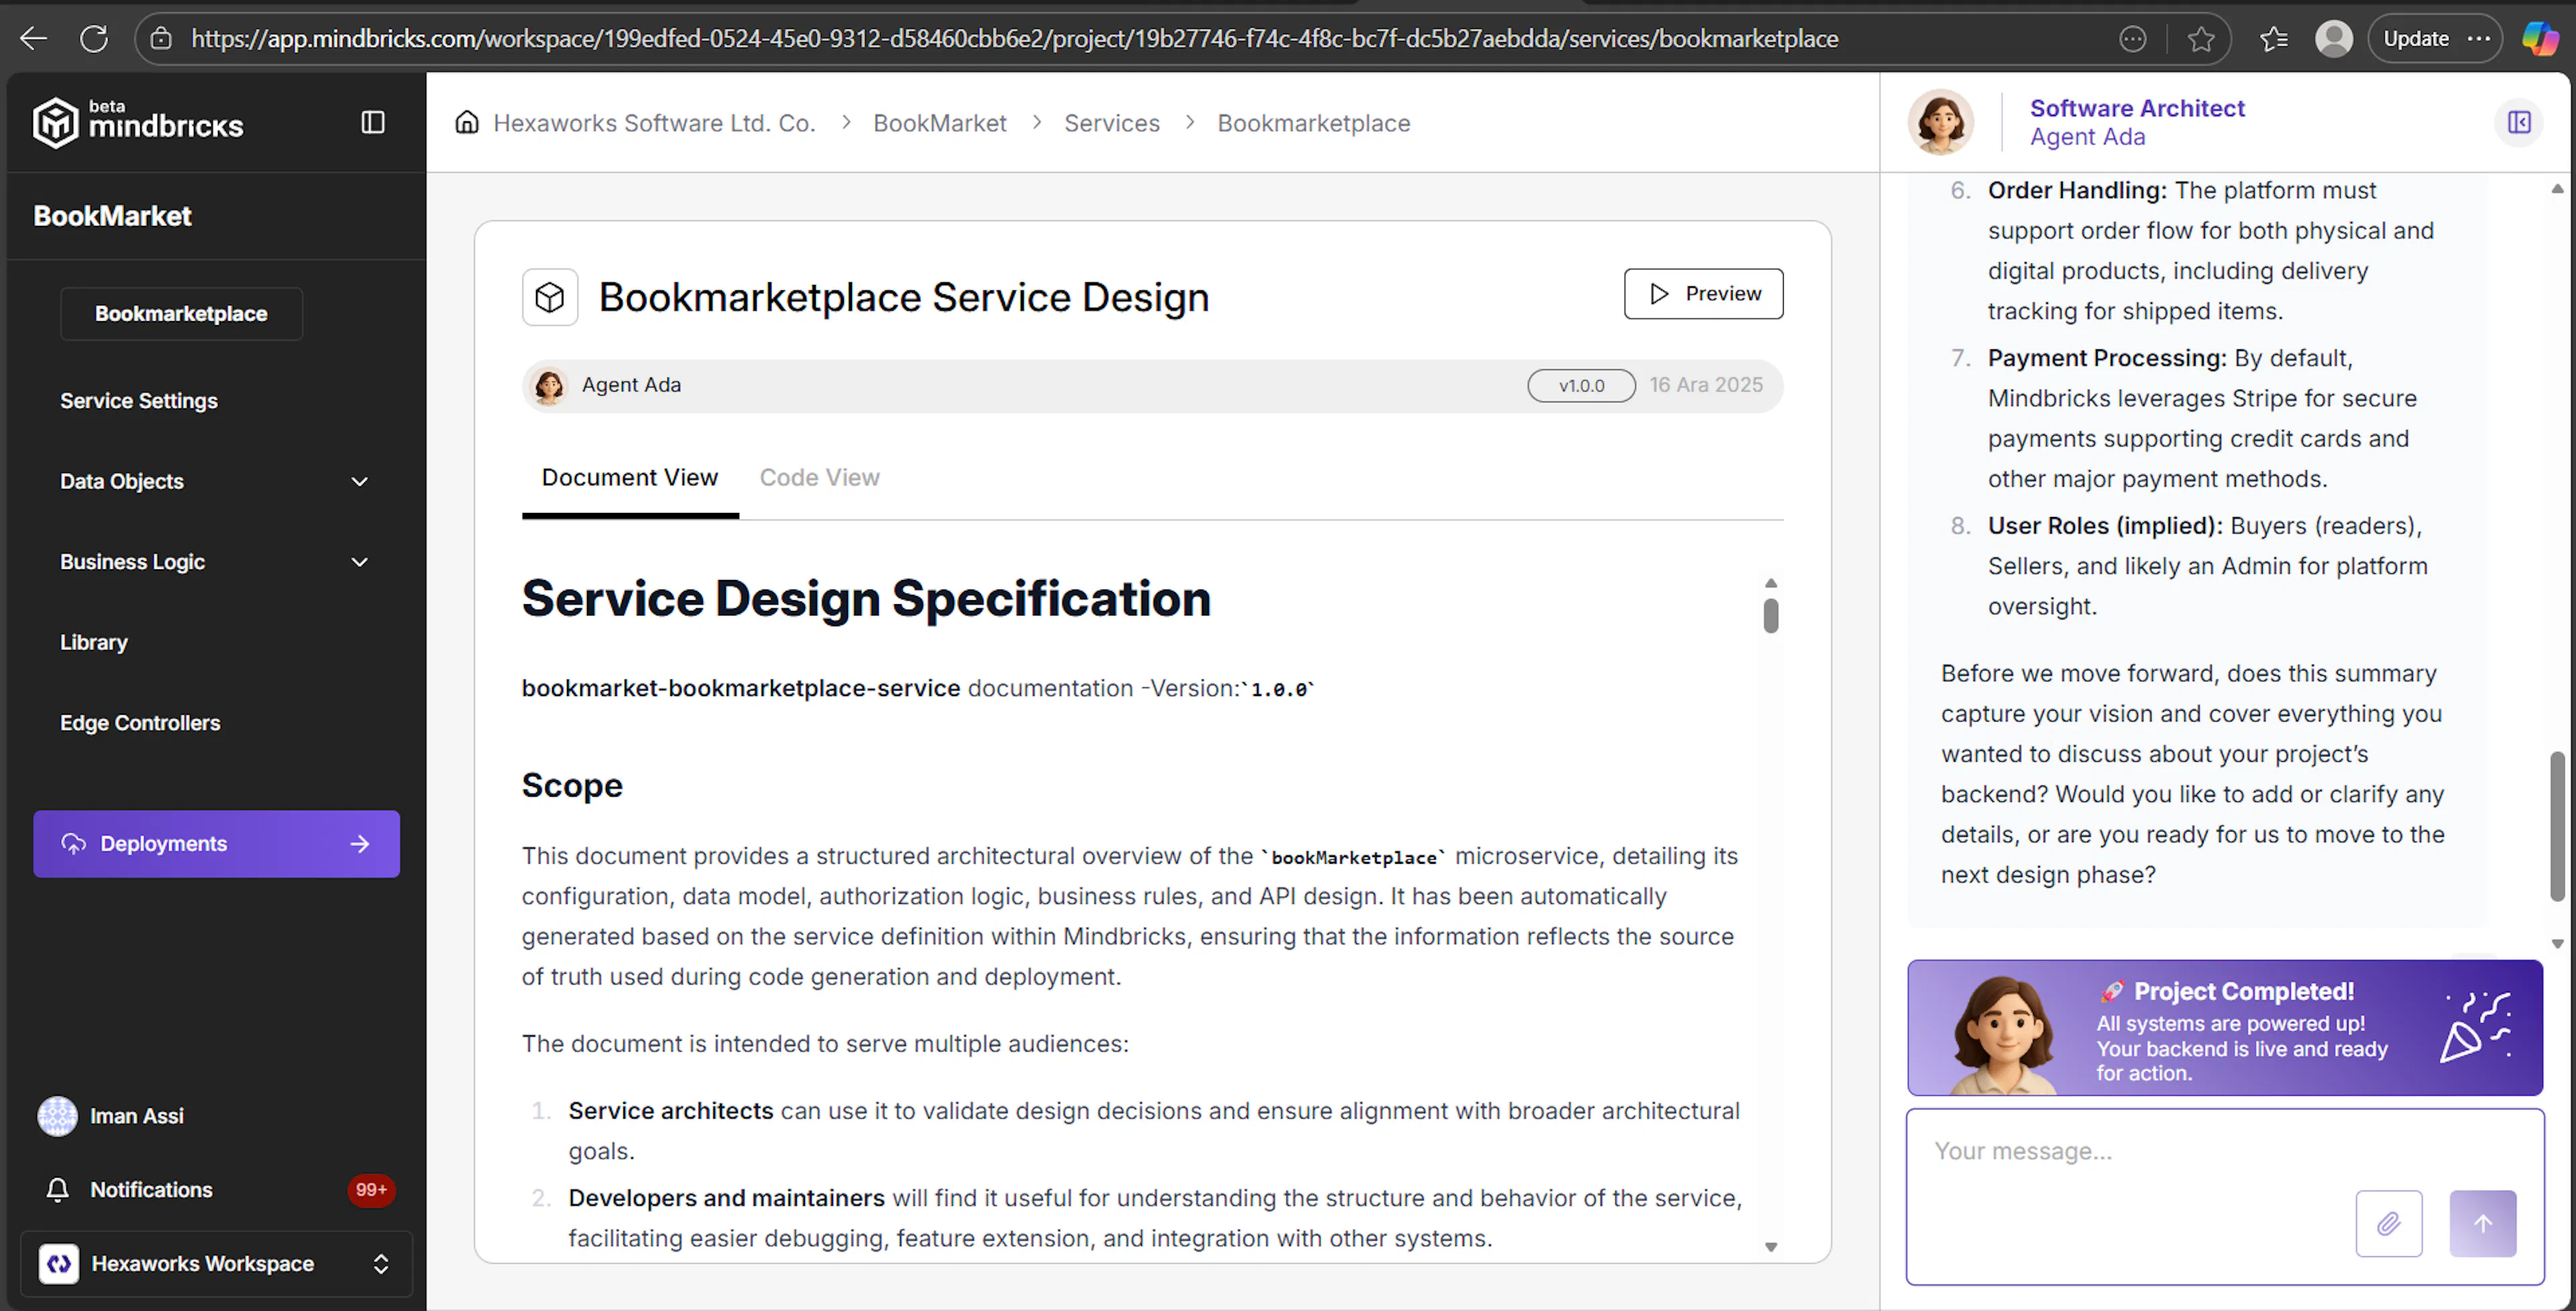
You can edit both Project Settings and each microservice inside Mindbricks.
Mindbricks is designed to be AI-assisted, not AI-locked.
You always remain in full control of the generated output.
ℹ️ Detailed Note
All fields, sections, configuration options, and editing behaviors shown in Project Settings and service screens are explained step-by-step in the dedicated Mindbricks Project Guide.
This section focuses on how services are created, reviewed, and edited, while deeper explanations live in the project-level documentation.
4. Deployments
The Deployments section allows you to deploy your project to the cloud, manage environments, monitor deployments, and access the generated repository.
This is where your designed services become running applications.
Deployments → Overview
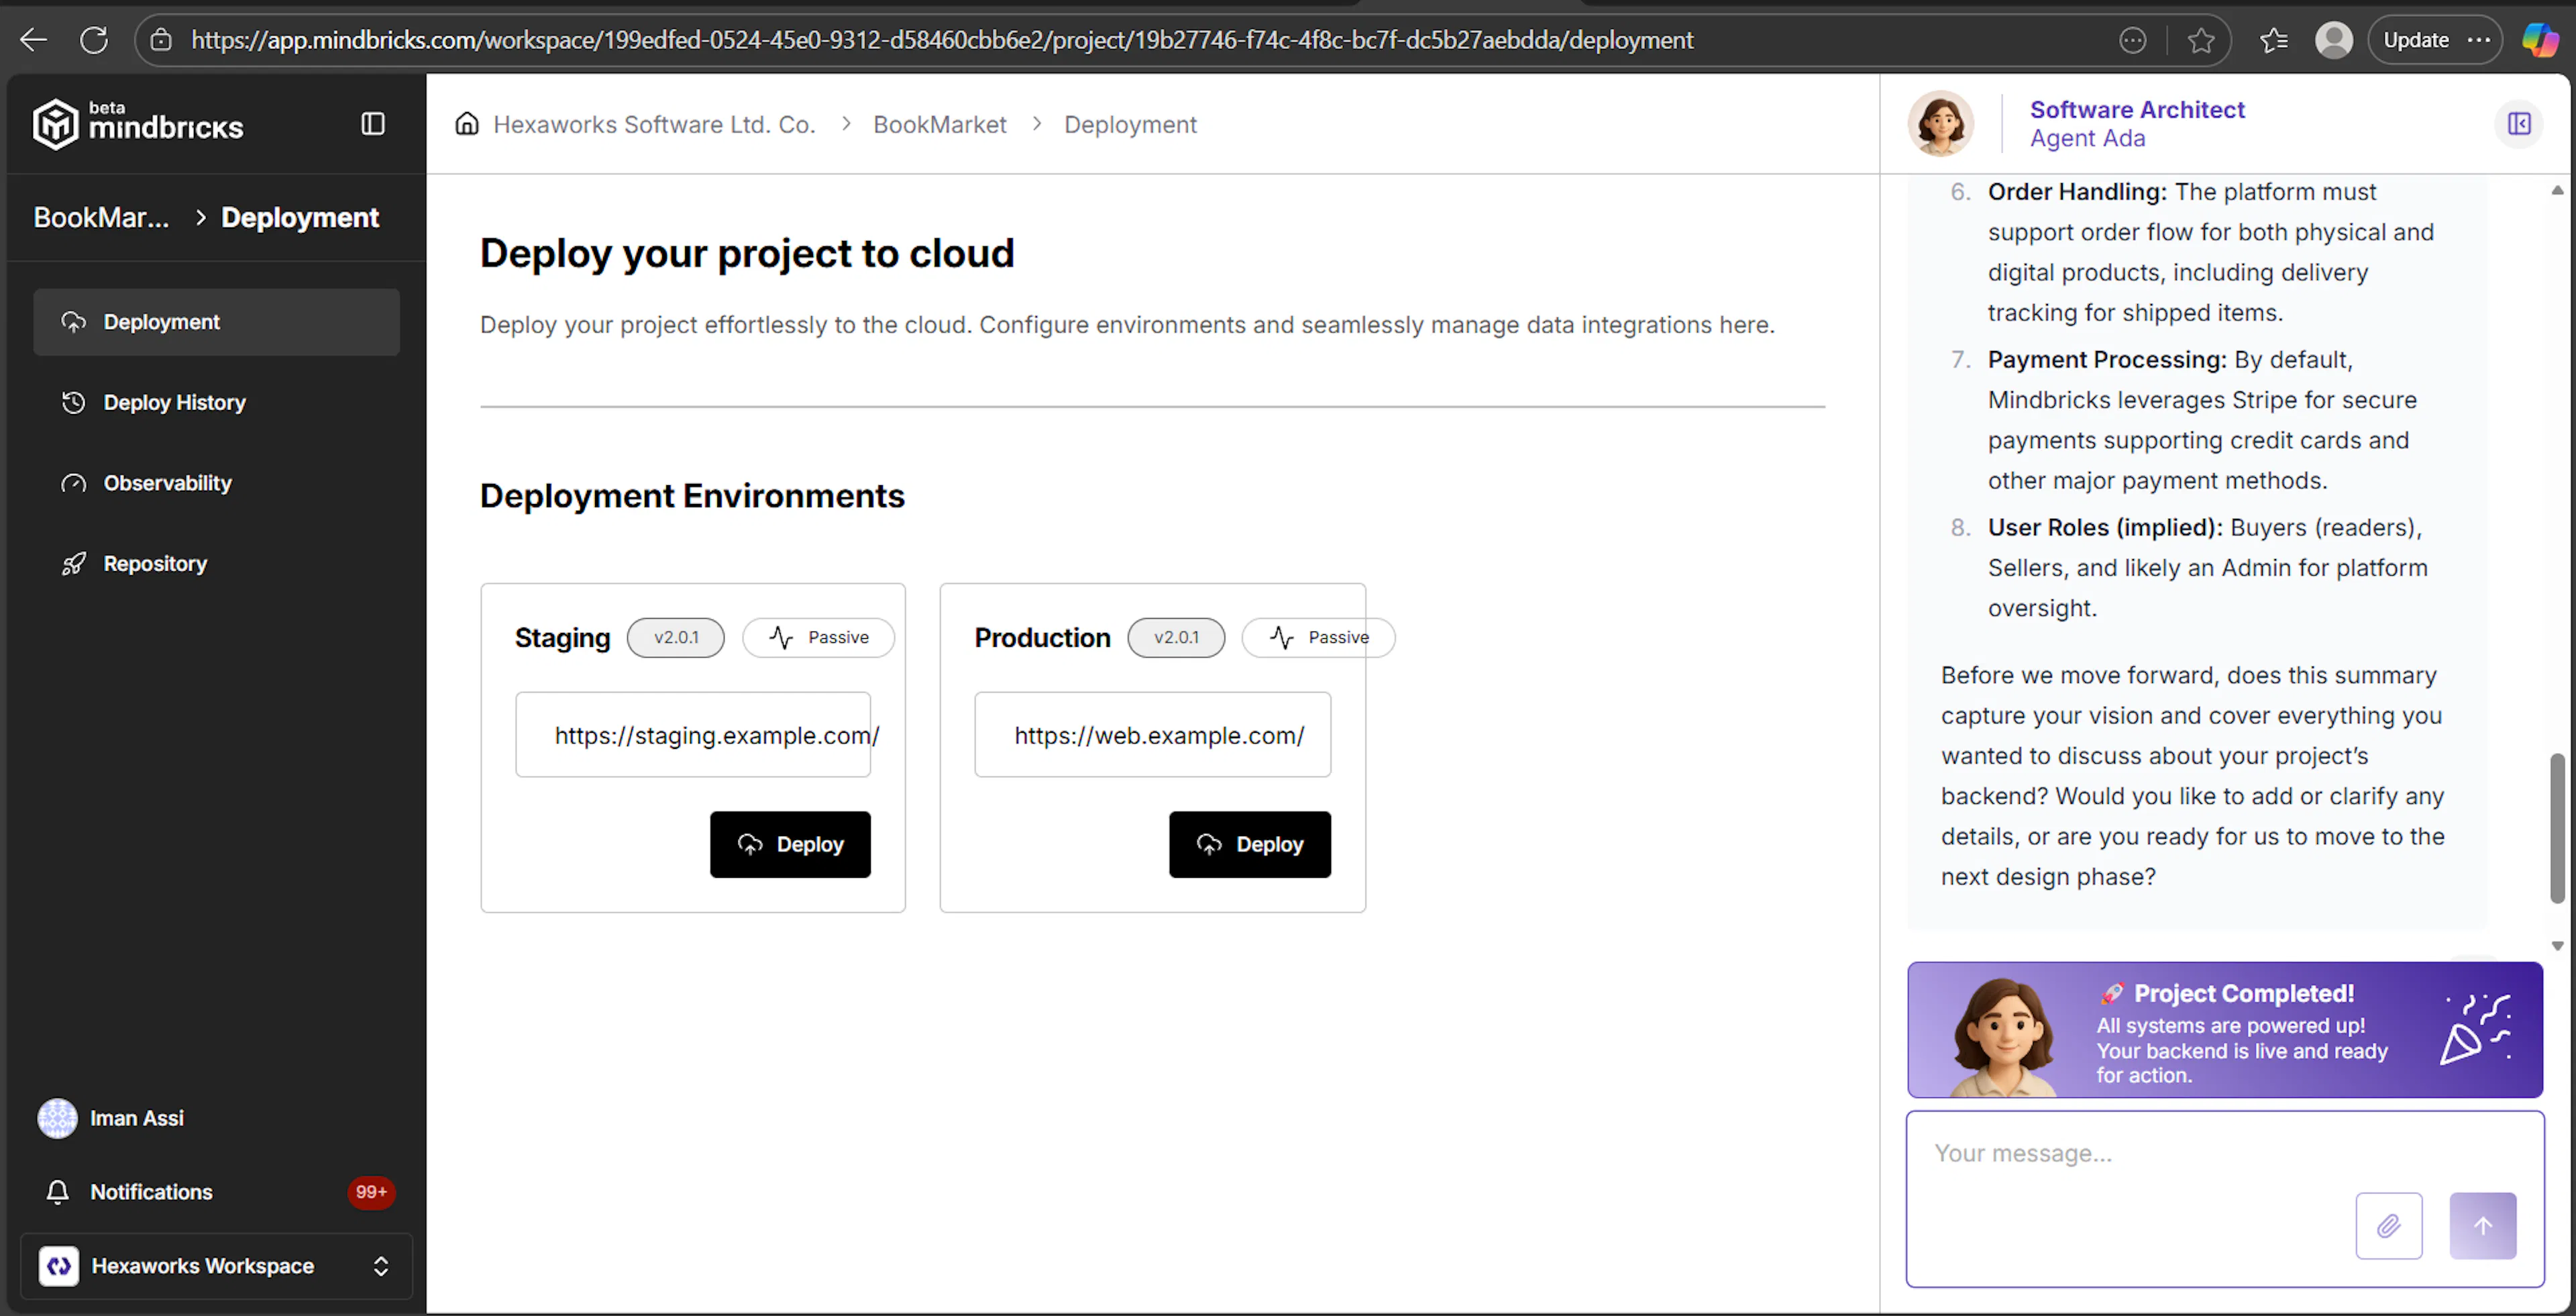
The main Deployment page shows the available deployment environments for your project.
By default, Mindbricks provides:
-
Staging – for testing and validation
-
Production – for live traffic
Each environment displays:
-
Current version
-
Status (e.g. Passive)
-
Public URL (if configured)
-
Deploy action
You can deploy independently to each environment.
Deployments → Deploy to an Environment
When you select an environment (e.g. Stage), you are taken to the environment-specific deployment screen.
Selecting an Instance
Before deploying, you must select a cloud server instance where the project will run.
-
Choose an instance from the dropdown
-
This instance must already exist in Cloud Servers
Deploying Services
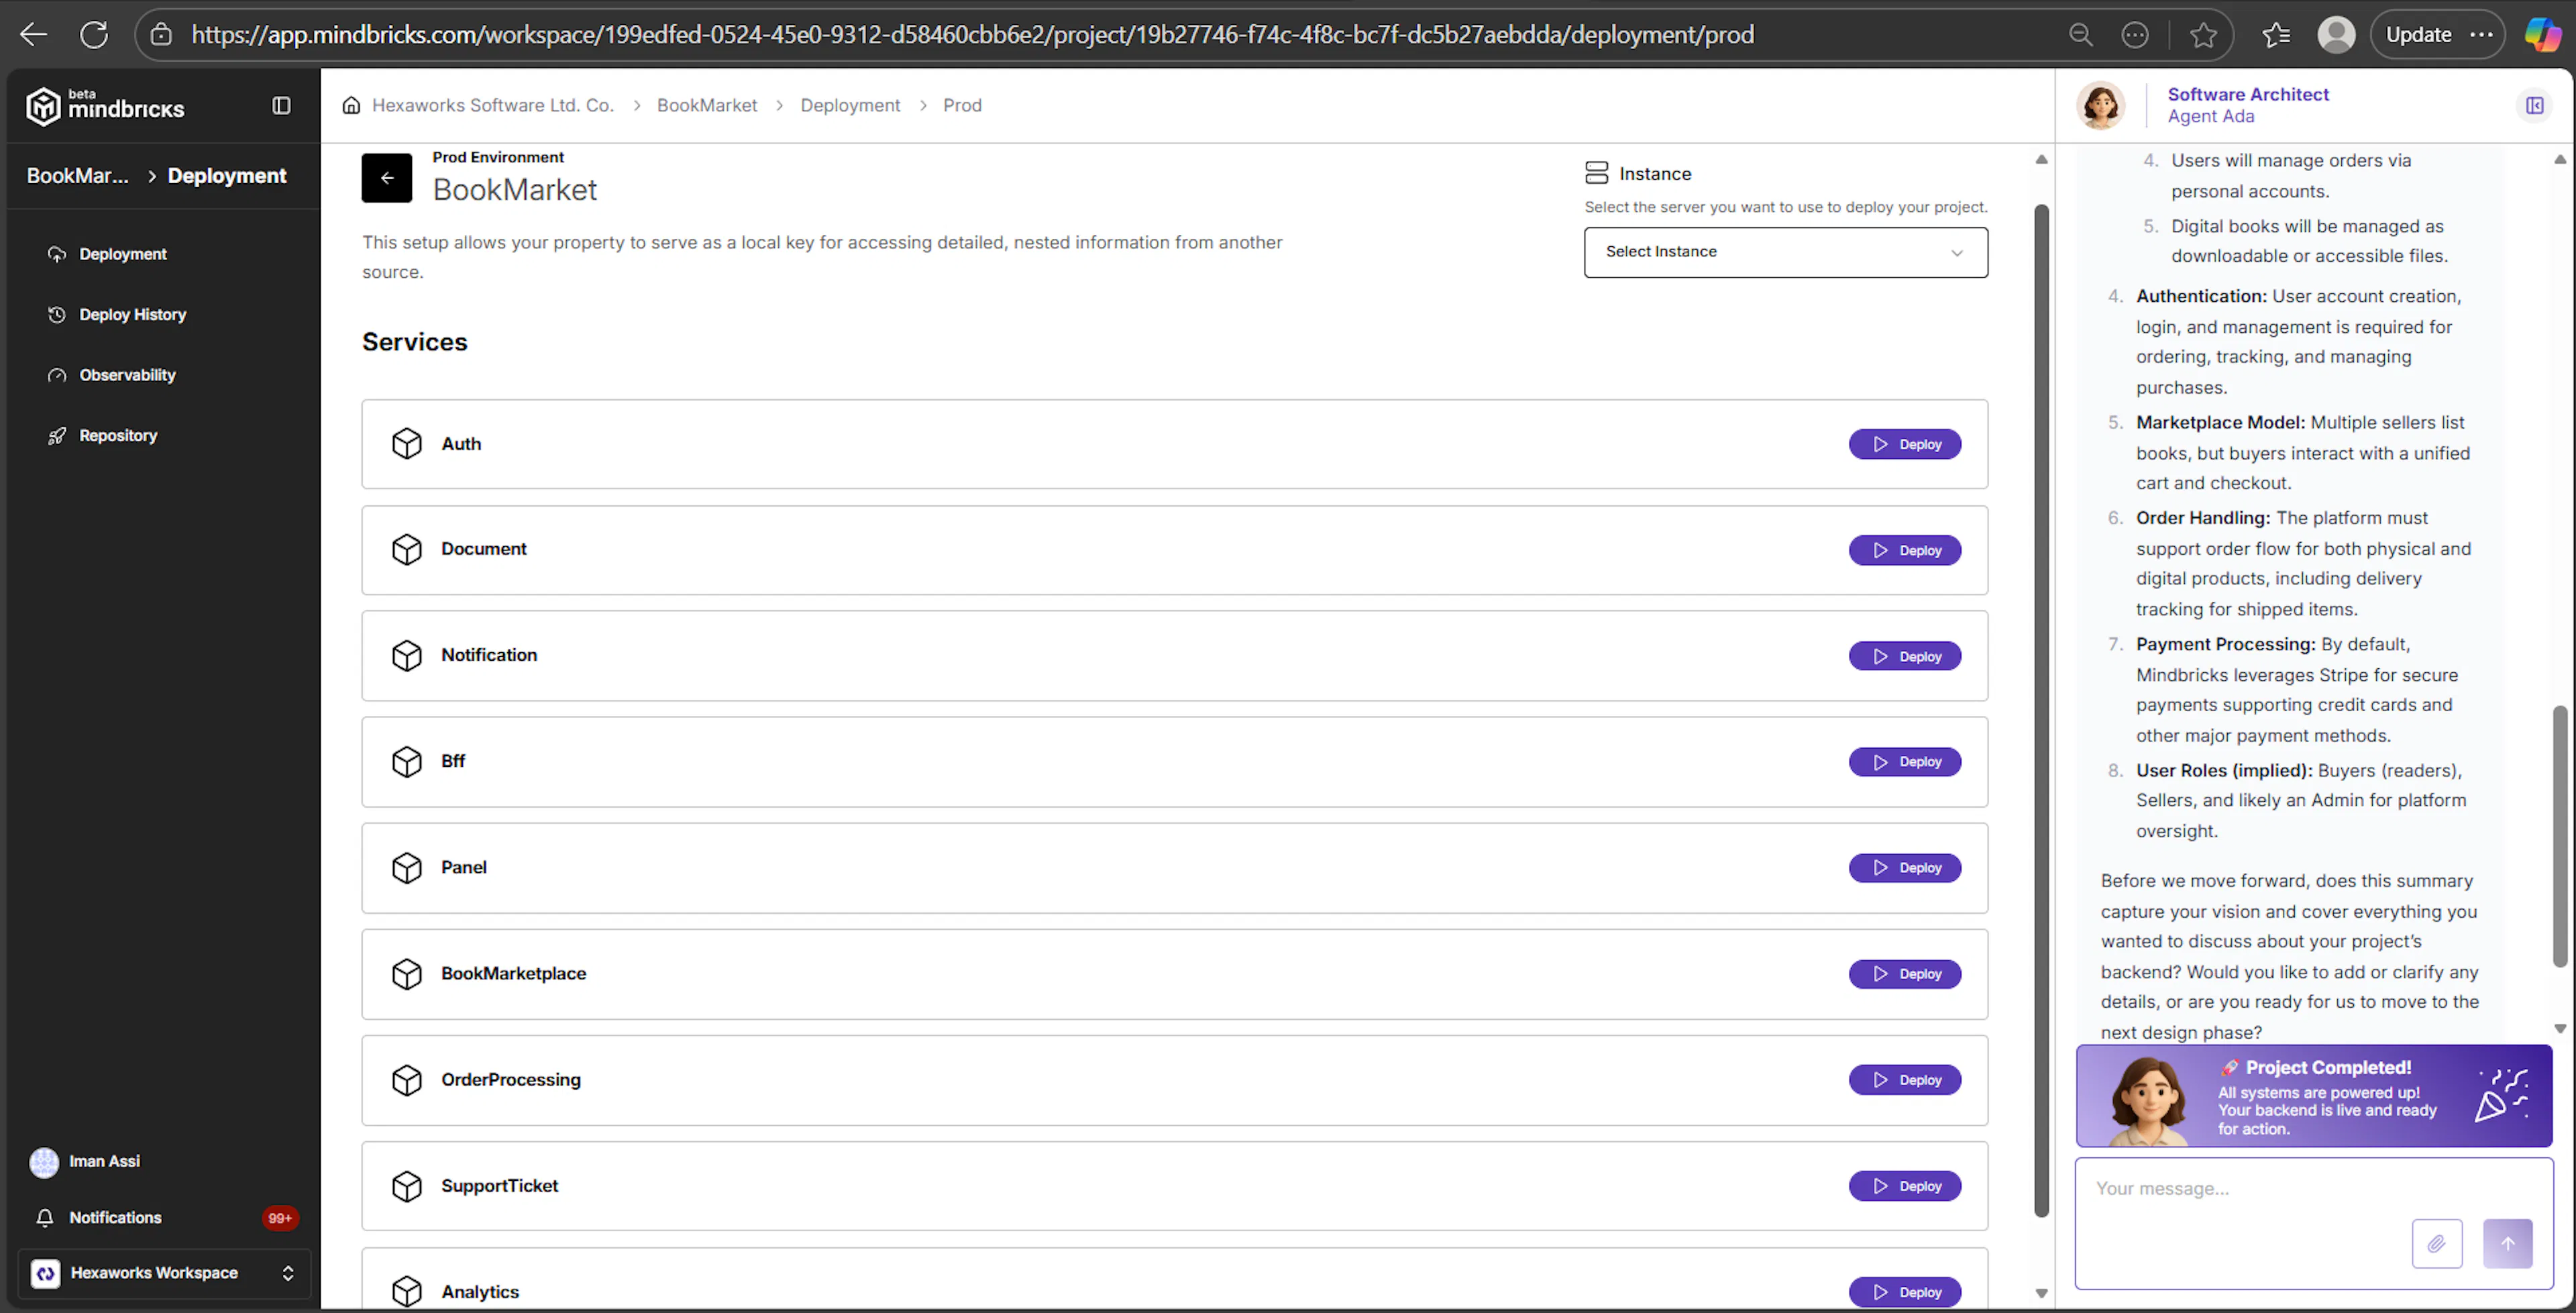
Once an instance is selected, all project services are listed.
For each service, you can:
-
See the service name
-
Click Deploy to deploy it to the selected environment
Services are deployed individually, giving you full control over rollout order.
Deployments → Deploy History
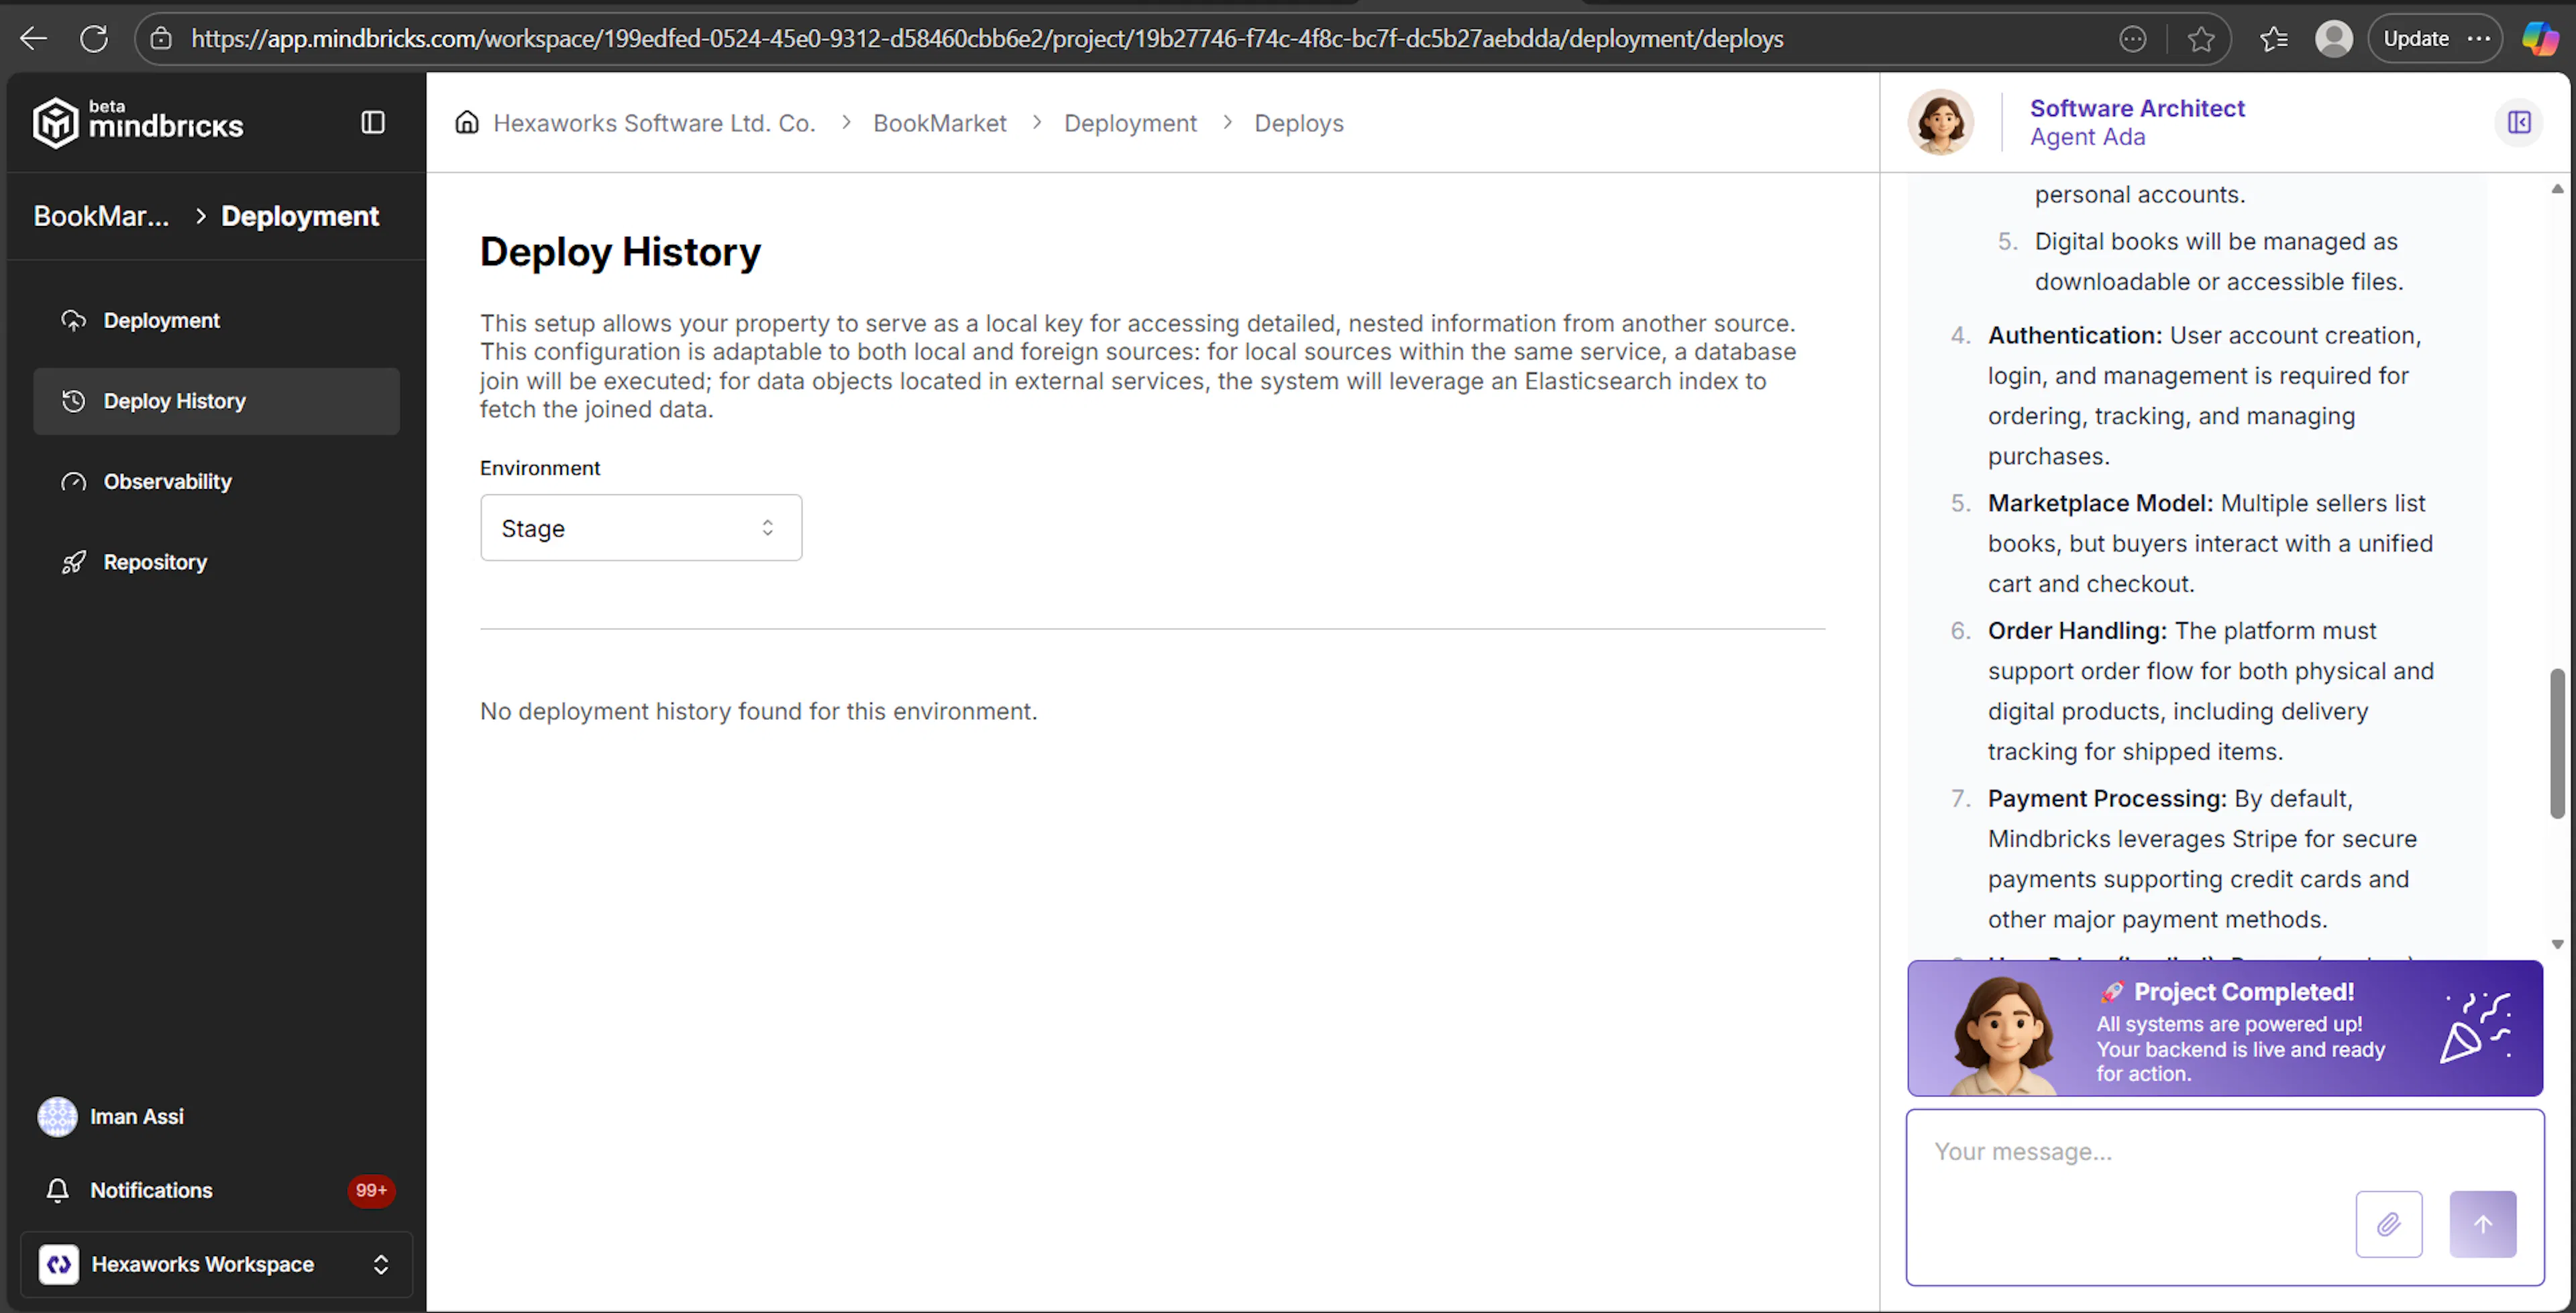
The Deploy History page shows past deployment activity.
Here you can:
-
Select an environment (Stage or Production)
-
View previous deployment attempts
-
Track whether deployments were executed or not
If no deployments have occurred yet, the page shows an empty state.
Deployments → Observability
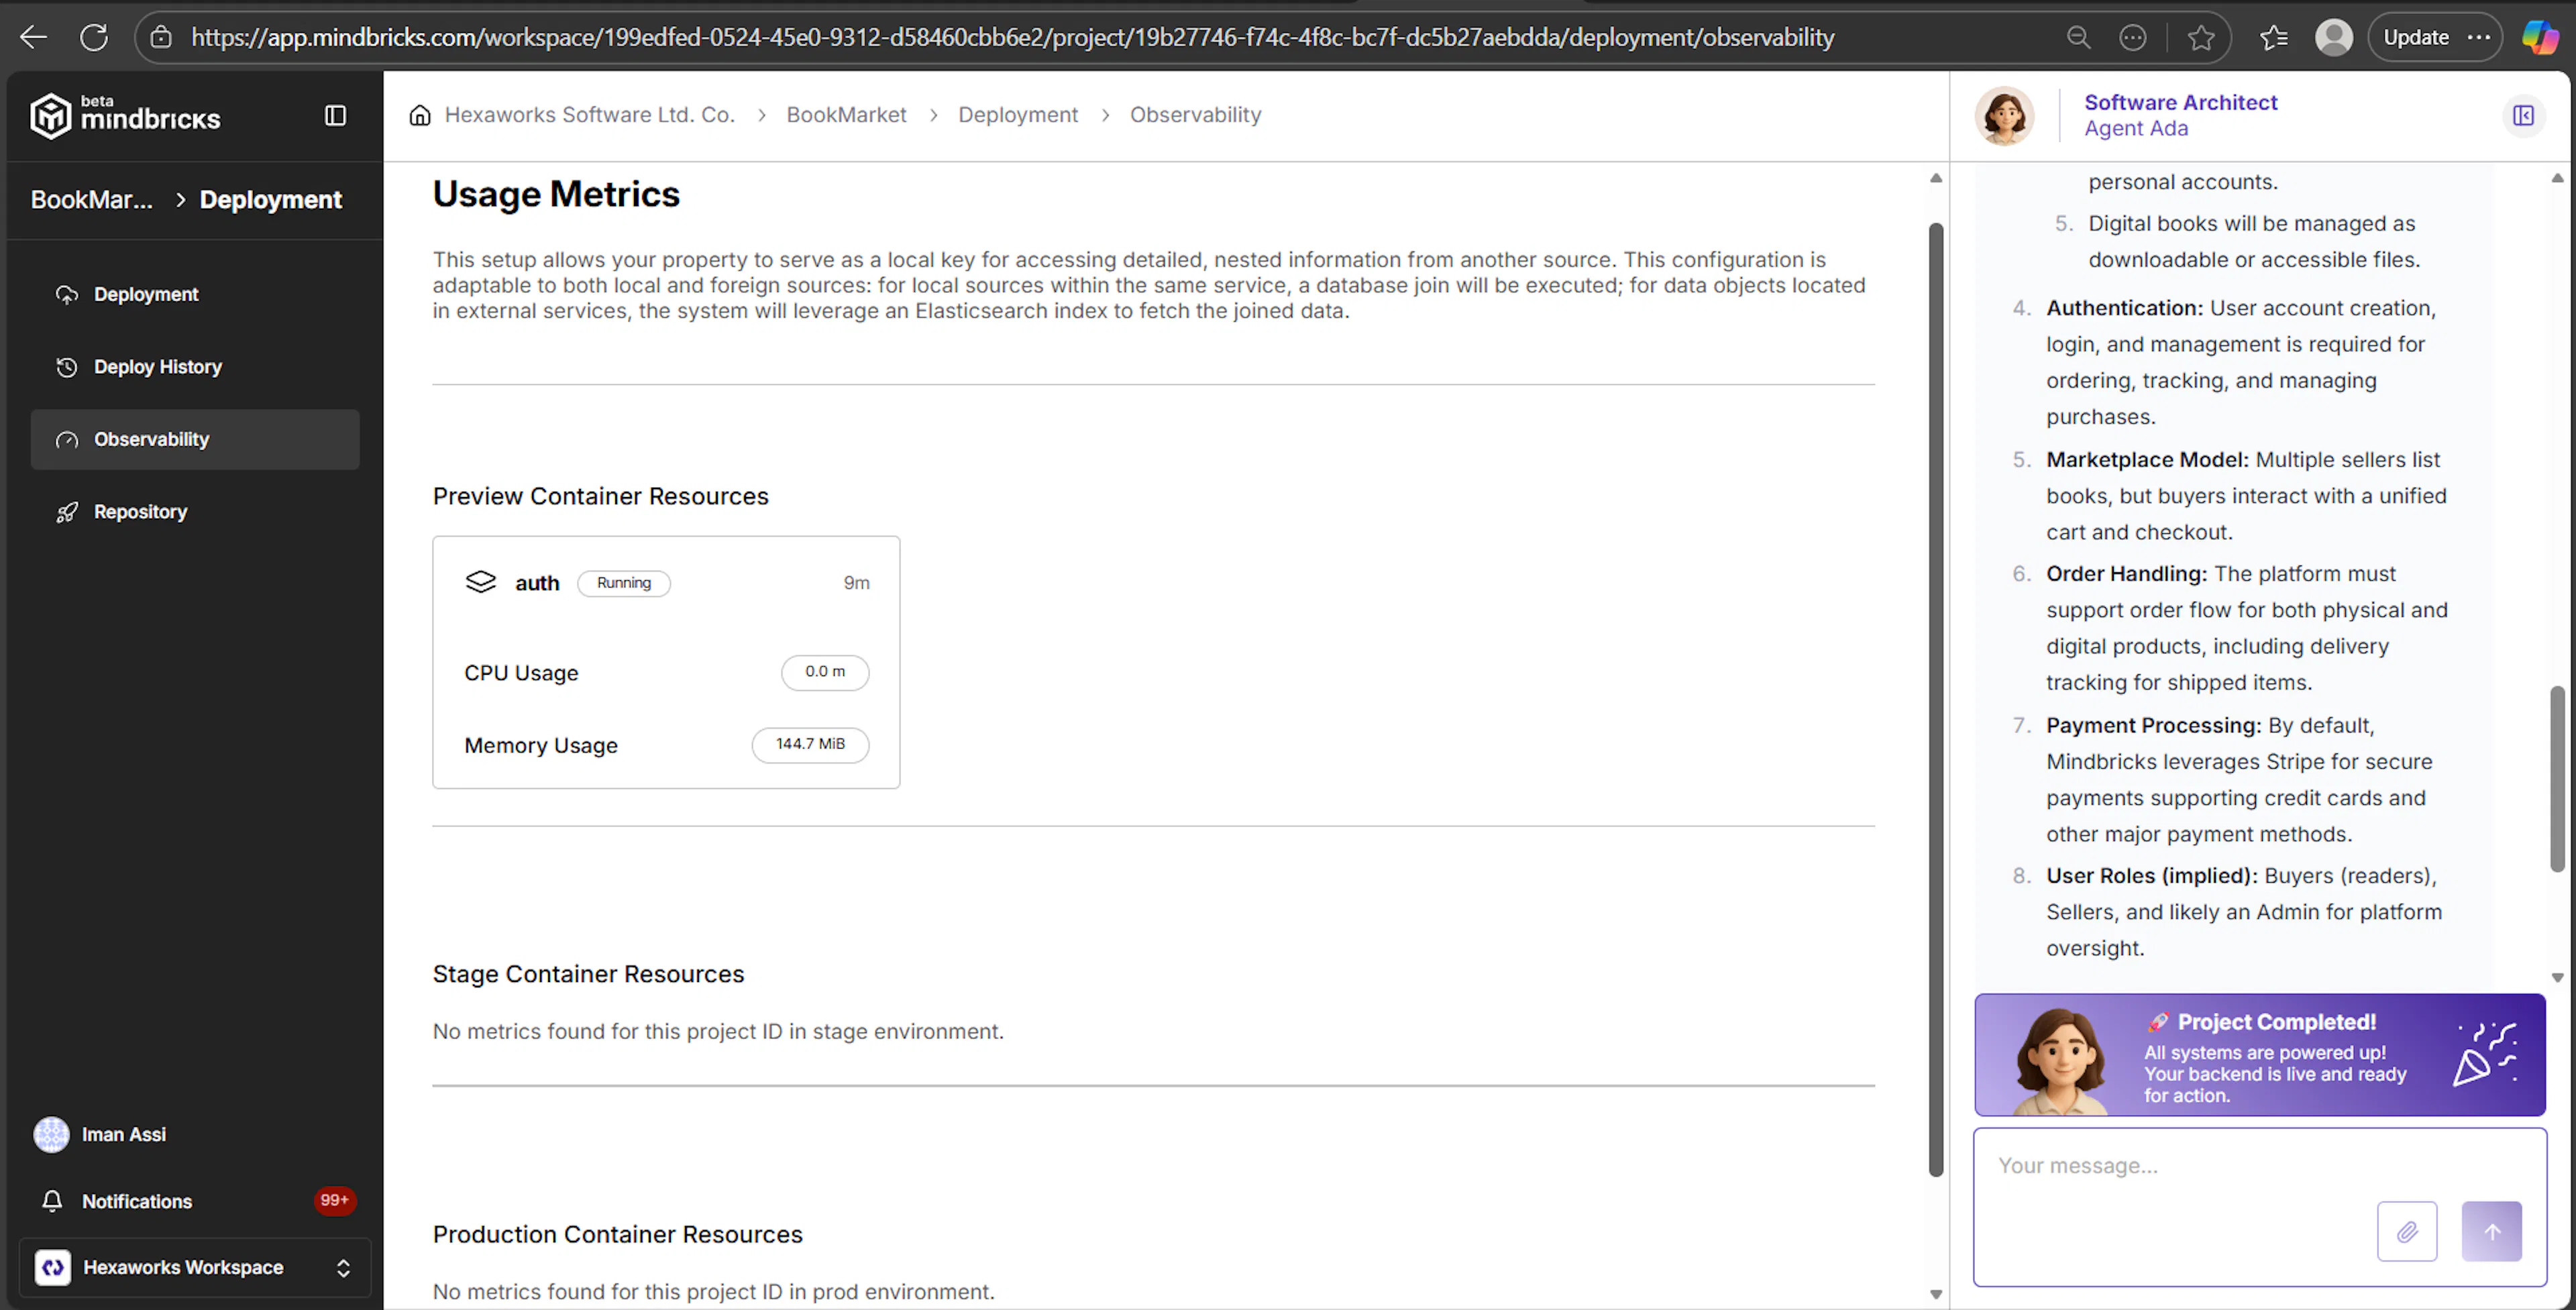
The Observability page provides runtime visibility into deployed environments.
It displays container-level metrics for:
-
Preview environment
-
Stage environment
-
Production environment
Typical metrics include:
-
CPU usage
-
Memory usage
-
Resource availability
If no deployments are running, metrics may not be available yet.
Deployments → Repository
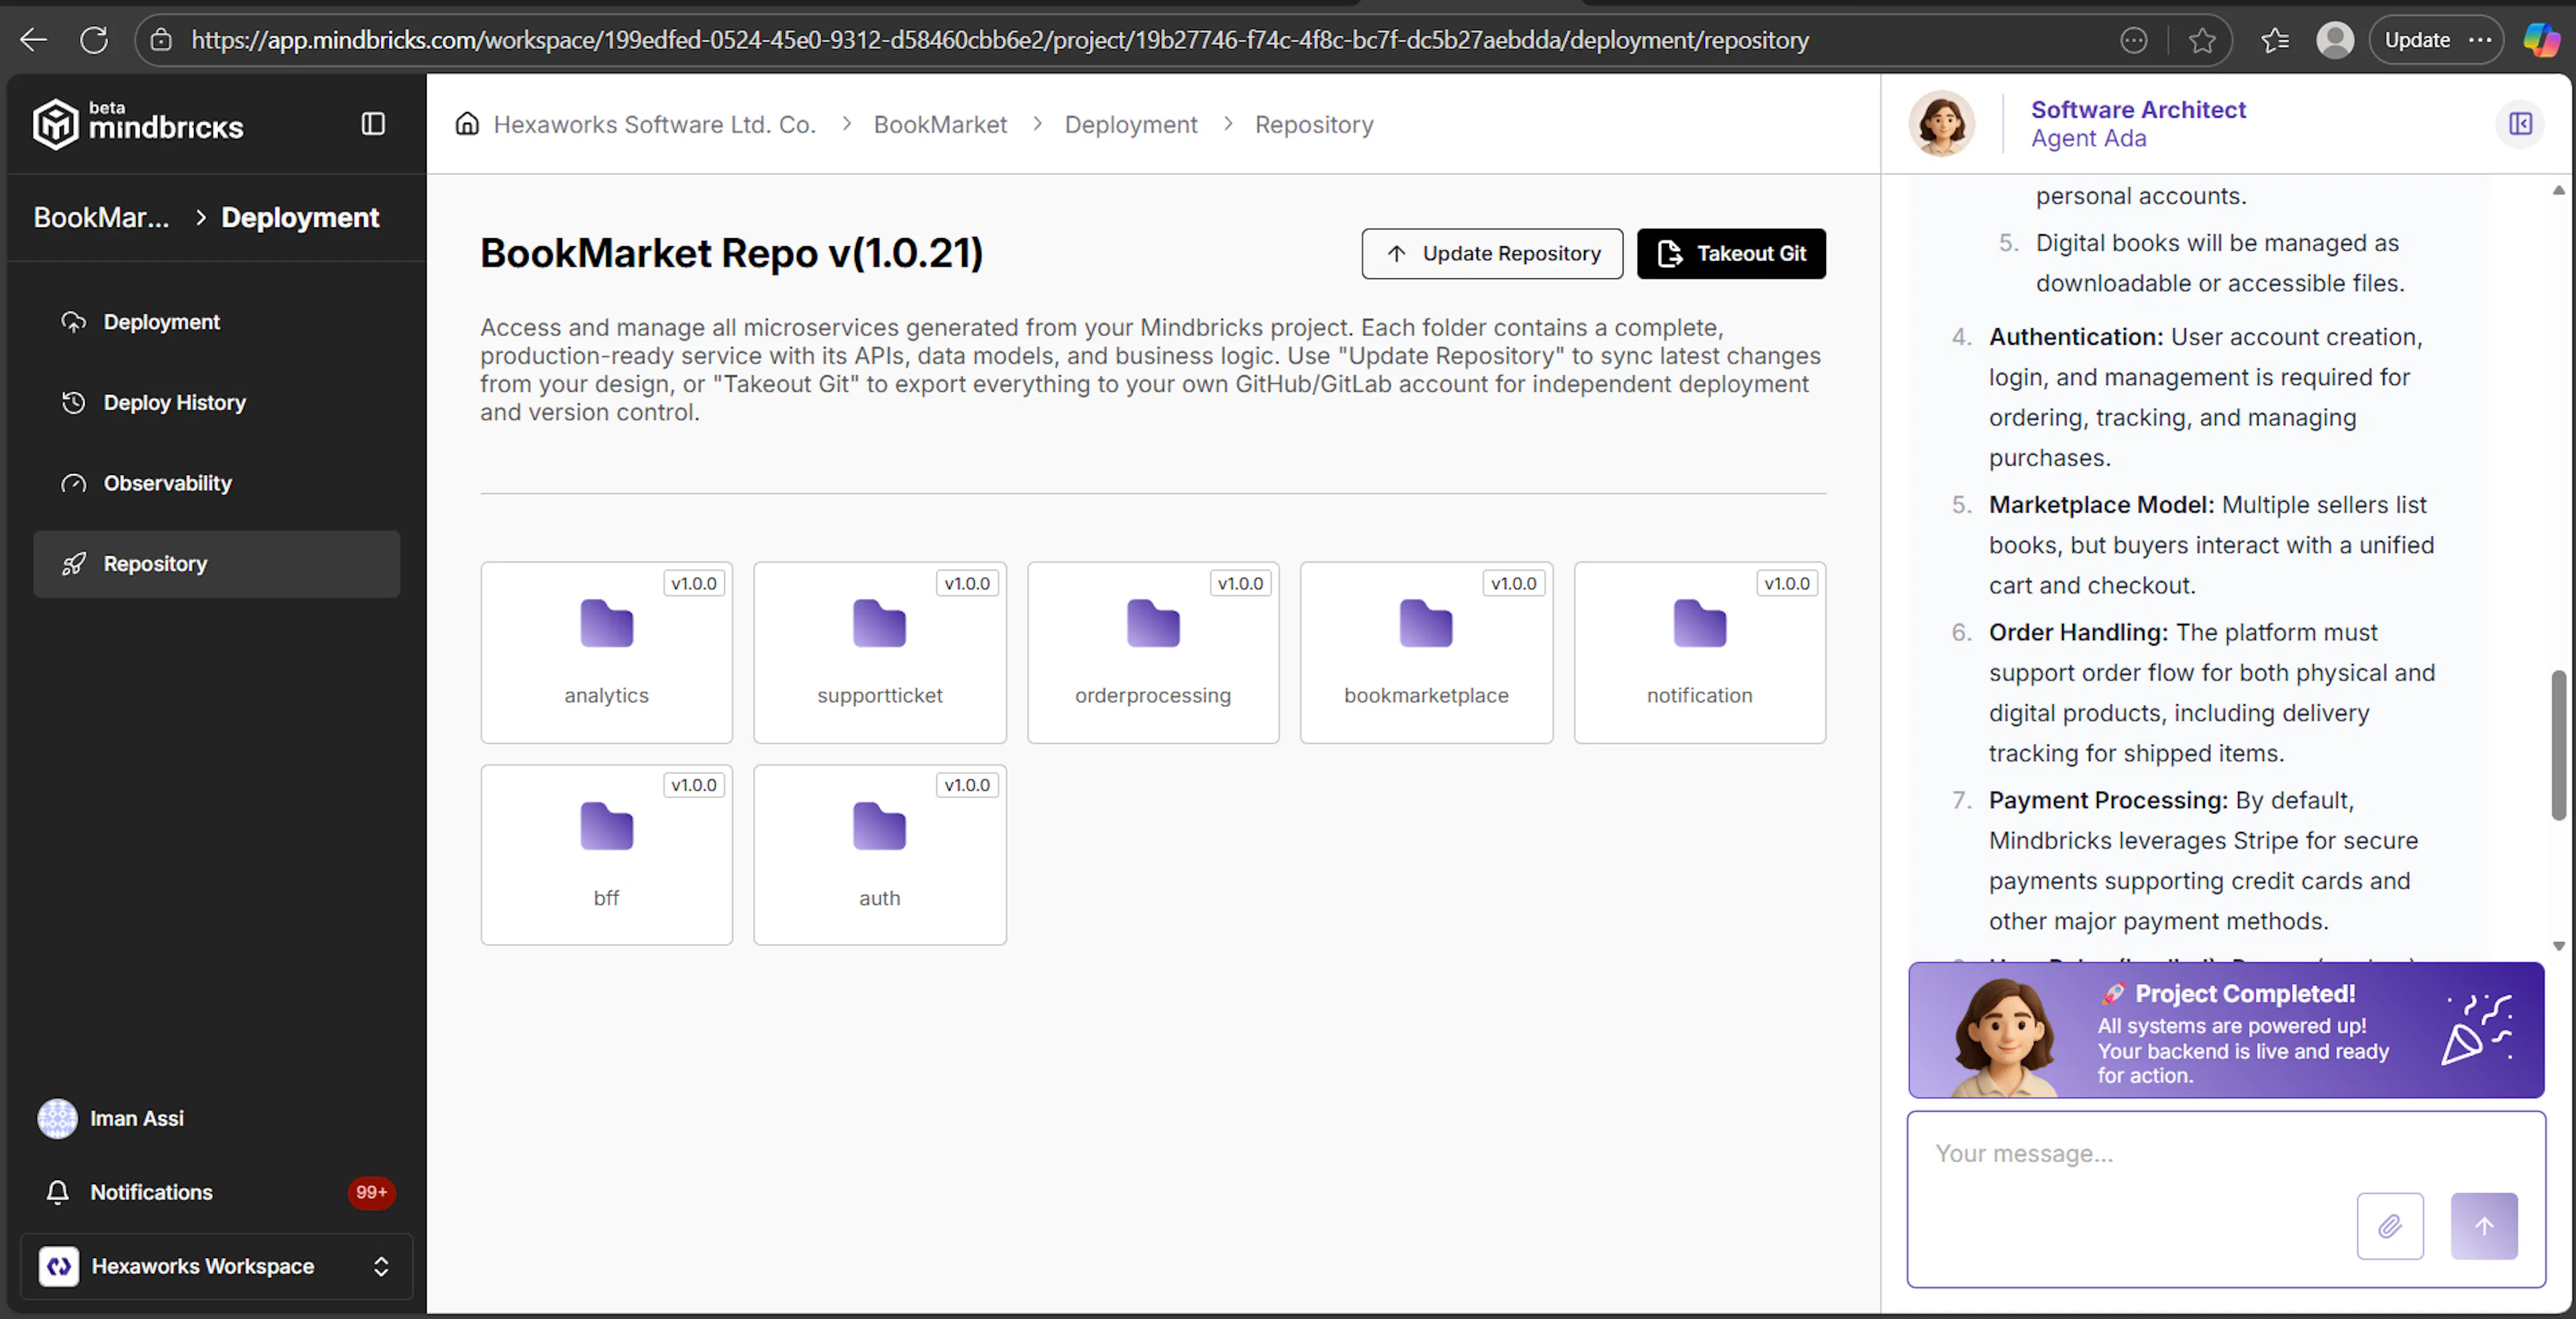
The Repository page provides access to the generated project source code.
What you see
-
A versioned repository (e.g.
v1.0.x) -
One folder per microservice
-
Each folder contains production-ready code
Available Actions
-
Update Repository – sync latest design changes into the repository
-
Takeout Git – export the full repository to your own GitHub or GitLab account
This allows you to:
-
Continue development outside Mindbricks
-
Use your own CI/CD pipelines
-
Deploy independently if needed
5. Subscription Plan
Mindbricks uses a workspace-based subscription model.
Each workspace has its own subscription, limits, billing lifecycle, and usage tracking.
Important rule
✅ The first workspace created for a user is always Free
💳 All additional workspaces require selecting a paid subscription plan
Default Subscription Behavior
First Workspace (Free by default)
When you create your Mindbricks account:
-
A personal workspace is automatically created
-
This workspace is assigned the Free plan
-
No payment is required
The Free plan includes predefined limits such as:
-
Code generation (LOC)
-
AI credits
-
Seat count
-
Integrations
-
Deployment availability
-
Monitoring and documentation access
These limits are enforced immediately and apply across all projects in the workspace.
Additional Workspaces (Paid required)
When you create any additional workspace:
-
The workspace does not start with a Free plan
-
You must select and activate a paid subscription
-
Access is limited until a plan is chosen
This ensures:
-
One Free workspace per user
-
Clear separation of billing per organization
-
Predictable usage and cost control
Subscription Plan → Overview
What this screen is for
The Subscription Plan Overview page shows:
-
Your current subscription plan
-
Available upgrade options
-
Feature and quota summaries
-
Billing cycle information
This page is the main entry point for managing subscriptions.
Subscription Plan → Compare Plans
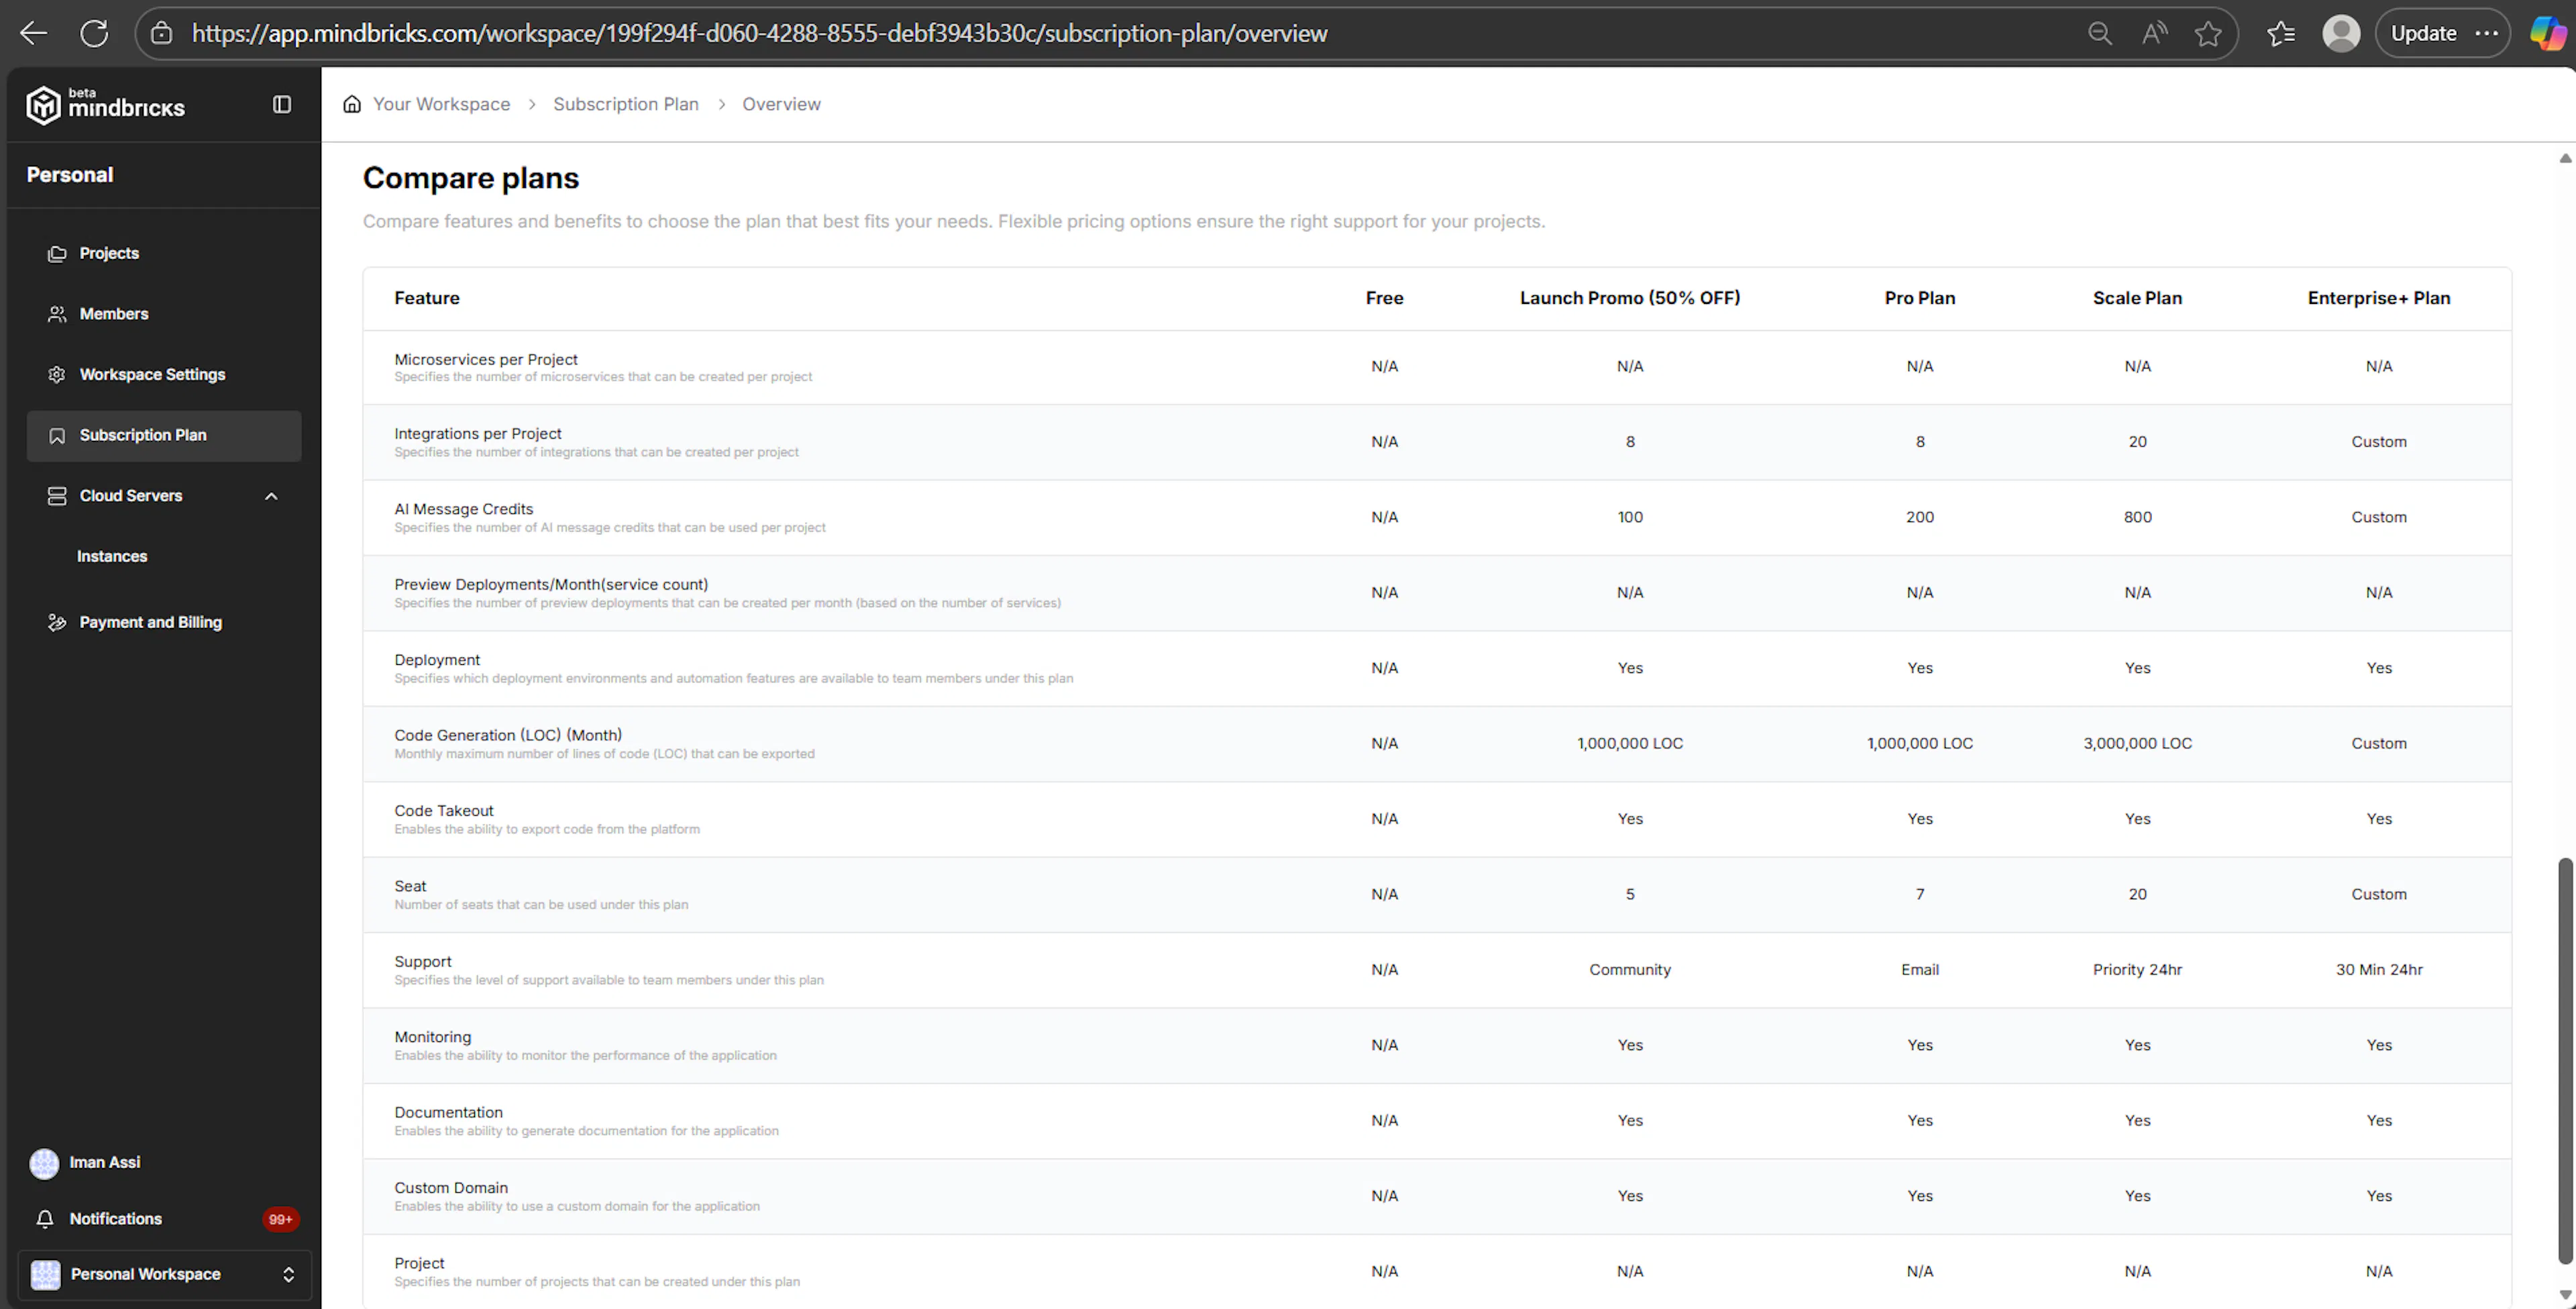
What this section is for
The Compare Plans table helps you understand the differences between subscription tiers before upgrading.
It compares:
-
Free
-
Launch Promo (50% OFF)
-
Pro
-
Scale
-
Enterprise+
Compared features include
-
Integrations per project
-
AI message credits
-
Code generation (LOC per month)
-
Deployment availability
-
Code takeout
-
Seat limits
-
Support level
-
Monitoring and documentation
-
Custom domain usage
-
Project capacity
Values may be numeric, Yes / No, N/A, or Custom.
This table is informational and does not trigger billing actions.
Available Subscription Plans
Mindbricks offers multiple subscription plans designed to support different usage levels — from individual experimentation to enterprise-scale production systems.
Each plan defines feature availability, usage quotas, and support level for the workspace.
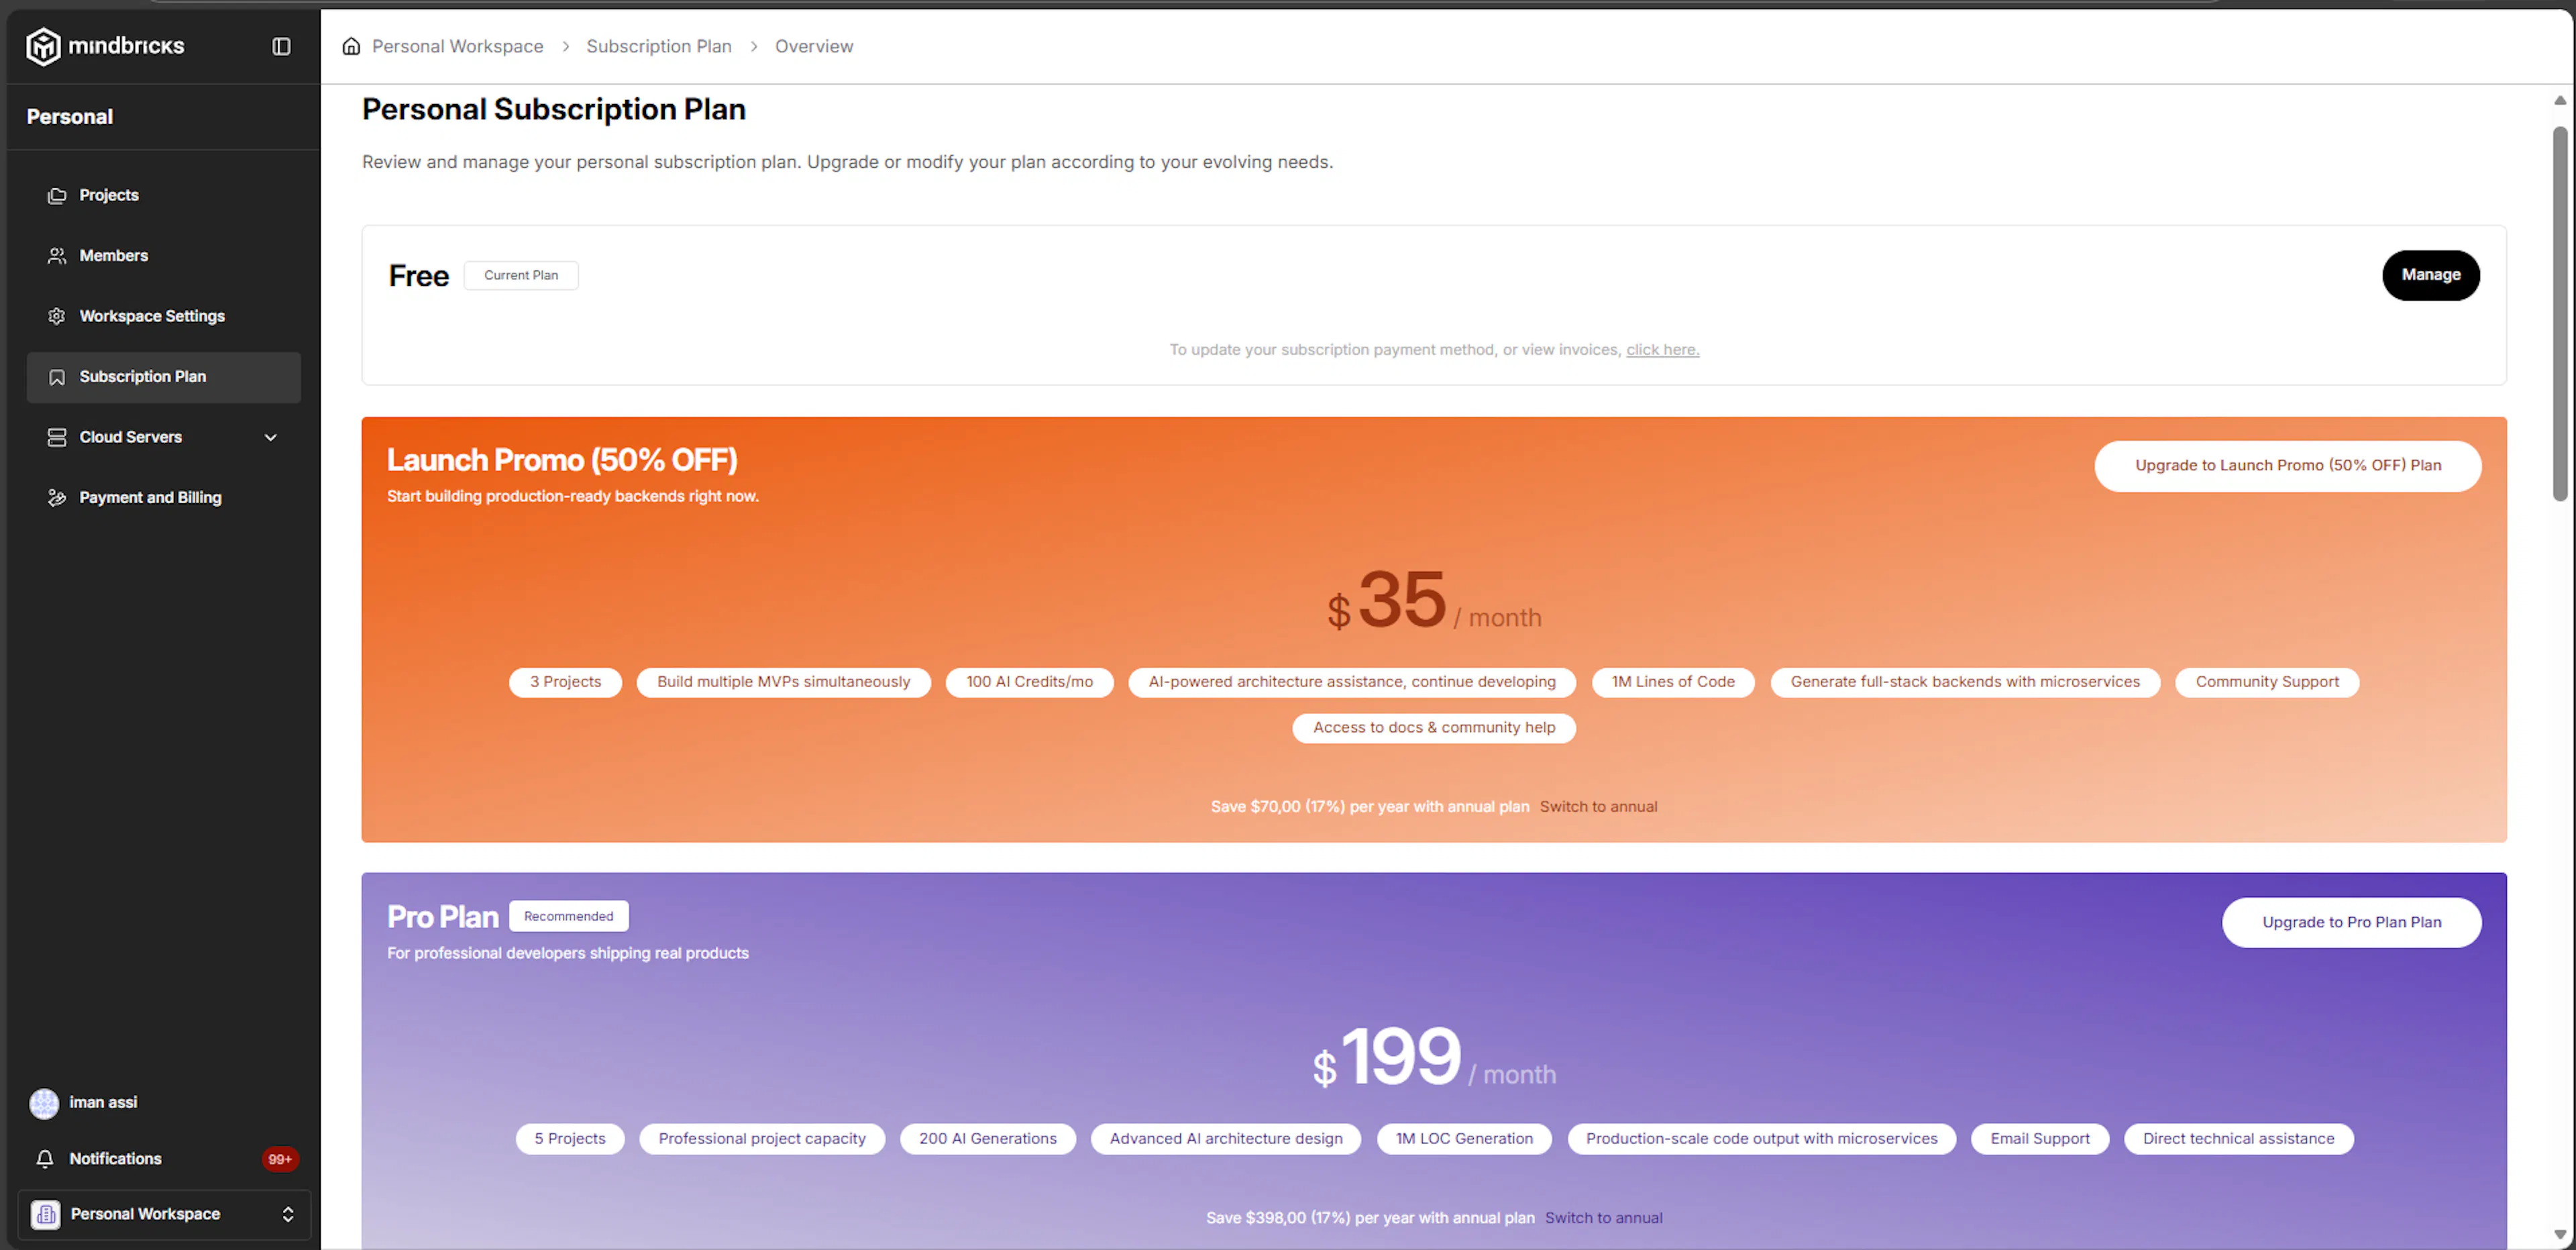
Free Plan
Best for individuals and hobbyists getting started
- Price: Free
- Billing: No payment required
- Intended use: Personal experimentation and learning
Included capabilities
- Limited code generation (LOC)
- Limited AI credits
- Single seat
- Basic integrations
- No deployment or code takeout
- Community support
- Monitoring and documentation access (limited)
This plan is automatically assigned to the first workspace created by a user.
Launch Promo (50% OFF)
Best for early-stage builders and MVP development
- Price: $35 / month
- Billing: Monthly (promo pricing)
- Intended use: MVPs, early production testing, small teams
Included capabilities
- Multiple projects per workspace
- Increased AI credits
- AI-powered architecture assistance
- Up to 1,000,000 LOC per month
- Full backend generation with microservices
- Documentation and monitoring enabled
- Community support
This plan is often the first upgrade from the Free plan.
Pro Plan
Best for professional developers shipping real products
- Price: $199 / month
- Billing: Monthly or annual
- Intended use: Production-ready applications and growing teams
Included capabilities
- Higher project capacity
- Increased AI generations
- Advanced AI architecture design
- Up to 1,000,000 LOC per month
- Production-scale microservice output
- Email support
- Direct technical assistance
This plan is recommended for teams actively building and maintaining live systems.
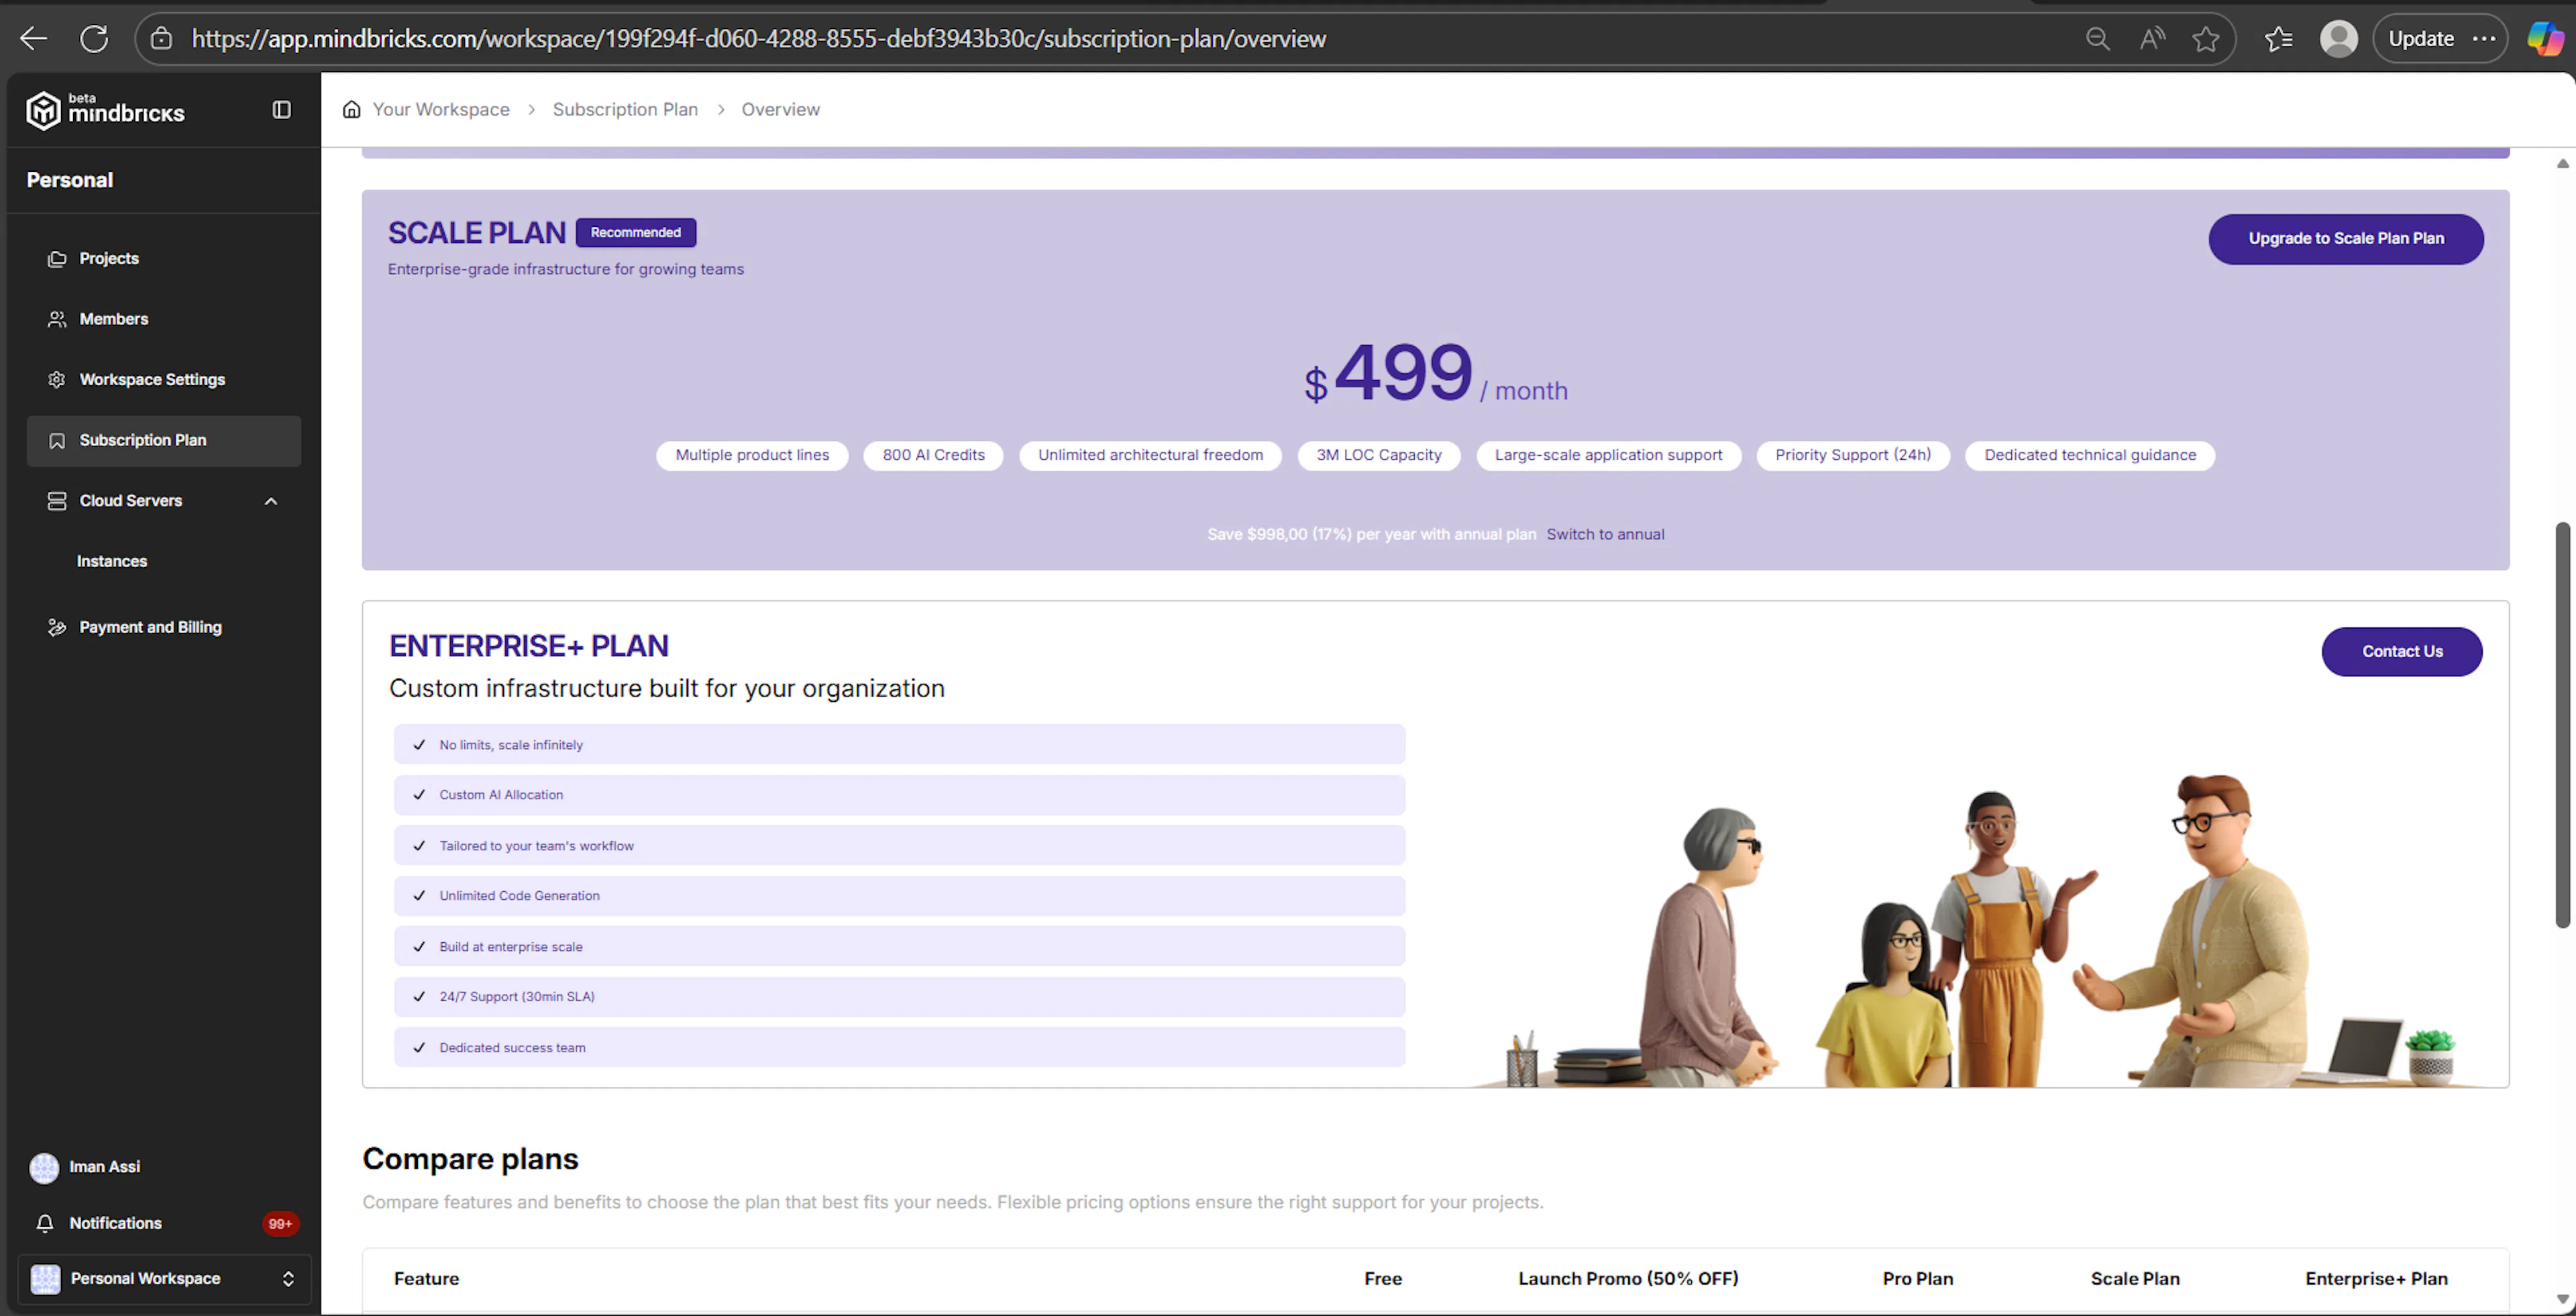
Scale Plan
Best for growing teams and complex systems
- Price: $499 / month
- Billing: Monthly or annual
- Intended use: Large applications and multi-product platforms
Included capabilities
- Multiple product lines
- High AI credit limits
- Unlimited architectural flexibility
- Up to 3,000,000 LOC per month
- Large-scale application support
- Priority support (24h response)
- Dedicated technical guidance
This plan is designed for teams scaling both usage and complexity.
Enterprise+ Plan
Custom infrastructure for organizations with advanced needs
- Price: Custom
- Billing: Contract-based
- Intended use: Enterprise-grade deployments and custom workflows
Included capabilities
- No predefined limits
- Custom AI and LOC allocations
- Tailored workflows and integrations
- Unlimited code generation
- Enterprise-scale infrastructure
- 24/7 support with SLA
- Dedicated success and technical teams
Enterprise+ plans are configured through direct contact with the Mindbricks team.
Notes on Plan Selection
- Only one subscription plan can be active per workspace
- Upgrading applies immediately after successful payment
- Downgrades take effect at the next billing cycle
- Feature availability and quotas are enforced automatically
- Add-on packages can be purchased separately to extend limits
Subscription Plan → Upgrade Flow
Starting an upgrade
When you click Upgrade on a paid plan:
-
A checkout session is created
-
The subscription enters a waiting state
-
You are redirected to the payment page
No plan limits change at this stage.
Payment success

If payment is successful:
-
The subscription becomes active
-
The selected plan is applied immediately
-
New feature limits take effect
-
Usage counters reset according to the new plan
A confirmation screen is shown before returning to the app.
Payment failure or cancellation
If payment fails or is canceled:
-
The subscription remains unchanged
-
No limits are modified
-
You can retry the upgrade at any time
The system does not partially apply upgrades.
Subscription Plan → Current Plan View
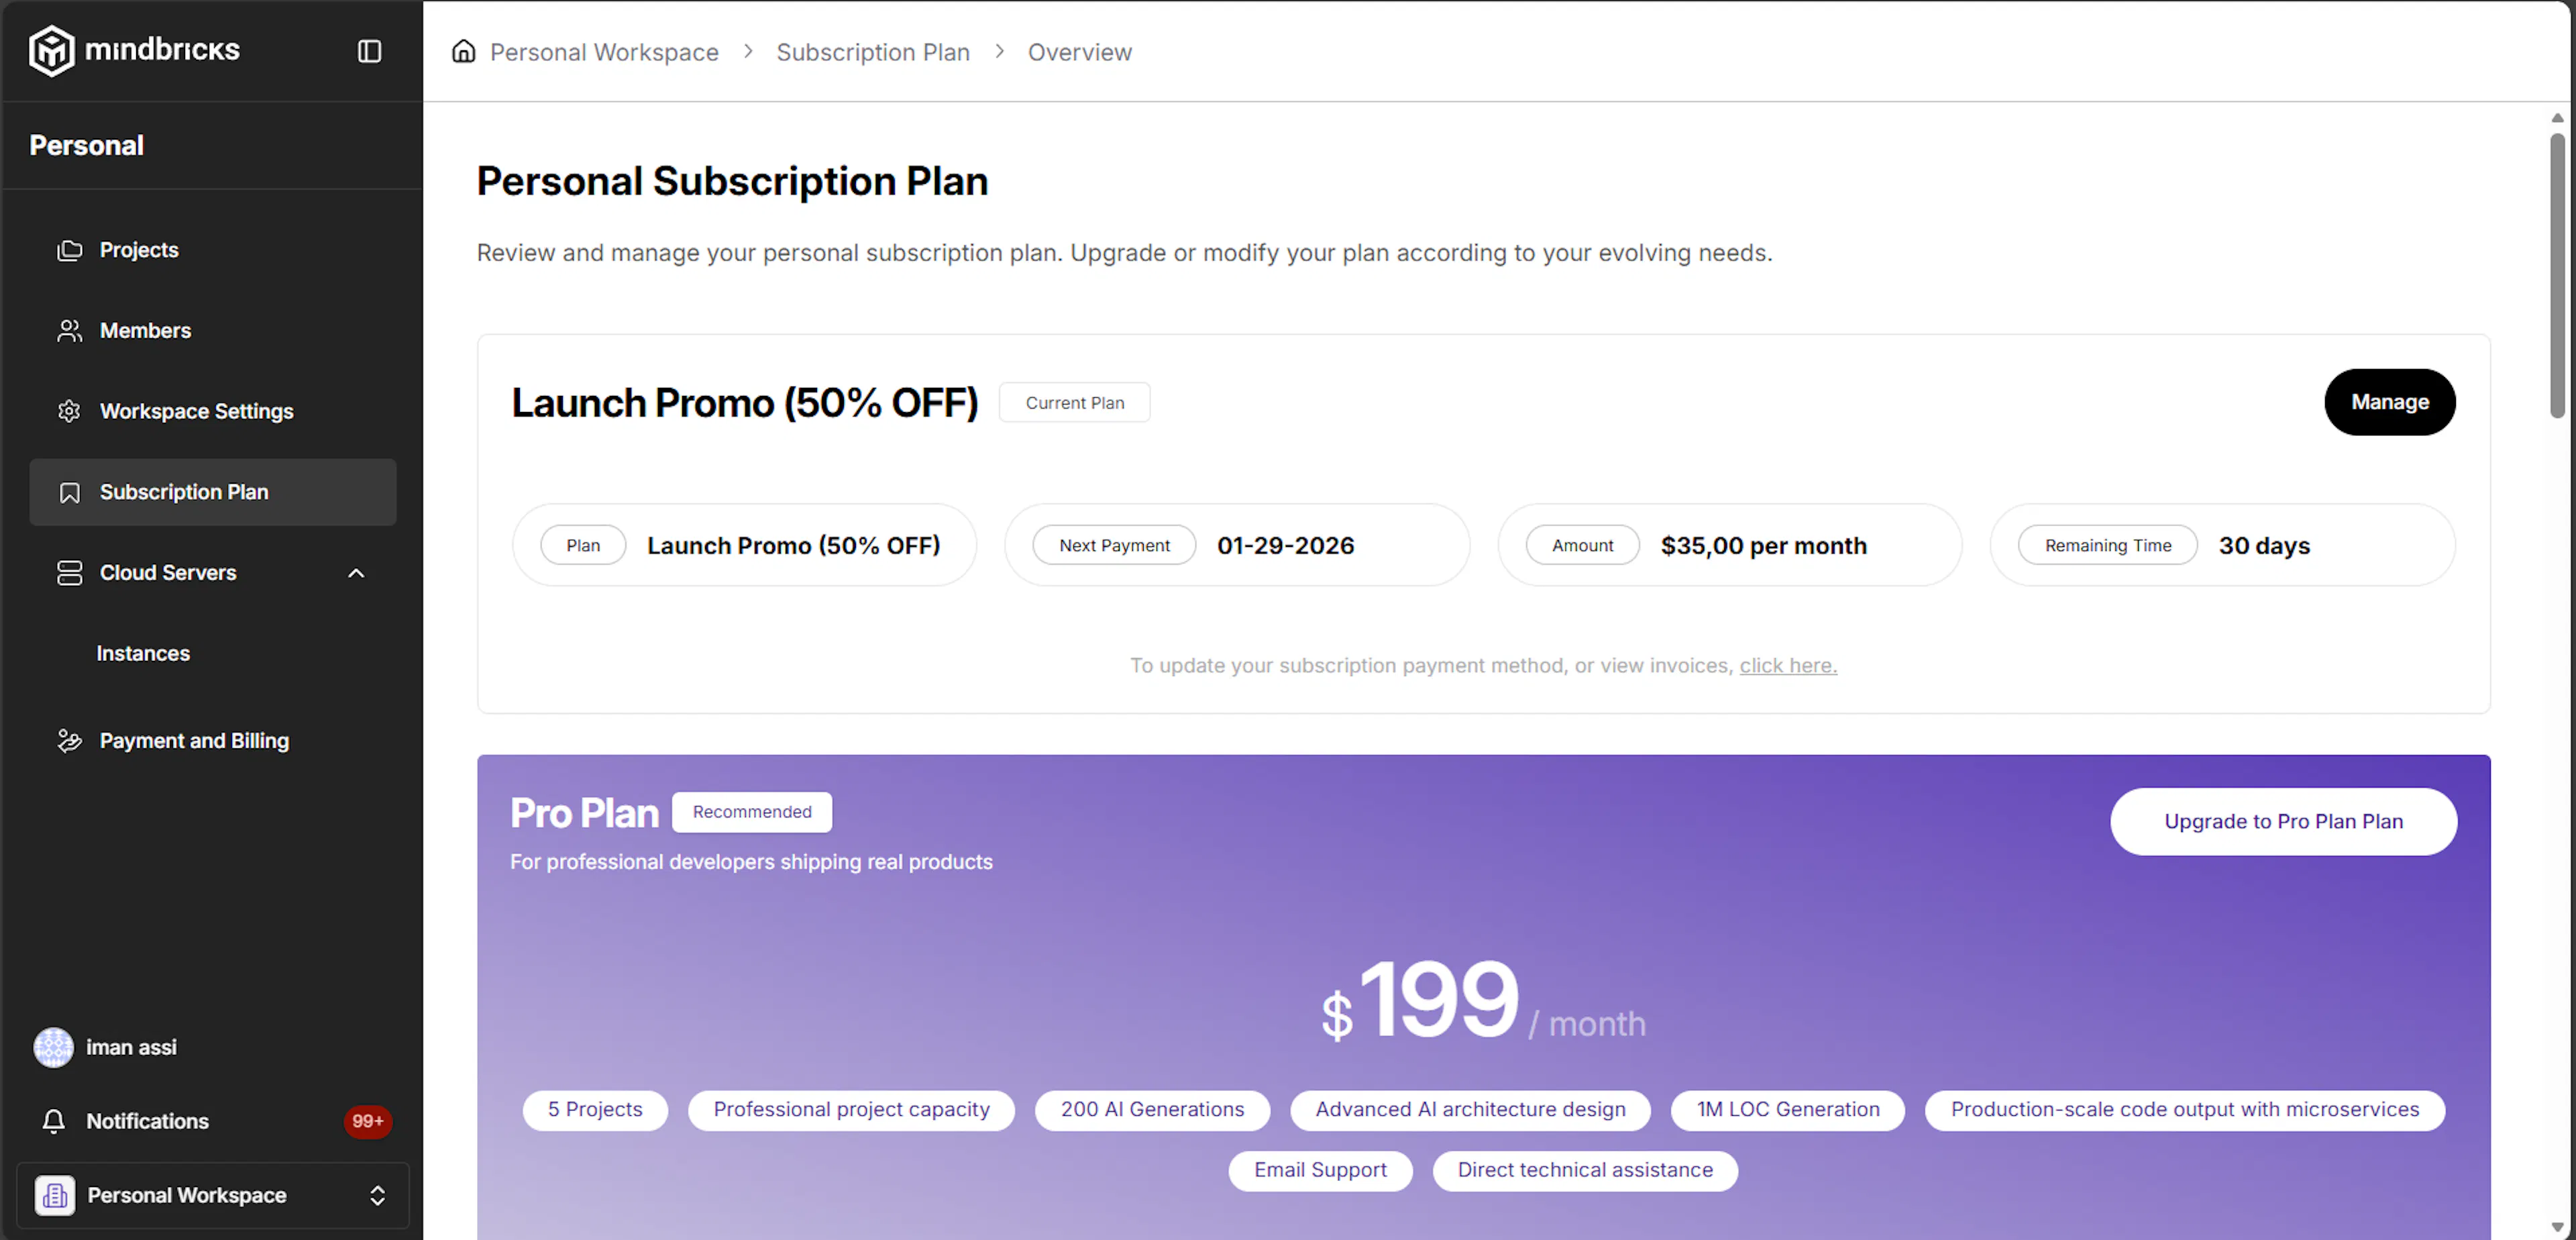
What this screen shows
After activation, the overview displays:
-
Active plan name
-
Next payment date
-
Monthly charge
-
Remaining time in the billing cycle
This reflects the currently active subscription for the workspace.
Subscription Plan → Plan Management
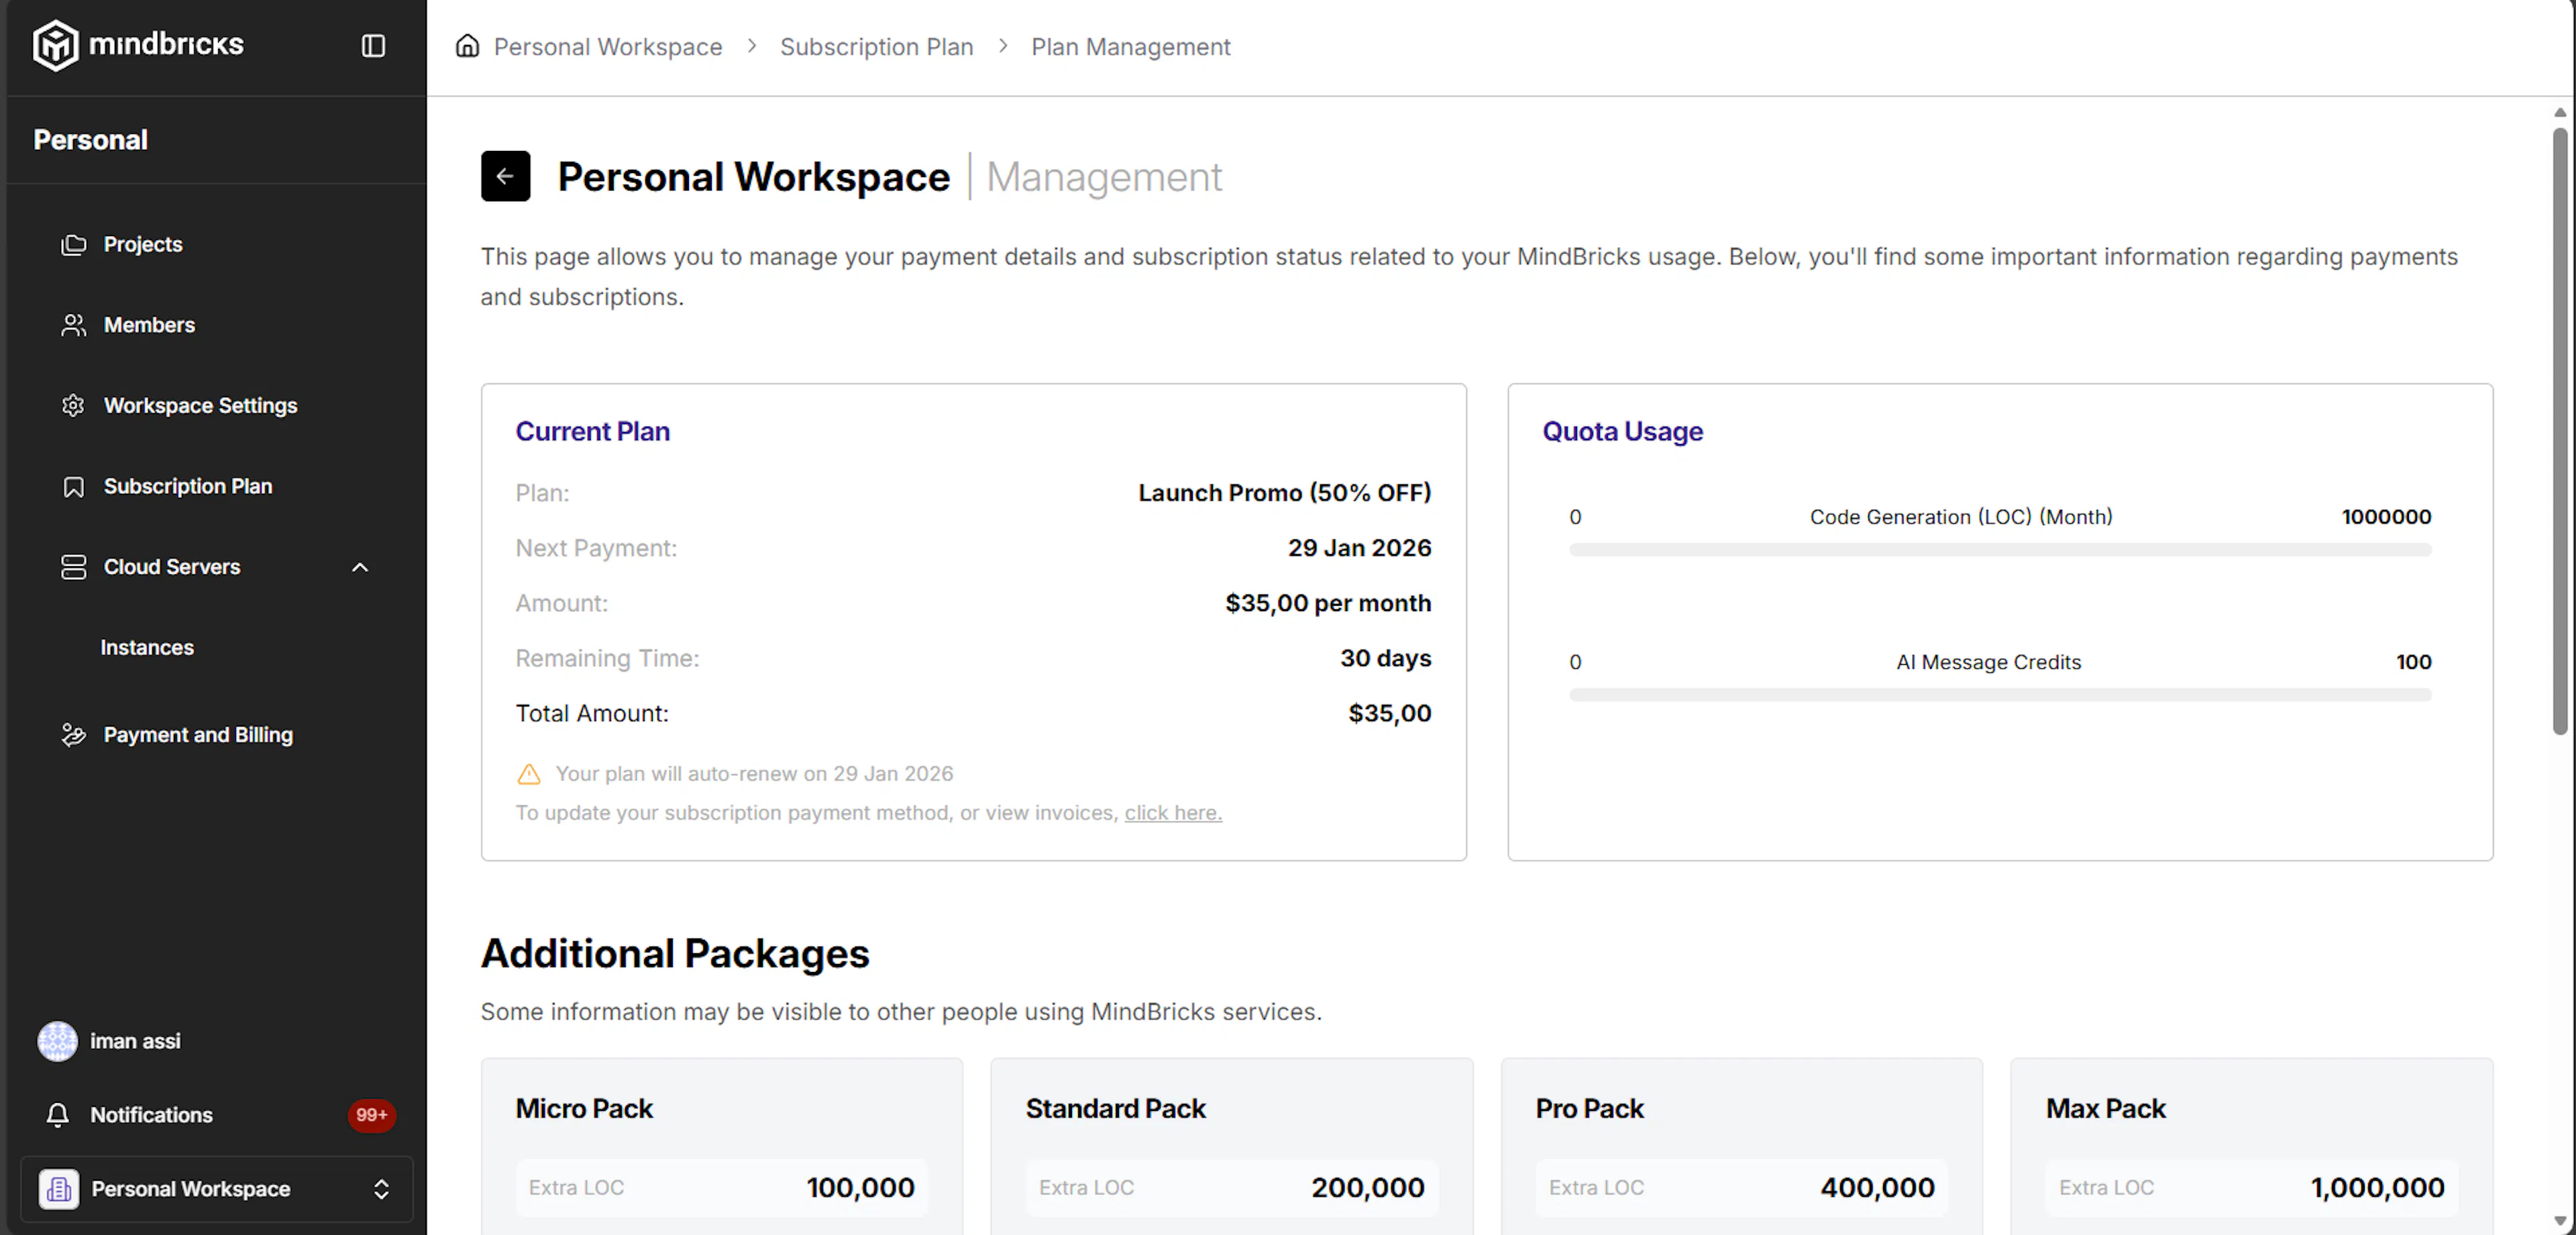
What this screen is for
The Plan Management page provides detailed operational insight into:
-
Subscription status
-
Usage quotas
-
Additional packages
-
Remaining limits
This page focuses on usage and control, not plan comparison.
Quota Usage
What this section shows
Quota Usage visualizes how much of your plan limits you have consumed.
Common quotas include:
-
Code Generation (LOC per month)
-
AI message credits
Usage updates in real time and resets based on the billing cycle.
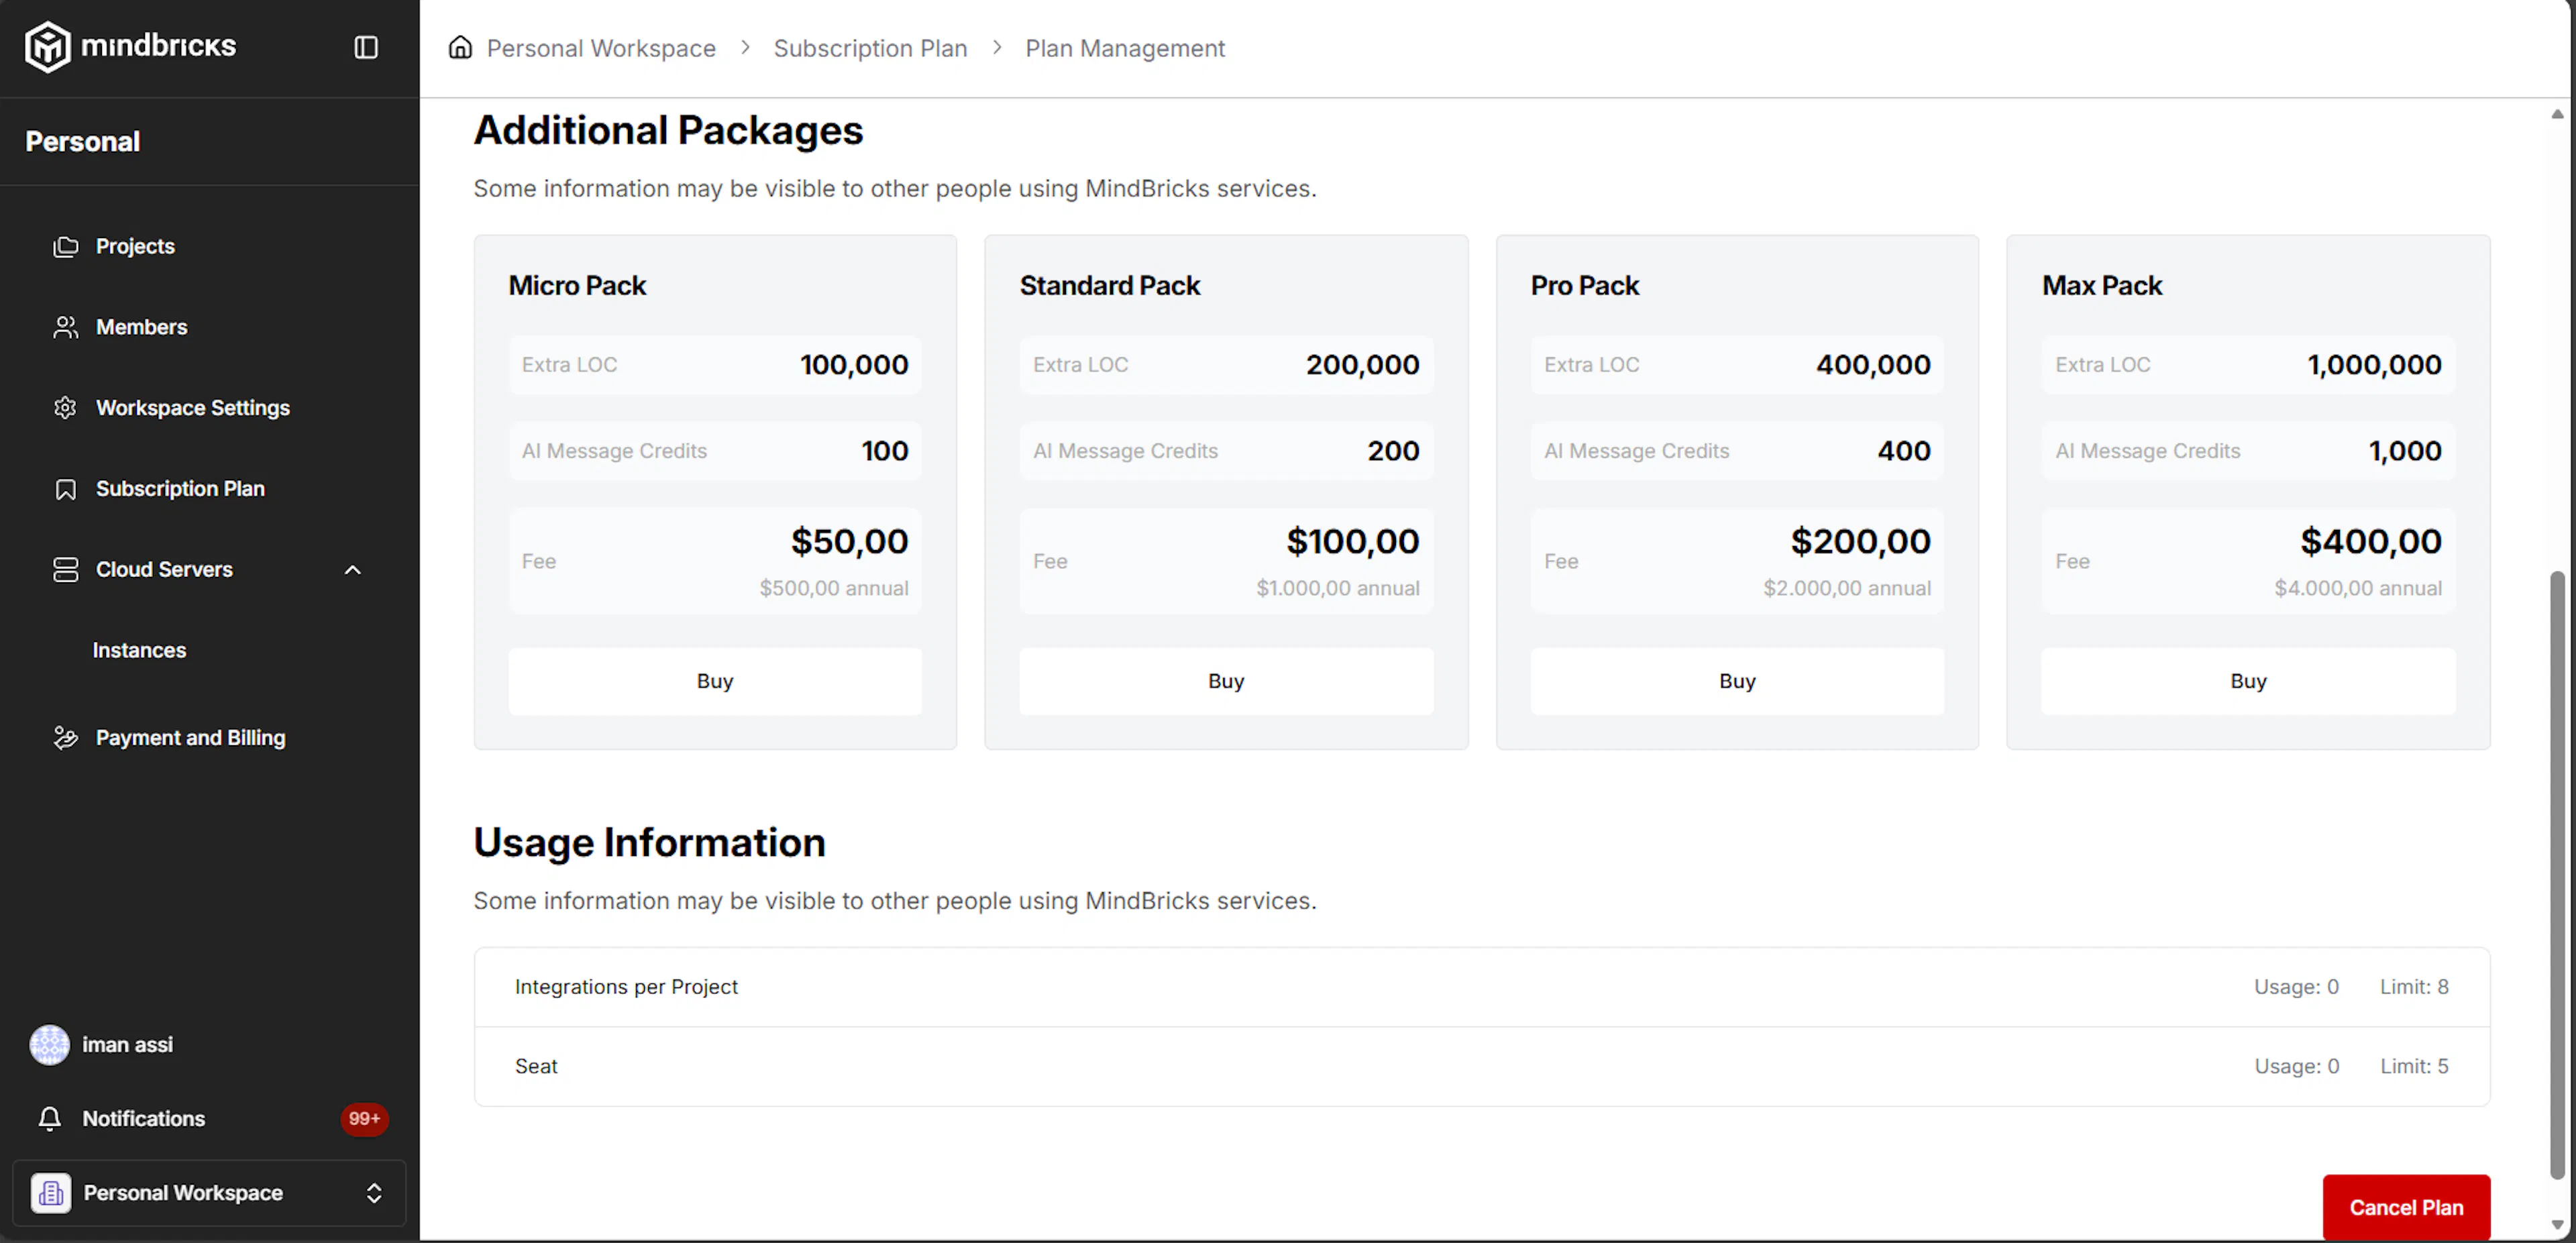
Additional Packages
What this section is for
Additional Packages allow you to extend your plan limits without changing your base subscription.
Examples include:
-
Extra LOC packs
-
Extra AI credit packs
Buying an add-on
When you purchase an add-on:
-
Payment is processed immediately
-
The quota is added to your workspace
-
The base plan remains unchanged
Add-ons stack and apply to the current billing period.
Usage Information
What this section shows
Usage Information provides detailed breakdowns such as:
-
Integrations per project
-
Seat usage
-
Other plan-specific limits
This helps you monitor consumption and avoid hitting limits.
6. Cloud Servers
The Cloud Servers section allows you to create and manage compute infrastructure for your workspace.
These servers are used to run deployments, services, and runtime workloads created in Mindbricks.
Cloud servers are workspace-level resources and are billed separately from subscription plans.
Viewing Available Instances

The Instances page displays all available worker group configurations.
Each worker group represents a predefined server type with:
-
CPU core count
-
Memory (RAM)
-
Disk storage
-
Hourly pricing
You can review and compare configurations before creating a server.
Buying an Instance
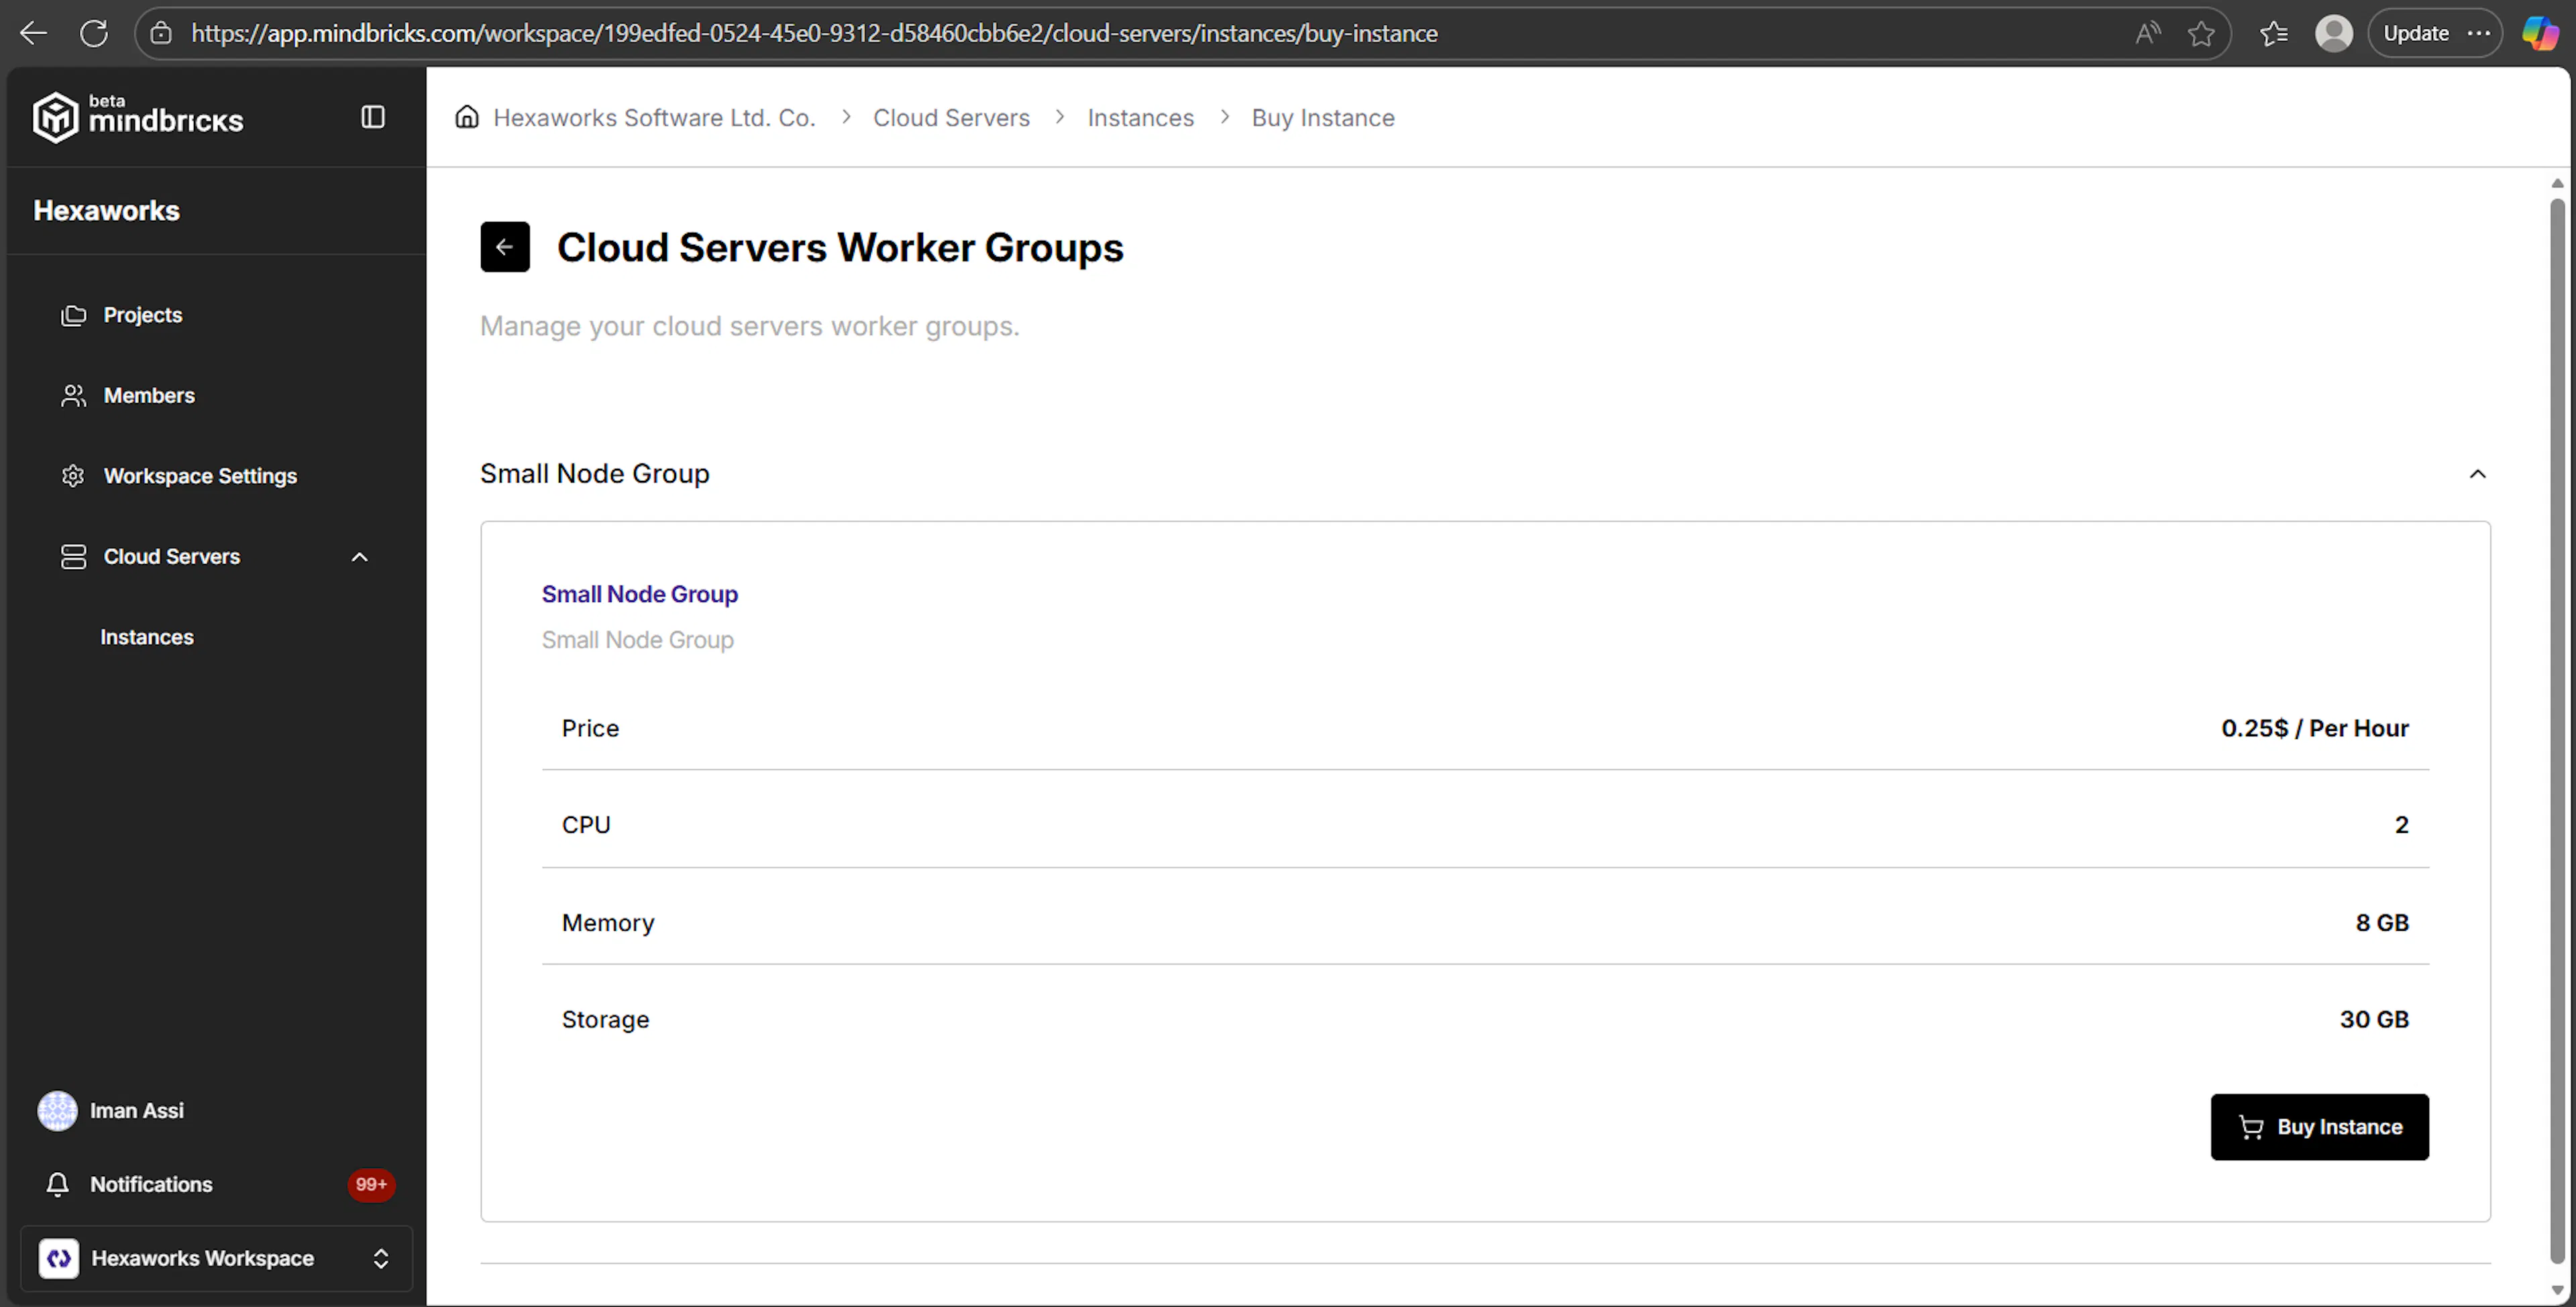
When you click Buy Instance, you choose the worker group that best fits your workload.
Each option shows:
-
Price (billed hourly)
-
CPU
-
Memory
-
Storage
This allows you to balance performance and cost based on expected traffic and usage.
Creating a Cloud Server
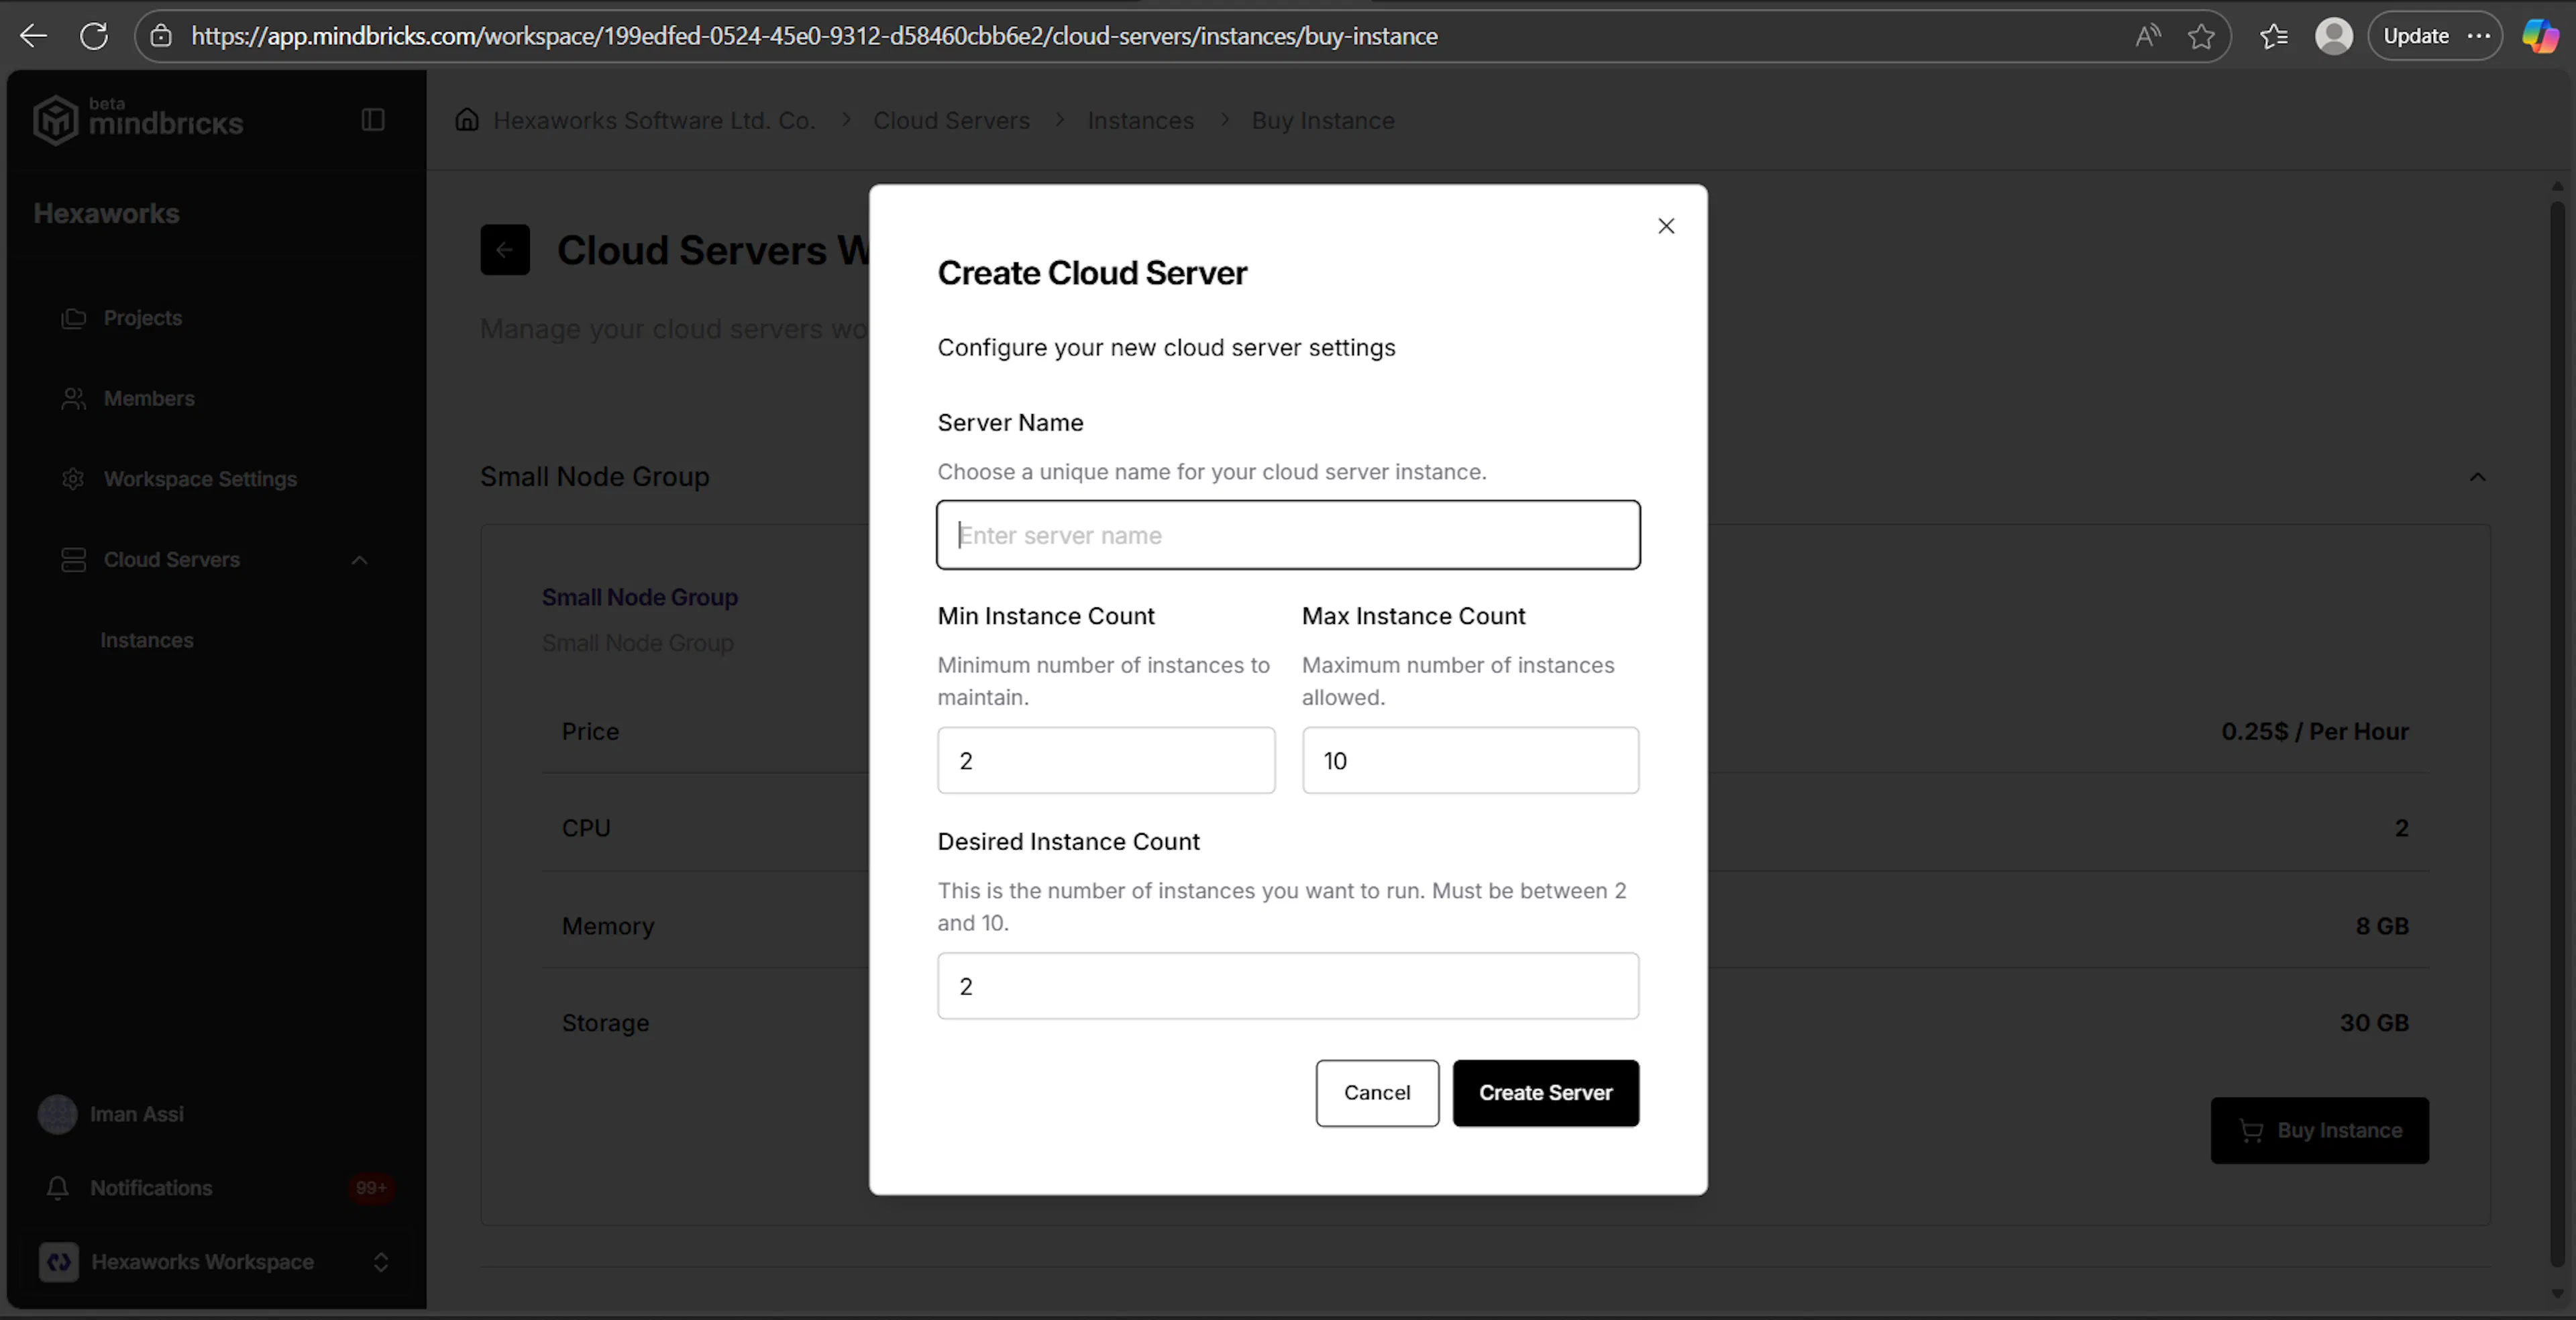
After selecting a worker group, you configure how the server will run.
Configuration Fields
Server Name
A unique identifier for the server inside the workspace.
Min Instance Count
The minimum number of instances that must always stay running.
Max Instance Count
The maximum number of instances the server can scale up to.
Desired Instance Count
The number of instances to start immediately.
These values define the scaling behavior of the server.
Example Configuration
-
Min Instances:
2 -
Max Instances:
10 -
Desired Instances:
2
This ensures baseline availability while allowing automatic scaling when load increases.
Payment & Setup
When creating a cloud server for the first time, a one-time setup fee is required.
This fee covers:
-
Initial provisioning
-
Infrastructure configuration
-
Runtime preparation
After payment is completed, the server setup begins automatically.
Server Provisioning Status
Once payment is successful:
-
The server enters a Pending state
-
Infrastructure provisioning runs in the background
-
Status updates appear in the interface
When provisioning completes, the server becomes Active and ready for deployments.
Managing Cloud Server Details
Each cloud server has a dedicated Instance Details page.
Here you can view:
-
Server status (Pending / Active)
-
Worker group type
-
Hourly pricing
-
CPU, memory, and storage information
Scaling the Server
The Scale Worker Group section allows you to adjust capacity at any time.
You can change:
-
Minimum instance count
-
Desired instance count
-
Maximum instance count
Scaling changes apply dynamically and control how the server responds to traffic and workload changes.
Budget & Usage Alerts
Cloud servers include budget and usage monitoring.
You can configure:
-
Monthly usage alert thresholds
-
Budget warnings
-
Visual indicators as usage approaches limits
These tools help prevent unexpected infrastructure costs.
Metrics & Monitoring
Each cloud server provides real-time metrics, including:
-
CPU usage percentage
-
Memory usage percentage
-
Network traffic (in / out)
-
Instance-level activity
These metrics help you understand performance and scaling needs before and after deployment.
Deployed Projects & Services
When services are deployed to a cloud server, you can see:
-
Which projects are running on the server
-
Which services belong to each project
-
Runtime status of deployed services
This gives clear visibility into what is running where.
7. Payment & Billing

The Payment & Billing section provides visibility into all financial activity related to your workspace.
From this page, you can review invoices generated from:
-
Subscription plans
-
Cloud server setup fees
-
Usage-based charges (e.g. hourly instances)
Payment & Billing → Invoices
The Invoices page lists all billing invoices associated with the current workspace.
What you see on this page
-
A list of generated invoices (when available)
-
Invoice records are grouped per workspace
-
Each invoice represents a completed billing event
If no billing activity has occurred yet, the page displays an empty state.
No Invoices Found
When the workspace has not yet generated any invoices, you will see:
No invoices found
This typically means:
-
You are using only the Free plan
-
No cloud servers have been created yet
-
No paid subscription or usage-based charges have occurred
Invoices will automatically appear here once any billable action is completed.
What Happens When an Invoice Is Created
When billing activity occurs, this page will allow you to:
-
View invoice details
-
Track billing history over time
-
Access records for accounting or reporting purposes
Invoices are created automatically and require no manual action.
8. Profile & Account Management
The Profile section allows you to manage your personal account settings, security preferences, and workspaces.
You can access this section from the avatar menu in the sidebar.
Profile → Avatar Menu
When you click on your avatar in the sidebar, a quick-access menu opens.
What you see in this menu
-
Your name and email
-
Current active workspace
-
Shortcut to My Workspaces
-
Logout action
This menu helps you quickly understand where you are and switch context if needed.
Profile → Personal Information

Accessible by clicking the settings icon from the avatar menu.
This page allows you to update your basic profile details.
What you can manage
Basic Information
-
Profile avatar
-
Full name
-
Birthday
Contact Information
-
Email address
-
Phone number
How to apply changes
-
Edit the fields
-
Click Save
-
Changes are applied immediately to your account
Profile → Security

The Security page allows you to manage account protection and access.
Change Password
You can update your password by providing:
-
Current password
-
New password
-
Password confirmation
Passwords must meet platform security requirements.
Click Save to apply the change.
Archive Account
At the bottom of the page, you can archive your account.
Important notes
-
Archiving schedules account deletion within 30 days
-
All data will be permanently deleted unless restored
-
This action should be used with caution
Profile → Workspaces
The Workspaces page shows all workspaces you are a member of.
What you see
-
Workspace name
-
Number of projects
-
Number of members
-
Your role in each workspace (e.g. Owner)
-
Edit preferences for each workspace
From this page, you can switch, manage, or create workspaces.
Profile → Create New Workspace
Clicking New Workspace opens a configuration modal.
Workspace Creation Fields
-
Organization Name
-
Company Business Name
-
Description
-
Web Address
These fields define the identity of the new workspace.
How it works
-
Fill in the required fields
-
Click Save
-
A new workspace is created and added to your workspace list
-
You are assigned as the Owner
Each workspace has its own:
-
Projects
-
Members
-
Subscription plan
-
Cloud servers
-
Billing history
9. Notifications
The Notifications page displays all system messages, alerts, and activity updates related to your account and workspaces.
It helps you stay informed about important events without interrupting your workflow.
Notifications → Overview
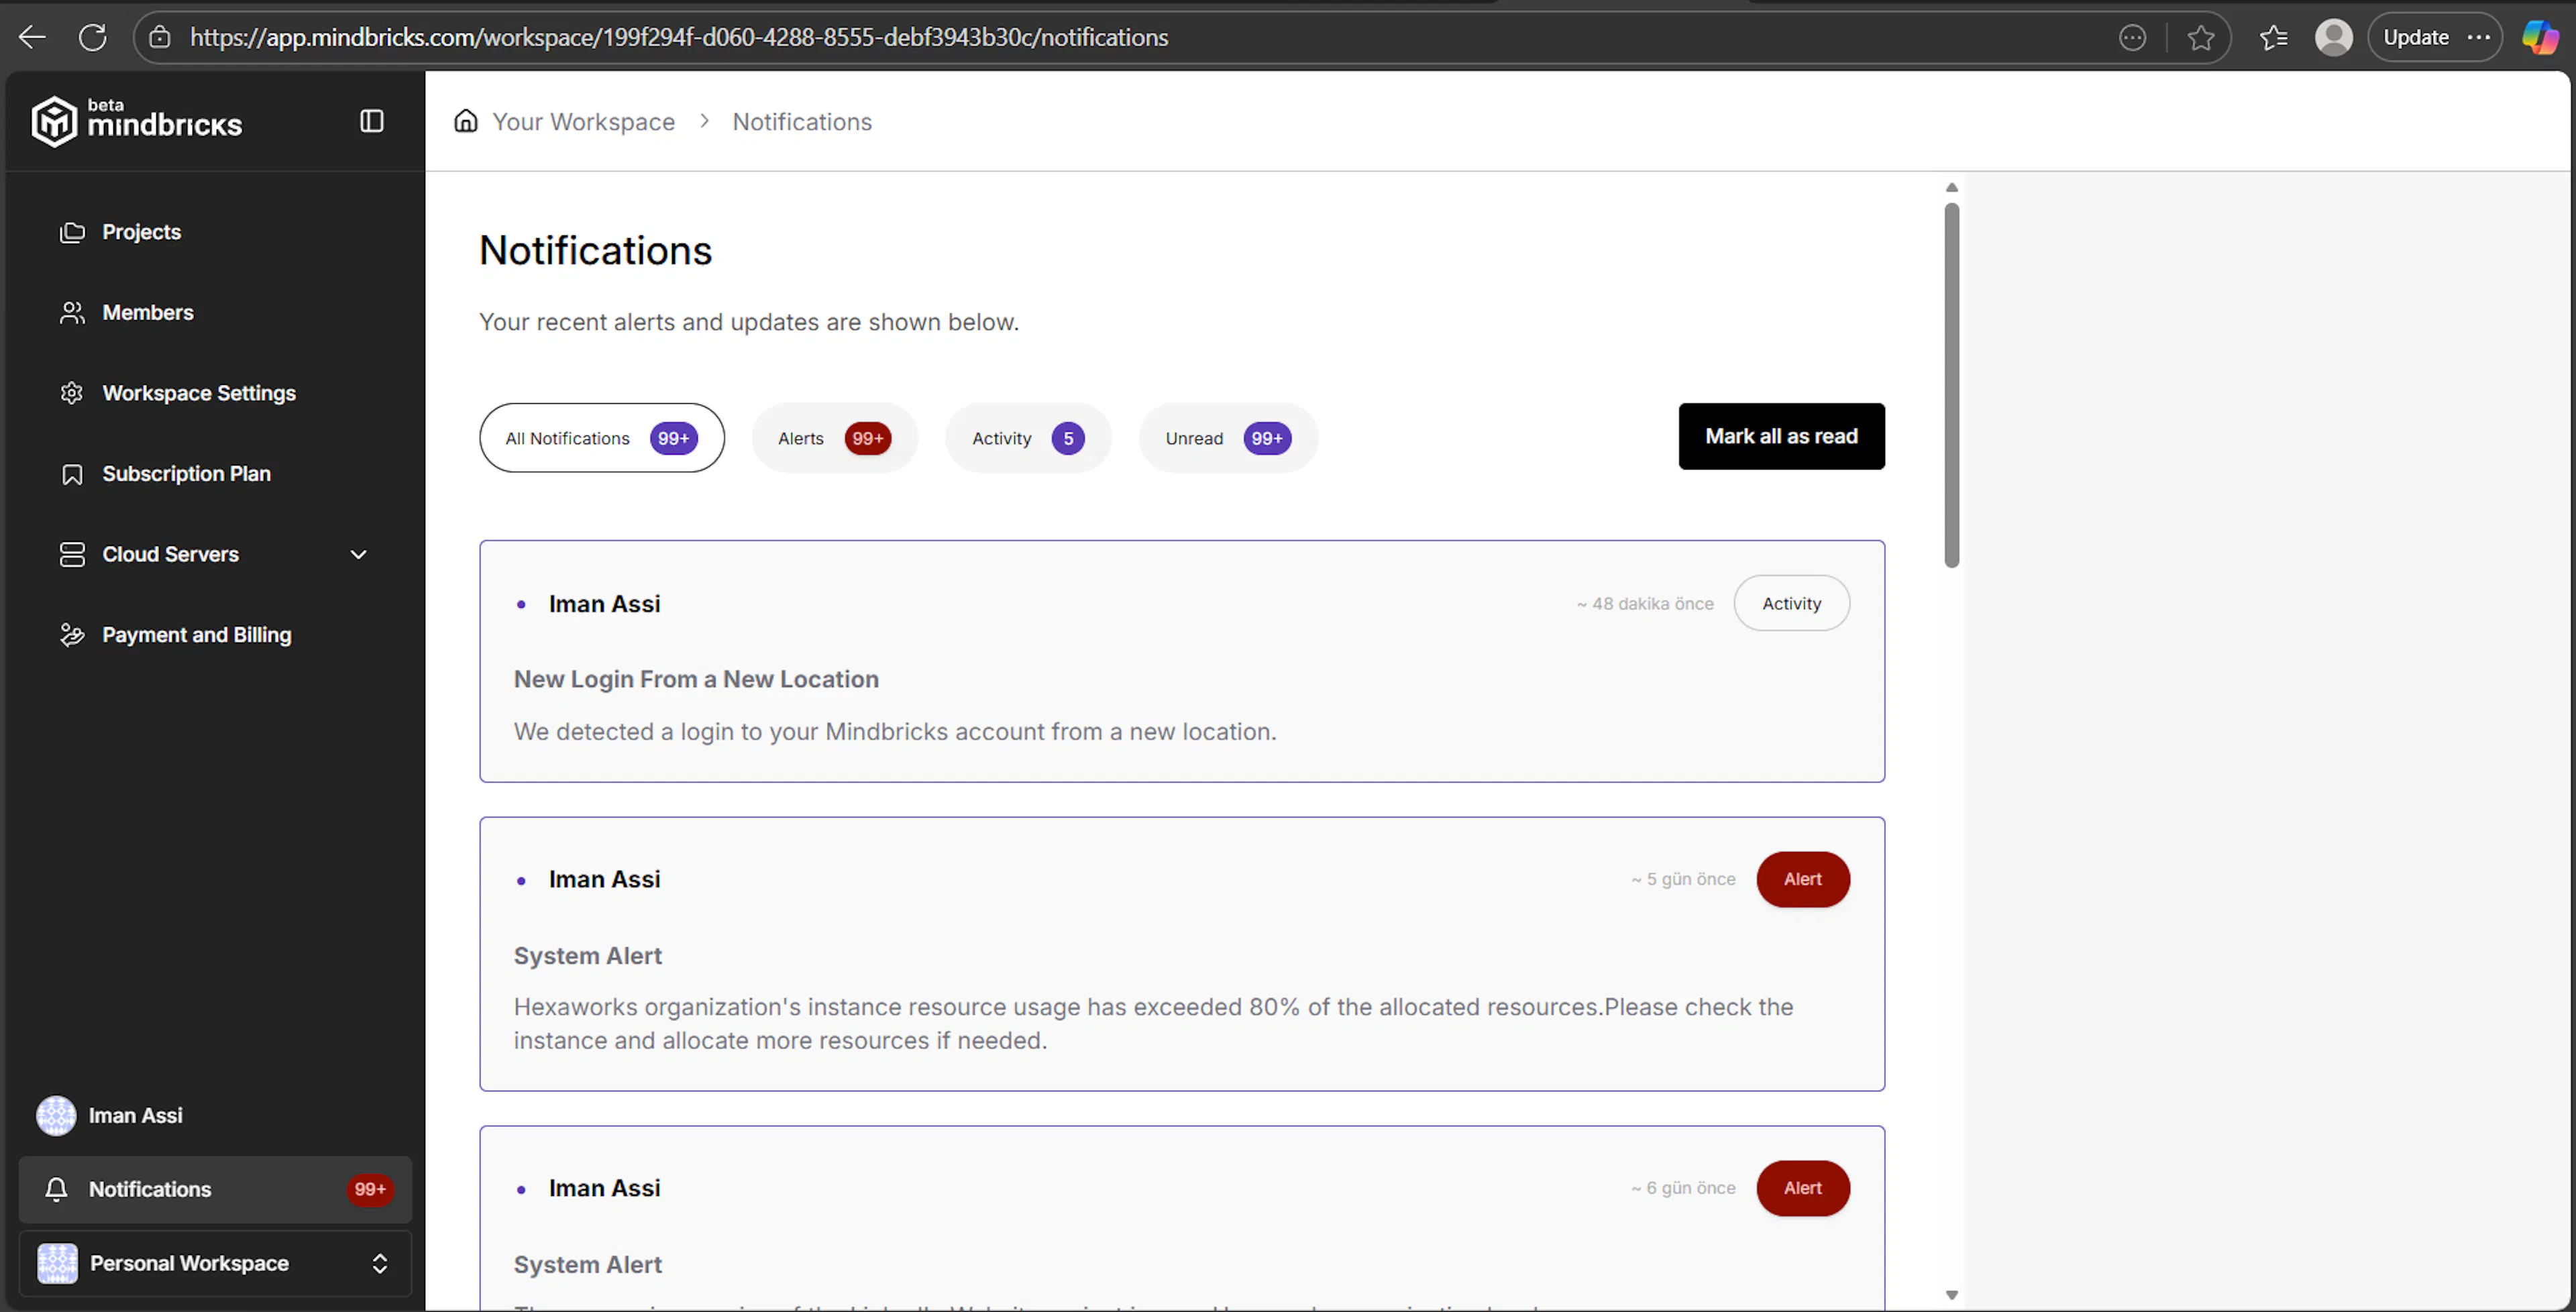
At the top of the page, you’ll see a list of your most recent notifications.
These may include:
-
Account-related updates (e.g. email verification)
-
Workspace activity
-
System alerts
-
Usage or action confirmations
Notifications are ordered from newest to oldest.
Notification Filters
You can filter notifications using the tabs at the top of the page:
-
All Notifications – shows every notification
-
Alerts – important system or usage alerts
-
Activity – general activity updates
-
Unread – notifications you haven’t viewed yet
These filters help you quickly focus on what matters most.
Mark as Read
The Mark all as read button allows you to:
-
Clear unread notification indicators
-
Mark all visible notifications as read at once
This is useful after reviewing updates in bulk.
Notification Items
Each notification item displays:
-
A short title
-
A description explaining the event
-
A timestamp showing when it occurred
-
A category label (e.g. Activity)
Example notification types include:
-
Welcome and account activation messages
-
Workspace-related updates
-
System confirmations
Pagination
If you have many notifications, pagination controls appear at the bottom of the page.
You can:
-
Navigate between pages
-
Review older notifications when needed